How to Compress Audio Files on Mac and Windows without Losing Quality
Whether you have downloaded or recorded audio, you would need to compress it to prevent a longer uploading process or save some storage space. Your computer has excellent functions that allow you to do many more tasks, and thankfully, there are audio-related features such as audio compression. If you are unfamiliar with the solution. This article will show you how to compress audio files on a Mac and Windows.

PAGE CONTENT
- Part 1. Why Do You Need to Compress an Audio File
- Part 2. How to Compress the Audio on a Computer via a Compressor (Easiest Way)
- Part 3. How to Compress Audio on a Computer via Zipping
- Part 4. How to Compress Audio on a Computer by Cutting Down Unwanted Parts
- Part 5. FAQs about Compressing Audio on a Computer
Part 1. Why Do You Need to Compress an Audio File
Basically, a compressed file will allow you to reduce the storage space it consumes. But other than the main reason, a larger file size can cause a longer transferring process, especially when you send it via email. Furthermore, compressing audio files is necessary as online platforms already set their limitations for any uploaded file. This means there is a possible error when the audio file is larger than the required size.
Part 2. How to Compress the Audio on a Computer via a Compressor (Easiest Way)
Do you want to compress audio files on a Mac in the easiest way? Introducing Vidmore Video Converter, a cross-platform program for Windows and Mac. The software consists of an advanced converter for any audio format, such as MP3, WAV, AAC, FLAC, and more. It also supports batch conversion with individual settings for output format, bitrate, sample rate, and channel. Additionally, it has more functions that can help you boost the audio volume, enhance sound, and improve overall audio quality. Try Vidmore Video Converter with its free trial version!
- Comprehensive conversion without file size limitation.
- Offer device preset to convert to iPhone, Samsung, etc.
- Easily adjust output settings for better codec, encoder, bitrate, and others.
- 50x conversion speed without distorting the audio quality.
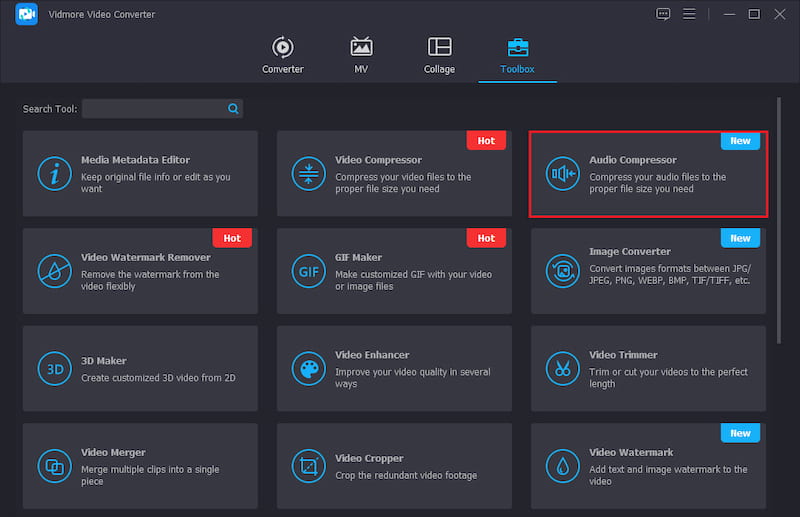
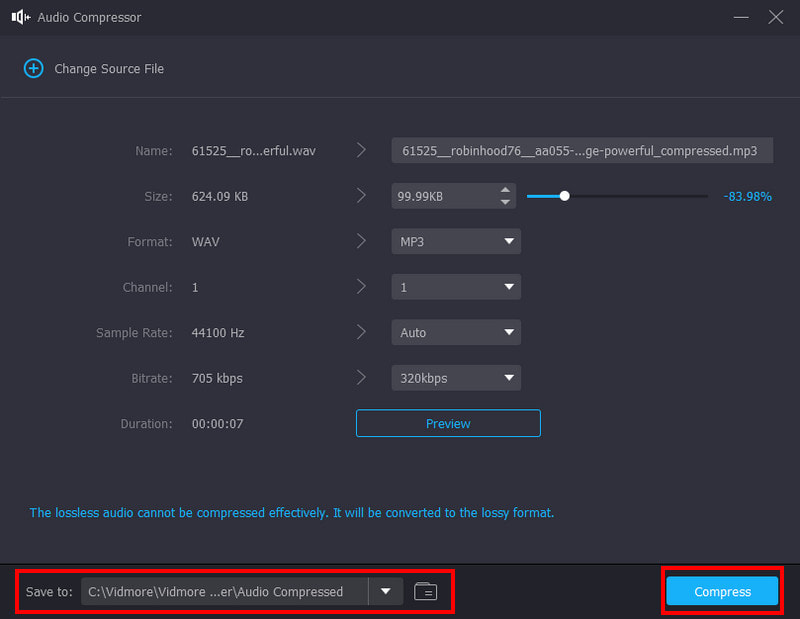
Step 1. Download and install the converter. Launch the converter and proceed to the Toolbox menu. Choose Audio Compressor and click the Add button to upload the audio file from your folder.
Step 2. By default, the program will compress the audio file to the recommended size. But you can still change it using the Size option. Configure other settings such as the format, channel, sample rate, duration, and so on.
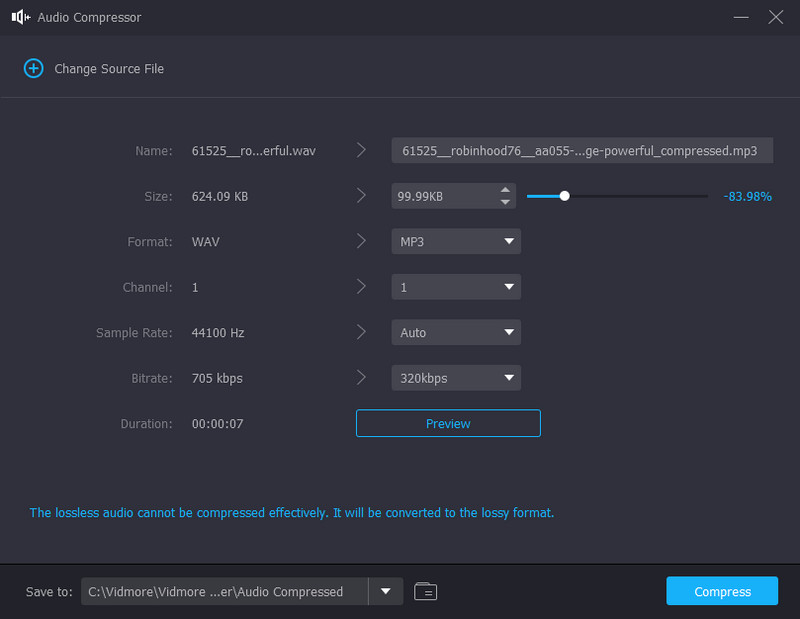
Step 3. After customizing the settings, click the Preview button to check the first ten seconds of the compressed file. Choose the location folder from the Save To tab, then click the Compress button. Wait until the process is done.
Part 3. How to Compress Audio on a Computer via Zipping
There are size limitations on the email attachments, which prevents from sending large files. Thus, you need to compress videos for email as well as audio files.
Sending multiple audio files via email or other platforms can be disrupted due to larger file sizes. Since the capacity of any messaging service is minimal, using the zip option is advisable. In this part, learn how to compress audio files on Mac using the zip method:
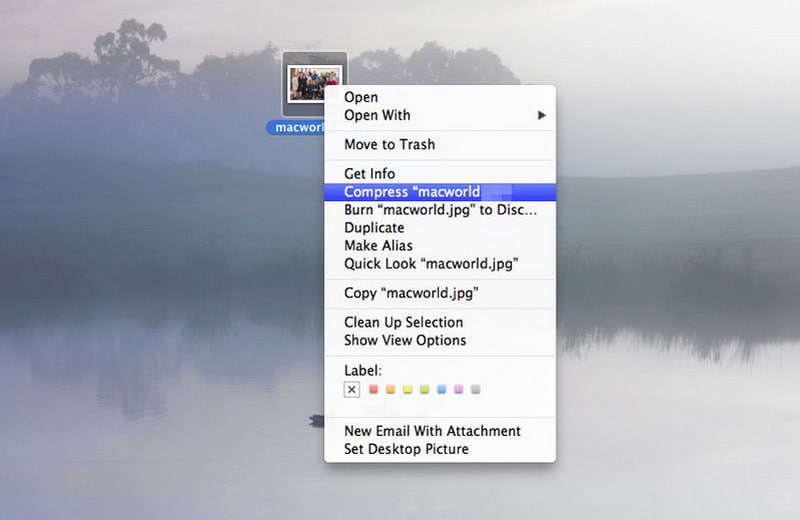
Step 1. Use Finder to search for the audio file you want to send. You can also gather all audio files in one folder and right-click on it.
Step 2. Alternatively, while selecting the folder, you can press the CTRL button on your keyboard. From the dropdown list, choose the Compress “file name” option. Rename the folder, then send it via email or other sources.
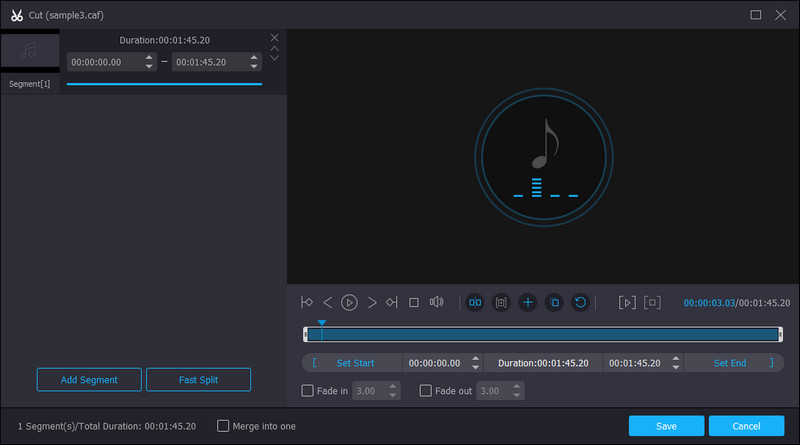
Part 4. How to Compress Audio on a Computer by Cutting Down Unwanted Parts
One thing that causes a file to be bigger is keeping the unwanted parts. When you remove unimportant details of the sound, the size will get smaller, and you can free up some storage. To do this, use Vidmore Video Converter on your Mac. Since it is an all-in-one solution, cutting and splitting an audio file is a remarkable attribute of the software. Moreover, its tools are effective for editing and cutting with precision.
Step 1. After downloading and installing the video converter, launch it and click the Add Files button from the upper left corner. Choose the file you want to cut or edit. Click the Open button to confirm.
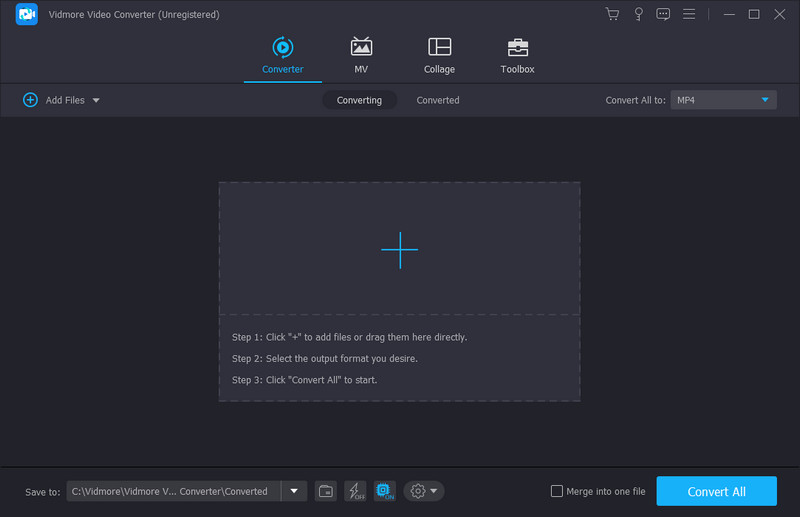
Step 2. Click the Cut button with the scissors icon. You can find it under the uploaded file. Move both ends of the parameter to remove the unwanted parts. Or set the new duration from the start to the endpoint. Click the Play button to see the result.
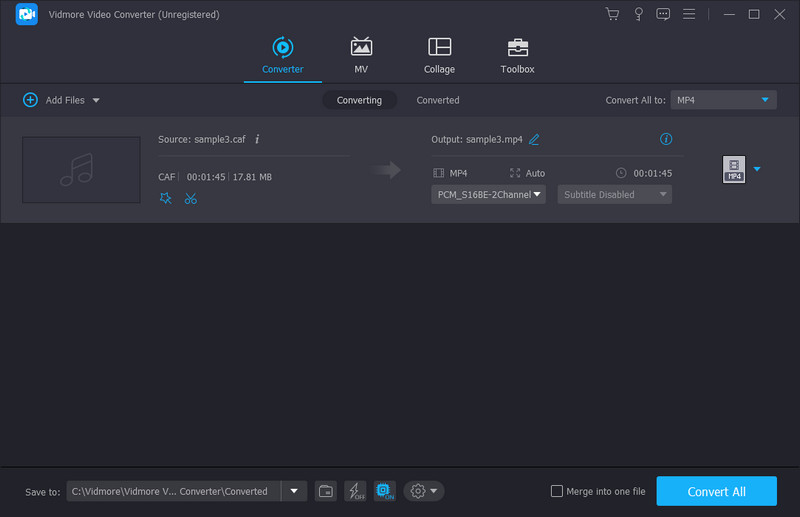
Step 3. Click the Save button, and you will get directed to the main menu. Choose the designated folder and click the Convert All button to export the edited file. Choose another audio file from your device to compress on your Mac.
Part 5. FAQs about Compressing Audio on a Computer
What is a large file format for Mac and PC?
AIFF and AIF are both audio file formats that are considered to be large in file sizes. AIFF is used commonly for Macs, while AIF is used for PCs. By converting AIF or AIFF to MP3 audio files, you can get a smaller file on both Mac and PC.
Why are Mac files bigger than Windows?
According to a trusted source, the two operating systems use different measurements for sizes, but in reality, they are the same amount. For example, Windows measures one gigabyte as 1024MB, but Mac defines it as 1000MB.
What audio format is smaller than MP3?
Rather than compressing audio on Mac, you can save an audio file as M4A. The file container is encoded with lossy AAC codec, which provides the same bitrate as the MP3 format but with a tighter compression. While M4A is ideal for smaller file sizes with high audio quality, it is incompatible with many platforms and programs.
How do you compress audio files on Windows 10 using Zip?
Open File Explorer from your computer and choose the file you want to compress. Right-click the file to reveal the additional options. From the Send To option, select the Compressed (zipped) folder. Rename the zipped folder and save it.
Conclusion
It is an awesome time to be on this page. You have learned how to compress audio files on Mac and Windows with the built-in zip method. But to avoid getting low-quality audio, it is better to use Vidmore Video Converter. This converter has a built-in professional audio compressor and audio trimmer that can reduce the file size instantly. You can have a free try at any time via the Download buttons above.