
What Causes Graininess in a Video & How to Fix it Easily?
Grainy video is often considered a bad quality video. The reason for this is that it contains visible noise or rough textures that make the footage look unclear and less detailed. Instead of a smooth and clean image, you may notice tiny moving dots or a sandy effect across the screen, especially in darker areas of the video.
This problem usually happens when a video is recorded in low-light conditions, when the camera sensor struggles to capture enough light. But don’t fret! Grainy videos can still be improved. With the help of video enhancement tools and simple editing techniques, you can reduce noise, sharpen details, and restore the overall clarity of your footage. In this guide, we’ll walk you through the common causes and show you effective methods to fix grainy videos easily.

PAGE CONTENT
Part 1. What Causes Grain in a Video?
As mentioned earlier, grain in a video indicates that it is of bad quality due to poor lighting and other factors. In fact, the grain you see is actually called digital noise. Instead of a smooth image, the footage may show tiny moving dots or rough textures. This usually occurs when the camera struggles to capture a clean image due to lighting conditions, camera limitations, or processing issues.
Below are some of the most common reasons why there are grainy videos:
Low Lighting and High ISO Levels
Recording in a dark environment is one of the biggest causes of grainy video. When there isn’t enough light, the camera sensor cannot capture enough visual information. To make the video brighter, the camera automatically increases its ISO or sensitivity. While this brightens the image, it also amplifies electronic noise, which appears as random bright or colored specks in the video.
Small Camera Sensors
Different cameras produce different levels of quality. Smartphones and basic compact cameras usually have smaller sensors compared to professional cameras. Because smaller sensors gather less light, they are more likely to produce noisy or grainy videos, especially when shooting in indoor or dim settings.
Heavy Compression or Low Bitrate
In some cases, a video looks clear during recording but becomes grainy after exporting or uploading it online. This happens because of compression. Many platforms reduce the size of video files to make them easier to upload and stream. When the bitrate is too low, the video loses some of its original visual data, which can result in pixelated or grain-like artifacts.
Using Digital Zoom
Digital zoom can also reduce video quality. Unlike optical zoom, which uses the camera’s lens to magnify a subject without losing detail, digital zoom simply enlarges a cropped part of the image. When this happens, any noise in the footage becomes more visible, making the video appear blurry or grainy.
Incorrect Camera Configuration
Even with good lighting, certain camera settings can cause graininess in a video. For example, using a very fast shutter speed indoors limits the amount of light reaching the sensor. To compensate, the camera increases its ISO, which can introduce grain. Likewise, a very narrow aperture restricts light entering the lens, leading to the same issue.
Part 2. How to Prevent Grain in Videos?
There is no exact way to prevent having grains in a video, but to prevent it has something to do with the camera being used and how the video was done. It is important to understand that grains in videos appear when your camera doesn’t get enough light or when settings are pushed too much.
Tips in recording a video:
- • Use enough lighting: Shoot in bright areas or add light when filming. More light means clearer video.
- • Keep ISO low: A high ISO makes videos brighter but also adds noise. Keep it as low as possible.
- • Avoid digital zoom: Don’t zoom in digitally because it makes grain more visible. Move closer instead.
- • Adjust camera settings properly: Use settings that allow more light in, like a slower shutter speed or wider aperture.
- • Export in good quality: Save your video with a higher bitrate so it doesn’t lose quality and become grainy.
Part 3. How to Fix Grainy Video: 4 Effective Methods
Now, if grains in a video persist or you have a grainy video, using a video enhancer tool can enhance the visual quality eliminating the graininess in the video.
Method 1: Using Vidmore Video Enhancer
First on the list is by using the Vidmore Video Enhancer. This AI-powered tool is designed to fix grainy videos by automatically detecting and reducing noise in your footage. With just a few clicks, it can smooth out grain, enhance details, and improve overall video clarity without requiring manual adjustments. This makes it perfect for users who want a quick and easy way to clean up grainy clips.
In addition to fixing grain, Vidmore can also improve video quality by increasing resolution up to 4K. This is especially helpful for restoring old, blurry, or heavily compressed
Main Features:
- • AI-powered video denoising that automatically removes grain and visual noise.
- • Multiple AI enhancement models for different video improvement needs.
- • Video upscaling supports up to 4K resolution.
- • Supports 720p, 100%, 200%, and 400%, plus custom settings.
- • Smooth and fast video processing performance.
- • Supports a wide range of input and output video formats.
- • Compatible with various video types, including vlogs, anime, documentaries, and more.
- • Built-in Preview feature to compare results before exporting.
How to Use Vidmore Video Enhancer Tool to Denoise a Video:
Step 1. First, download and install the tool on your computer. Take note that this is available on both Windows and macOS.
Step 2. Once you open the tool, click the Plus icon to add the grainy video you want to fix.

Step 3. Lastly, you’ll find several AI enhancement models designed to improve video quality. To reduce visual noise, simply choose the Video Denoise Model, which is specifically designed to eliminate grainy and dirt-like artifacts for cleaner, smoother output. You can also use the Preview button below the player to instantly compare the original video with the enhanced result before exporting.

Method 2: Using Ffmpeg
For the second method, you can use FFmpeg. This tool is well known for its open-source command-line feature that is used for processing and editing video and audio files. While it may look technical at first, it’s widely used by professionals because of its flexibility and precise control. When it comes to fixing grainy videos, FFmpeg offers built-in filters like hqdn3d that can reduce noise and improve video clarity through simple commands.
Here’s how you can fix grainy video with Ffmpeg:
Use the hqdn3d filter to perform spatial and temporal denoising:
ffmpeg -i stabilized.mp4 -vf hqdn3d=4.0:3.0:6.0:4.5 -c:v libx264 -c:a copy denoised.mp4
- • hqdn3d parameters control spatial and temporal denoising strength.
- • 4.0: Spatial denoising strength.
- • 3.0: Temporal denoising strength.
- • 6.0: Temporal denoising strength for the second component.
- • 4.5: Another temporal denoising strength.

Method 3: Using Final Cut Pro
Final Cut Pro is a professional video editing software designed for Mac users. It comes with built-in tools that can help improve video quality, including a Noise Reduction feature. This makes it a good option if you want to fix grainy videos directly while editing, without using extra plugins.
Here’s how to use Final Cut Pro to fix grainy video:
Step 1.Click the grainy clip in your timeline and place the playhead over it so it shows in the preview screen.
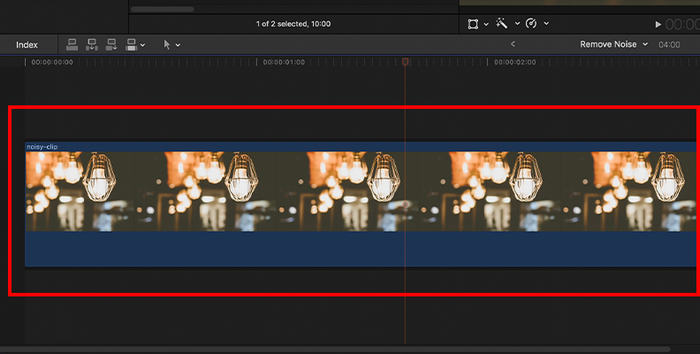
Note: The timeline is the area at the bottom where you arrange and edit your clips.
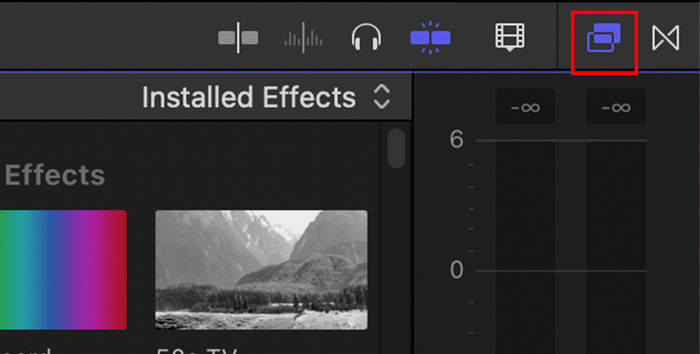
Step 2. Open the Effects Browser by clicking the icon with two overlapping squares at the top-right of the timeline.
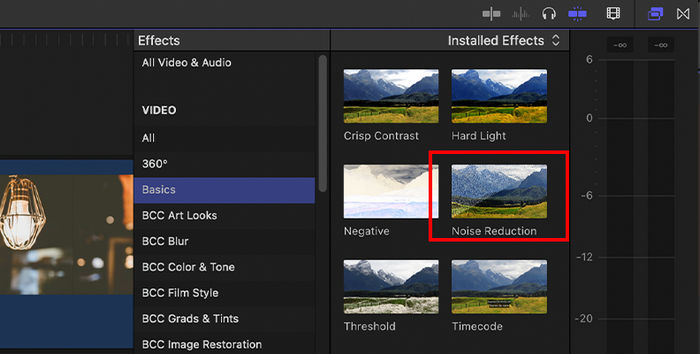
Step 3. Find the Noise Reduction effect by typing it in the search bar or by checking the Basics section.
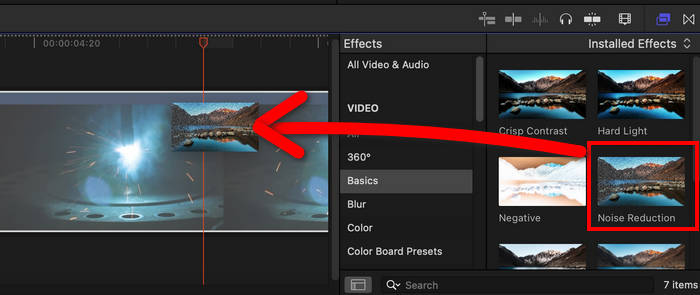
Step 4. Lastly, apply the effect by dragging it onto your clip or double-clicking it. Final Cut Pro will automatically scan the clip to detect noise.
Method 4: Using Neat Video
Neat Video is a dedicated noise reduction plugin used by many editors to fix grainy footage. It works with editing software like Final Cut Pro and provides more advanced controls compared to built-in tools. This makes it ideal if you want more precise and higher-quality results when removing grain.
Here’s how you can use Neat Video to fix grainy video:
Step 1. Open Final Cut Pro and import the grainy video.
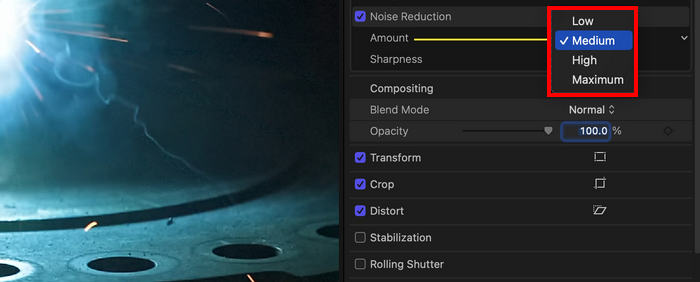
Step 2. Select the clip, then open the Inspector panel.
Step 3. Go to Effects, find Noise Reduction, and apply it to your clip.
Step 4. Adjust the Amount slider to control how much noise is reduced. Keep in mind it applies the same effect to all noise types.
Step 5. Play the video to check if the grain is reduced without losing too much detail. Adjust if needed.
Part 4. FAQs on How to Fix Grainy Video
Can you remove grain from a video without losing quality?
Yes, you can reduce or fix grain in a video without losing too much of its quality by using the right noise reduction settings. However, applying too much can make the video look blurry, so it’s important to find the right balance.
Does increasing video resolution fix grainy videos?
No, increasing resolution alone won’t remove grain in a video. It may improve sharpness, but you still need noise reduction tools to actually reduce the grain.
What is the best setting to fix grain in videos?
There is no one perfect setting to fix grainy videos. It depends on your video, but generally, using moderate noise reduction with proper lighting and low ISO during recording gives the best results.
Conclusion
You don’t have to deal with grainy videos forever. With the right methods and tools, you can easily reduce noise, improve clarity, and make your footage look more polished. Moreover, understanding what causes grain and how to prevent it can help you avoid the problem in future recordings. By using proper lighting, the right camera settings, and good export quality, you can capture cleaner and more professional-looking videos from the start.
Now that you know how to fix grainy videos, it’s time to try these methods and see which one works best for your needs.