All Steps You Need to Burn ISO to DVD on Windows/Mac
If you've got an ISO file ready to go and want to burn it to a DVD for safekeeping, take a quick look at this guide to see if there's any information you need. Windows computers now offer a built-in disc burner, and Mac computers offer Finder and Disk Utility to help with disc handling tasks. While understanding this information, you may not have a very good idea of how to do it on both systems. Therefore, we will introduce how to burn ISO to DVD on Windows and Mac. Considering that the tools that come with the system may have limited functions, we also provide a most professional third-party DVD burner for you to choose.

PAGE CONTENT
Part 1. Burn ISO to DVD on Windows
If you are a Windows user, please read this section first. Windows computers have a built-in DVD burning tool, Windows Disc Image Burner. You can use it to burn ISO images to DVD. However, different Windows systems correspond to different operation methods. Read the following subsections to see how to apply it separately.
On Win 7/Vista
If your computer applies the Windows 7 or Vista system, use the guide below to learn how to burn ISO to DVD on your device.
Step 1. Prepare a blank DVD and insert it into your computer's optical drive.
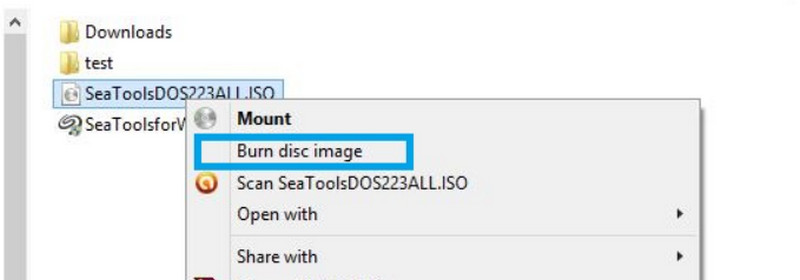
Step 2. Find the ISO file you want to burn. Right-click on it, and choose the Burn disc image in the drop-down menu. Thus, a Windows Disc Image Burner will be launched.
Step 3. Go to the Disc burner tab and choose the right DVD burner from the menu.
Step 4. Click Burn to start burning ISO files to your DVD.

On Win 11/10/8.1/8
If your computer system is Windows 11, 10, 8.1, or 8, please refer to this subsection to burn ISO to DVD.
Step 1. Insert the blank DVD into your drive. Get the ISO file folder on your computer. Open the file folder, find the .iso file, and right-click on it.
Step 2. After expanding the menu, click Burn disc image. Then, the Windows Disc Image Burner will open.
Step 3. Finish the burning options on the interface. Finally, click Burn.

On Win 10
Burning ISO file to DVD has another procedure on Windows 10 PC. Here's how to accomplish it.
Step 1. Get your blank disc ready. Click on the ISO image file you want to burn.
Step 2. Navigate to File Explorer and choose Manage under Disc Image Tools.
Step 3. Choose the Burn tab, and set your CD-ROM as the burner.
Step 4. Click Burn to launch the burning process.

Part 2. Burn ISO File to DVD on Mac
If you are a Mac user, consider utilizing Finder or Disk Utility to burn ISO to DVD. Exactly how to do this again depends on what device model you are currently using. We will divide this section into two subsections to help you understand.
By Finder
First, let's introduce the most versatile way to burn DVDs using Finder. Finder is available for almost all macOS versions.
Here is how to write ISO to DVD with Finder on Mac.
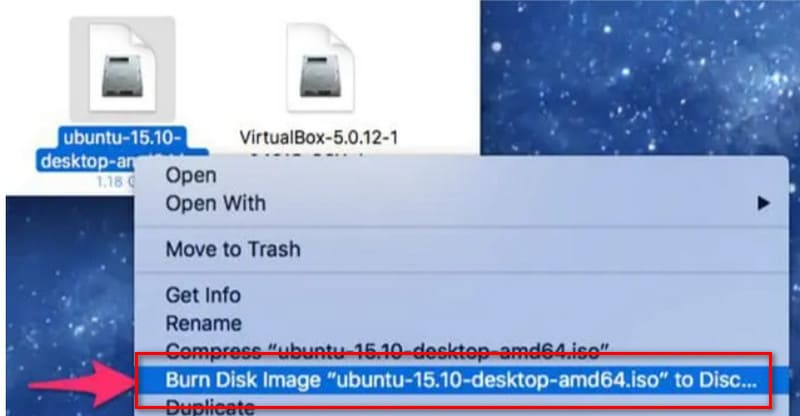
Step 1. Make sure you have a blank DVD inserted. Open Mac, and launch Finder.
Step 2. Go to File on the top of your Mac screen. Choose Burn Disk Image XXX to Disc. Or you can right-click on the ISO file and select Burn Disk Image XXX to Disc.
Step 3. Click Burn to start writing ISO to DVD.
By Disk Utilityr
If your computer's system is on OS X 10.10 or earlier, you can still use Disk Utility. Please note that this tool is no longer available on devices with later versions.
Here is how to burn ISO to DVD using a Disk Utility DVD burner.
Step 1. Choose Applications on your computer, and select Utilities to open Disk Utility.
Step 2. Choose Applications on your computer, and select Utilities to open Disk Utility.
Step 3. Select the image file and click Burn.
Step 4. Check the Verify burned data option. Finally, click Burn.

Part 3. Bonus: Best DVD Burner to Create ISO File
Vidmore DVD Creator
None of these methods require additional tools to be installed, but there are a lot of limitations to implementing them, and there's so little you can do to personalize them. For more detailed burning, using a professional third-party tool like Vidmore DVD Creator is still recommended. It not only helps you burn videos or ISO files to DVD but also supports you to customize the playback menu. The formats adapted by this software include MP4, AVI, MOV, WMV, etc. You can also crop and edit the original video before burning it. Vidmore DVD Creator provides a lot of menu templates, and you can also adjust the text, background image, and button styles according to your preferences until you design the most beautiful work.
Here is how to burn ISO files to DVD with Vidmore DVD Creator.
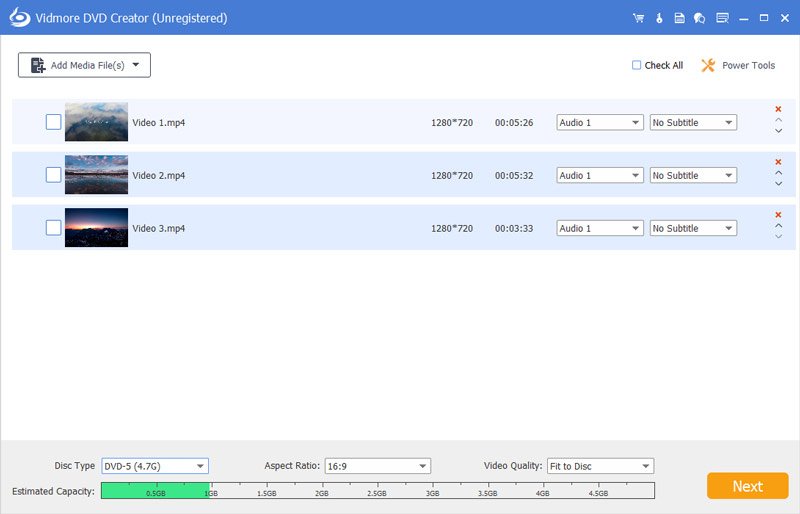
Step 1. Download and install Vidmore DVD Creator on your computer. Click Add Media File(s) to import your ISO file.
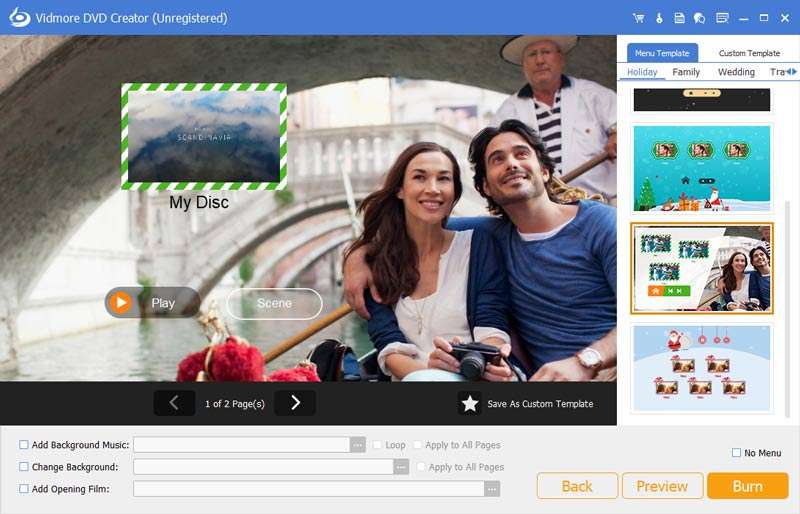
Step 2. Select a menu template, and adjust the font, color, title, and button as you like. Then click Burn.
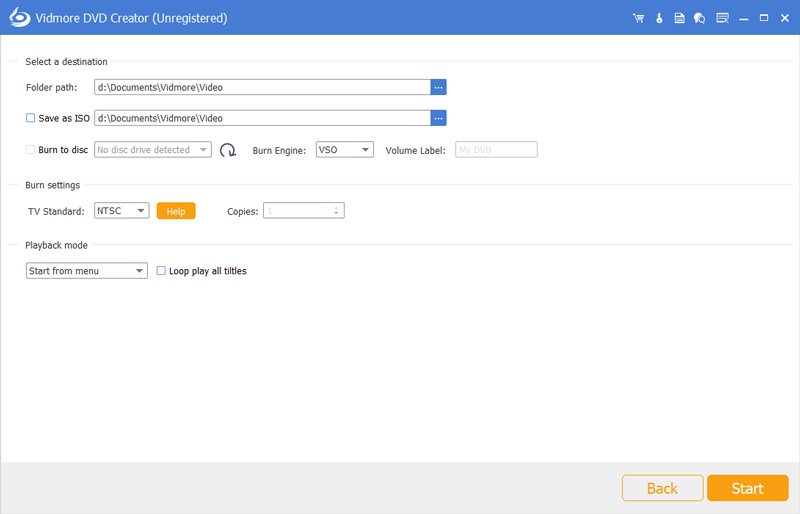
Step 3. Set the Folder path, Burn settings, and Playback mode. Finally, click Start.
Part 4. FAQs of Burning ISO to DVD
How to burn ISO to DVD?
You can use the Burn disc image function with Windows or professional third-party tools like Vidmore DVD Creator and ImgBurn.
Does Windows 10 have a built-in DVD player?
Of course, there is Windows Media Player. It can also perform simple CD-burning tasks, such as burning MP4 to DVD.
Is burning a DVD illegal?
If you burn copyrighted content onto a CD-ROM and also use the CD-ROM for profit, you may be infringing on intellectual property rights. If it's just for personal use, that's fine.
Conclusion
This article shows how to burn ISO to DVD on Windows and Mac devices. The steps you need to complete are different for devices with different system models. We've divided it into several subsections to show. If you find the functions of the tools that come with your system too limited, you can try a professional tool like Vidmore DVD Creator. It can burn any video or ISO file to a disc and has ample DVD menu styles for you to choose from.