How to Take a Screenshots with VLC on Windows and Mac OS X
“I am using VLC to watch movies and videos on my computer, sometimes I want to take a screenshot and extract a frame as an image, but I cannot find the screenshot feature in VLC?”
As a media player, VLC is popular around the world, partly because it supports almost all multimedia formats. Another advantage of VLC is offering extensive bonus features. However, it is difficult to find them since advanced features are hidden in menu list deeply. This guide focuses on how to take screenshots in VLC.

PAGE CONTENT
Part 1: How to Take Screenshots with VLC
In VLC, you have three ways to take screenshots for the video playing. We share all of them below and you can use any one based on your preference.
Method 1: How to Take a Screenshot in VLC with Hotkeys
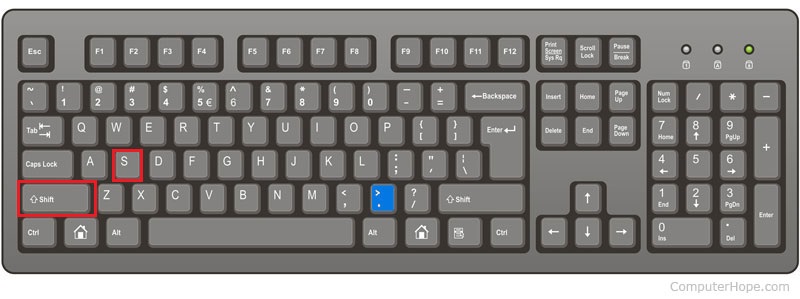
Step 1: Open the desired video in VLC and play to the frame that you want to extract.
Step 2: Press Shift + S on Windows, Cmd + Alt + S on Mac, or Ctrl + Alt + S on Linux. Then the VLC snapshot will be saved to your media library.
Step 3: By default, VLC snapshot location is C:/Users/username/My Pictures on PC, your desktop on Mac, and $(HOME)/.vlc/ on Linux. To change it, go to Tools menu and select Preferences, head to the Video tab and set the options under the Video snapchats section.
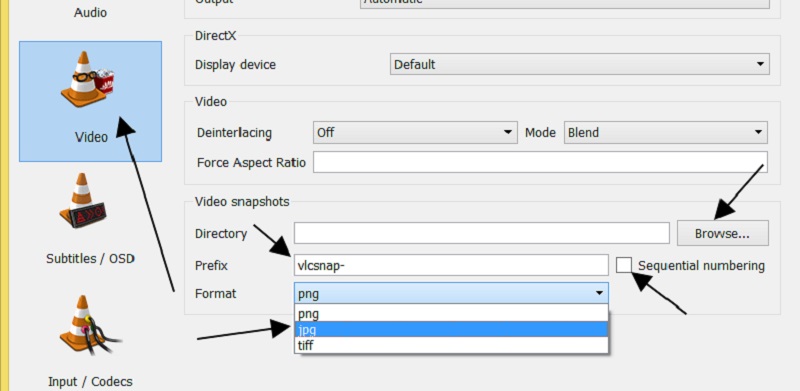
Note: Natively, VLC saves snapshots in PNG format, but you can change it to JPG or TIFF.
Method 2: How to Take a Screenshot in VLC with Menu
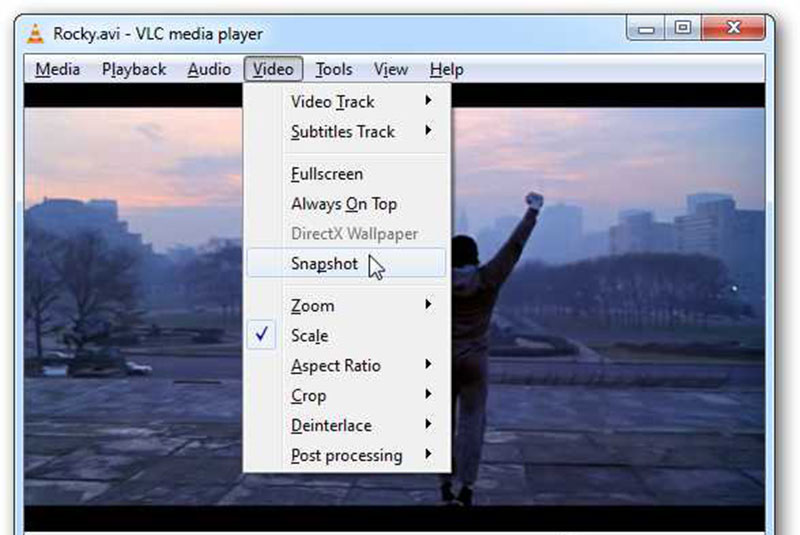
When you discover a frame in a video that you want to save, pause the playback, go to the Video menu and choose Snapshot or relative option.
Alternatively, right-click on the video and choose Snapshot from the context menu list. If it is successful, the thumbnail and snapshot location will appear on the video.
Method 3: How to Screenshot in VLC with Advanced Controls
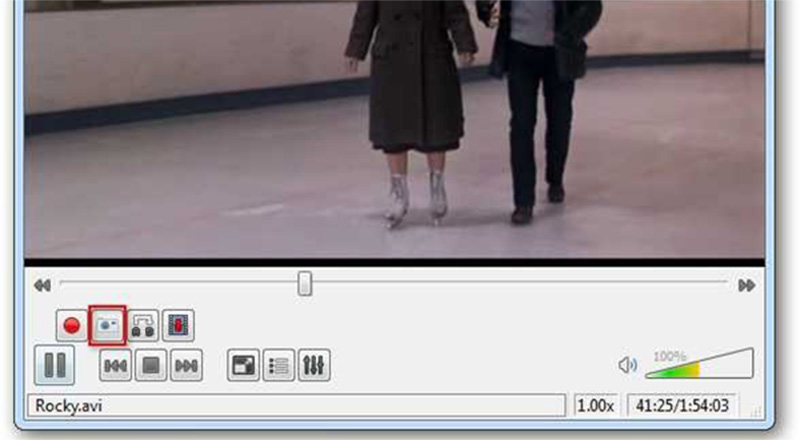
Step 1: Open a movie in VLC. Go to the View menu and enable Advanced Controls. Then you will get four advanced controls at the bottom.
Step 2: Play the video until you reach the target frame or you can use the Frame-by-frame feature on the advanced controls bar to find the desired frame. Click the Snapshot button with a camera icon at the bottom to screenshot in VLC.
Part 2: Best Alternative of VLC to Take Screenshots
Though VLC provides the snapshot feature, it is difficult to find and control, especially for non-tech savvy. Vidmore Screen Recorder, on the other hand, is the easiest alternative to VLC to take screenshots. Plus, you can use it for free without registration or other limits.
Main Features of the Best Alternative to VLC Snapshot
- Take screenshots for videos in VLC and other media player.
- Edit VLC screenshots in real time.
- Save screenshots as high quality images.
Needless to say, it is the easiest way to extract frames from video and take screenshots in VLC for free.
How to Take a Screenshot in VLC Easily
Step 1: Install VLC alternative
The screenshot tool offers two versions, one for PCs and the other for Mac. Download and install the proper version according to your system, and then launch it. If you want to modify the custom options, click the Menu button, select Preferences, go to Output tab, and set Location of screenshot files and Screenshot format. Hit OK to confirm it.
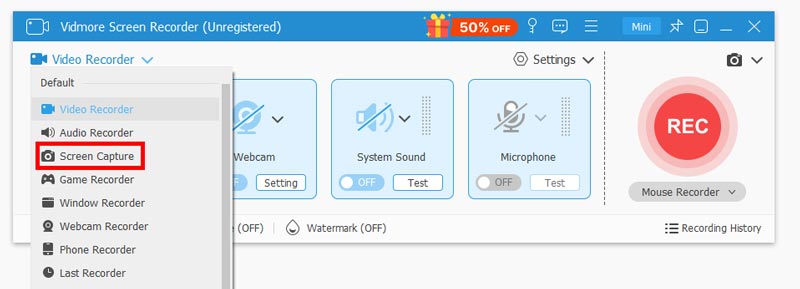
Step 2: Take a snapshot for VLC
Play a video in VLC and pause at the frame that you wish to extract. Turn to the screenshot tool and select Screen Capture. Then your cursor will turn to a cross. To snapshot entire video frame, click on the VLC window. If you just intend to capture a part of the frame, draw on the desire area with your left mouse.
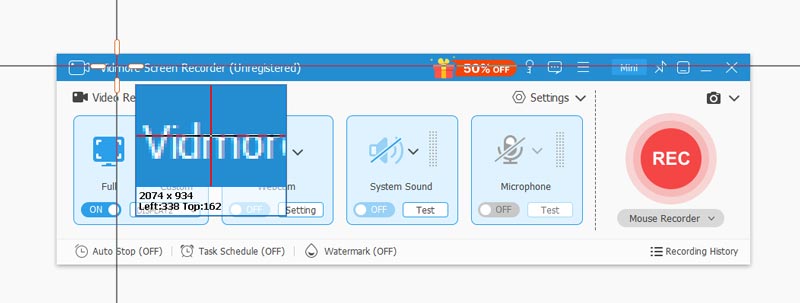
Step 3: Edit and save screenshot
Once you release your mouse, the video frame will be saved as an image and you will be presented the toolbar. Optionally, you can edit the snapshot immediately. To add text to the snapshot, for example, select the T icon, set color, font, size and other parameters, click on the right position, and enter the texts. Besides, you can add paintings, shapes and arrows on the snapshot.
Finally, you have two options to handle the snapshot. Click the Disk icon and the snapshot will be saved to your hard drive. If you want to use it in other programs, click the Clipboard icon.

You can also use this tool to screenshot FaceTime, or take scroll screenshots on your computer.
Part 3: FAQs of VLC Screenshot
Where VLC screenshots are saved?
Natively, VLC saves screenshots in different place on Windows, Mac and Linux:
On Windows 7 and later: C:/Users/username/My Pictures.
On Windows XP: C:/My Documents/My Pictures.
On Mac: Save to your desktop directly.
On Linux: $(HOME)/.vlc/.
Plus, you are allowed to customize the location on the Preferences dialog.
Can VLC display still photos?
Yes, VLC is able to open images, such as JPG files. All you need to do is to drag and drop the image onto your VLC Media Player. Now, this functionality is not limited to a single image. If you select multiple images and open them in VLC, they will be displayed as a slideshow.
How do I take a screenshot on Windows Media Player?
On Windows, you have several ways to take screenshots on Windows Media Player, such as the Print Screen key, the Snipping Tool, and Snip & Sketch on Windows 10. However, WMP does not offer any feature related to screenshot.
Conclusion
This guide has discussed how to take screenshots in VLC when playing movies. Though VLC is an open-source project, it does provide multiple ways to extract important frames. You can pick your favorite method and follow our guide to save important moments. If you want to get more advanced features, Vidmore Screen Recorder can meet your need. It is not only easy to use, but also able to edit screenshots directly. More questions? Please feel free to leave your message below.
