How to Use Snipping Tool on Mac: All Steps to Launch It
The Snipping Tool on Mac is widely recognized for its usability. It launches quickly and offers multiple launch methods. Although it is the default tool, it still offers a variety of screenshot modes—more importantly, it can also record videos. However, finding the specific feature you need can be a challenge. With so many buttons on the keyboard, you might momentarily forget which shortcut key corresponds to the feature you need.
Don't worry, we've prepared a guide on how to use Snipping Tool on Mac, including how to launch it using shortcut keys and how to click through the Toolbar. Considering that you might sometimes need more advanced screenshot features, we'll also recommend the best Mac Snipping Tool alternative for you. We hope to address all your questions here in one go.

PAGE CONTENT
Part 1. How to Use Snipping Tool Hotkeys on Mac
How do you use the snipping tool on a Mac? The quickest and most convenient method that most people think of is to use keyboard shortcuts. Yes, you only need to press the corresponding combination on the keyboard to automatically start taking a screenshot.
If you are worried about not remembering the corresponding buttons, please refer to this section of the guide. We will introduce them according to different functional points.
Take a Full-Screen Screenshot on Mac
If you want to grab everything on your screen in one shot, just press Shift + Command + 3 at the same time, then let go. That's it—the entire screen is instantly captured.
You'll see a small thumbnail pop up in the bottom-right corner. Click it if you want to preview or make quick edits.

Capture a Specific Window with Clean Edges on Mac
Want a clean screenshot of just one window—without dragging pixel by pixel? Here's a quicker method: press Shift + Command + 4, then tap the Spacebar. Your cursor will change into a camera icon.
Move the camera over the window you want to capture—it'll highlight automatically. Click once, and the screenshot is taken neatly with perfect edges.
Tip: If you need to reposition the screenshot area while dragging, just hold down the Spacebar during selection to move it around smoothly.

Capture a Custom Area on Mac
Sometimes, you only want to screenshot a small section of the screen—just enough to highlight what matters. Here's how to do it:
Press Shift + Command + 4. Your cursor will turn into a crosshair.
Click and drag to outline the area you want to capture. When you release the mouse, the screenshot will be taken automatically.
Need to reposition the selected box? While holding the mouse button, press and hold the Spacebar to move it around.
Made a mistake? Hit Esc to cancel and try again.
Please note that although both capturing a specified window and capturing a selected area use Shift + Command + 4 and may use the Spacebar, they are completely different.
The purpose of using the Spacebar when capturing a specified window is to turn the mouse into a camera icon to help you select the window. However, capturing a selected area does not normally require the use of the Spacebar. It is only necessary to use the Spacebar when you initially select the wrong area and need to modify the selection range.

Part 2. How to Use Screenshot Toolbar Interface on Mac
Using shortcut keys is quite convenient. However, as mentioned in the previous section, the tips we provided highlight an issue—shortcut keys are often similar, making them easy to confuse, and even minor errors in the sequence of use can result in different functions being activated.
So, besides using shortcut keys, how to use the Snipping Tool on a Mac? Why not take a more direct approach and bring up the intuitive toolbar? Clicking on the icons to select functions is much clearer. In this section, we will briefly explain the functions corresponding to each button.
Here, you only need to remember one set of shortcut keys:
”Shift
After pressing this combination, the Snipping Tool toolbar will automatically open.
On the left side of the toolbar, the first three buttons correspond to capturing the entire screen, a specific window, and a selected area.
On the right side of the toolbar, the second two buttons represent recording a video of a specific window and recording a video of a selected area.
Simply click the corresponding icon and select the screenshot or video recording area.

Part 3. Best Way to Snip Images or Record Videos on Mac
Regarding the question of how do you use Snipping Tool on a Mac, the answer has already been provided in detail above. However, we must objectively assess this feature. Its limitation lies in its basic recording options. While the Options menu does include some recording settings and file editing functions, these remain fairly limited and are only suitable for the most basic screenshot operations.
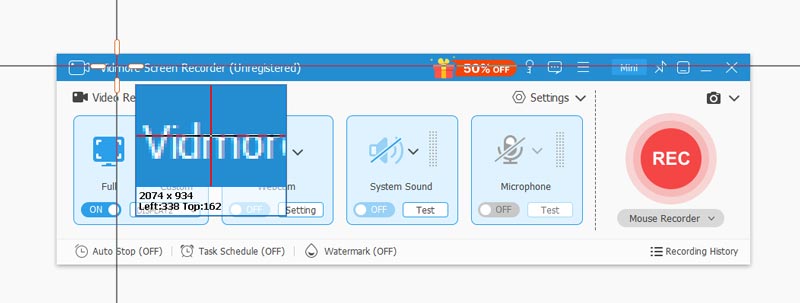
If you seek more comprehensive recording capabilities, we recommend using Vidmore Screen Recorder. It can record the screen, webcam, microphone audio, and system sounds. As long as you connect your phone to the computer via WiFi or USB, Vidmore Screen Recorder can even help you record content from your phone's screen.
Additionally, Vidmore Screen Recorder offers a full suite of screen capture and video recording editing features.
Here's how to take a screenshot using Vidmore Screen Recorder:
Step 1. Install Vidmore Screen Recorder and open it on your computer. Make sure the window or screen content you want to capture is already visible.
Step 2. On the main screen, look for the Screen Capture option and click it.
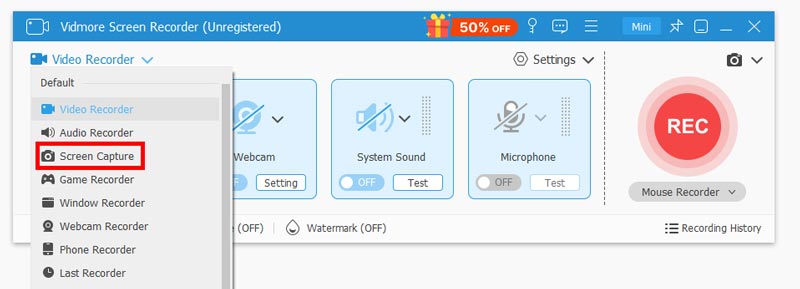
Step 3. Your mouse pointer will change. Click and drag to highlight the specific area you want to capture. Let go of the mouse, and the screenshot will be instantly saved.
Part 4. FAQs of How to Use Snipping Tool on Mac
How do I use Snipping Tool on Mac?
You can use Shift + Command + 5 to bring up the toolbar, click the corresponding button to activate the screenshot function, or use the shortcut key to start taking screenshots directly. If you want more colorful recording settings, we recommend using Vidmore Screen Recorder or other third-party screen recorders as alternatives.
How can I change where my Mac saves screenshots?
Press Shift + Command + 5 to open the Mac screenshot tool. Then click Options. In the dropdown menu, look for the Save to section and choose your preferred folder from the list. Your Mac will remember this new location for future screenshots.
Can I add the snipping tool to my Mac's Touch Bar?
Yes. Open System Preferences and go to Keyboard. Under the Touch Bar shows dropdown, select App Controls. Click Customize Control Strip. Find the Screenshot button and drag it onto your Touch Bar.
Conclusion
This is a guide that explains how to use Snipping Tool on Mac. We hope to help you master the steps for taking screenshots using shortcut keys and the toolbar, as well as important considerations during the process. If you want more flexible recording options and the ability to capture more content, such as videos and camera feeds, we recommend upgrading from the default Snipping Tool to a professional tool like Vidmore Screen Recorder.
