Easiest Way to Add a Watermark in Luminar 4 in Seconds
Do you wish to protect your photos while promoting your brand? Then, it is best to add a watermark on them. The question is, which program is the best tool for adding a watermark? Skylum created the all-purpose picture editing program called Luminar, which is available for Windows and macOS. Both standalone and plugin versions of Adobe and Apple programs can use Luminar. It enables users to add and create a customized watermark.
It is not extremely challenging to add a watermark with Luminar, but the procedure differs significantly from using a photo editing program. Using Luminar 4 let us have a look at how to add a watermark in Luminar 4.

PAGE CONTENT
Part 1. How to Add a Watermark in Luminar
Before uploading an image to the internet or making it into a print, it is a good idea to brand it in some way using a logo or a watermark. You may add a logo or watermark to a photograph by Luminar AI or Luminar 4. Let us get acquainted with the process of loading a photograph or a scanned signature. In this particular illustration, the image consists of black text superimposed on a white background.
Step 1. Open the photo where you wish to add a watermark. Then, click the + symbol at the top of the Layers panel and select Add New Image Layer...
Step 2. To apply a logo or watermark to your document, navigate to it on your hard disk drive and click the Open button. Now, please right-click on the thumbnail of the watermark and choose Texture Mapping to scale its texture.
Step 3. After that, let us apply a Curves filter to the logo layer to turn the logo to white text over a black background. By reversing the white and black points, you can invert the curve.
Step 4. Next, press the Ctrl or Cmd + T to access the Free Transform Tool option and scale the watermark. Hit the Lock icon in the Info Bar to avoid distortion.
Step 5. Finally, change the position and resize the watermark to taste. Hit Done when you are you got your desired appearance and position. That is how to add a watermark in Luminar AI with ease.

Part 2. How to Make a Watermark Quickly
Nothing beats discovering someone else's post that contains your content, graphics, images, color palettes, or even general ideas. While giving photo credit is proper etiquette these days, there are better ways to go online than the honor system, especially if it involves your business-based creations. Learn how to make your own watermarks to protect your creative visions.
1. Find a Logo or Create a Signature
First and foremost, navigate to your hard disk drive and look for a logo or signature you wish to use as a watermark. It is best to choose something that is simple. You will also need something that can be easily read even when it is faded out and reduced in size. Some companies choose to only utilize text in their logos, while others choose designs that do not include any text at all.
2. Remove the Background of the Logo or Signature
The next step is to get rid of the background of a logo or signature. In this case, you need a program to help you remove the background. You can rely on Vidmore Background Remover. This program is a web-based utility that allows you to instantly and effectively remove the background of your logo or signature. Here is the step-by-step guide to creating a background-less logo or signature using this program.
Step 1. Visit the program’s official website using any browser you prefer using. Now, from the address bar of your browser, type in the program's name. Also, you can simply tick the link provided here to go directly to its website.
Step 2. Click the Upload Portrait button or drop your file to the upload area to load your selected photo.
Step 3. Using the Keep option, trace the part of the photo that you wish to retain. This action will remove the untraced portion of the photo. If you choose to remove the background itself, you can use the Erase option.

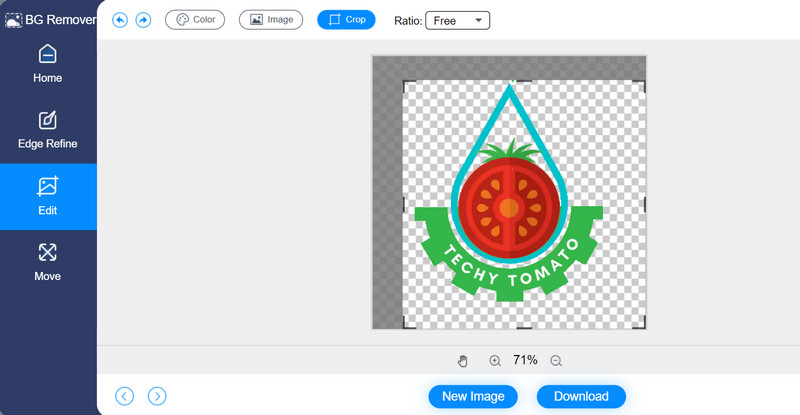
3. Change the Size
It is important to get the proper size for your photo. Hence, resizing it after editing is included. Using the same program, go to the Edit tab located in the left sidebar and resize the photo using the resizing handlebars. Once done, hit the Download button to get a copy of the edited photo.
Part 3. FAQs about Adding a Watermark in Luminar
How to create a watermark in Luminar?
To make a watermark in Luminar, you need to upload the program to the program and head to the Edit tab. Next, go to the Light to adjust the temperature, smart contrast, etc. After that, you want to turn the background black and the text white by playing around with the Curves effect. Then, resize the watermark from the Composition option
Can I create a watermark for videos?
Yes. The programs and procedures mentioned above can help in creating a watermark for videos, too. In other words, they work for both videos and images. You read it right. The process of creating a watermark for videos and images is the same. After creating, you can incorporate the watermark with a video editor
How can I remove the watermark from a photo?
While there is a way to create and add a watermark to a photo, there is also for removing watermarks. For an online option, you can rely on Free Watermark Remover Online. Now, if you want an offline and professional tool, Photoshop will come in handy
Conclusion
If you are into learning how to add watermark in Luminar, the tutorial will be of help. On the other hand, there is a way to create a customized watermark which is also provided in this tutorial. Therefore, you can choose to add watermarks to your favorite photos that you wish to protect or simply promote your brand online with your own created watermarks.