All-sided HDR Photography Tutorial: Create Your Masterpiece
Whether you are a professional photographer or social media blogger, taking photos of beautiful things or memorable moments is a must. But for better presenting the image with the most real effect, you can adopt the HDR photography technique.
Stands for High Dynamic Range, HDR is a photography technique that assembles multiple exposures of a single scene to one saturated and high-contrast image. Compared to other photography, HDR can reserve more details of the scene. Thus, we will show you how to take HDR photos on iPhone, Android devices, or cameras. Meanwhile, the methods to create and upscale HDR images on your computer will also be mentioned.

PAGE CONTENT
Part 1. What is HDR Photography
Starting from our human eyes, our eyes can capture a wide range of light from shadow to highlight. We can clearly see the shape of the sun and the shadow it caused during the sunset. However, the dynamic range of the camera’s sensor can’t detect both extremes of the light range. If the light of the subject you capture is beyond the camera’s range, the highlighted part will tend to be white as nothing, or the dark part will directly become a black area. That will lose many details of the image.
Therefore, more and more modern shooting methods and progressive post-processing technologies come to deal with this problem. HDR photography is one of these aggregations. HDR photography takes one photo with different exposures according to the distinct brightness of each part of the scene. There will be no part of the final HDR photo that is too bright or dim. So, the HDR photography contains a very high dynamic range.
Part 2. How Do I Take HDR Photos
Now that you already know what HDR photography is, let’s dive into the tutorial for taking HDR photos on different devices.
1. Take HDR photos on iPhone
Usually, the iPhone defaults to using the HDR feature when the HDR effect is better. But if you want to switch HDR on/off by yourself, you can follow the steps below.
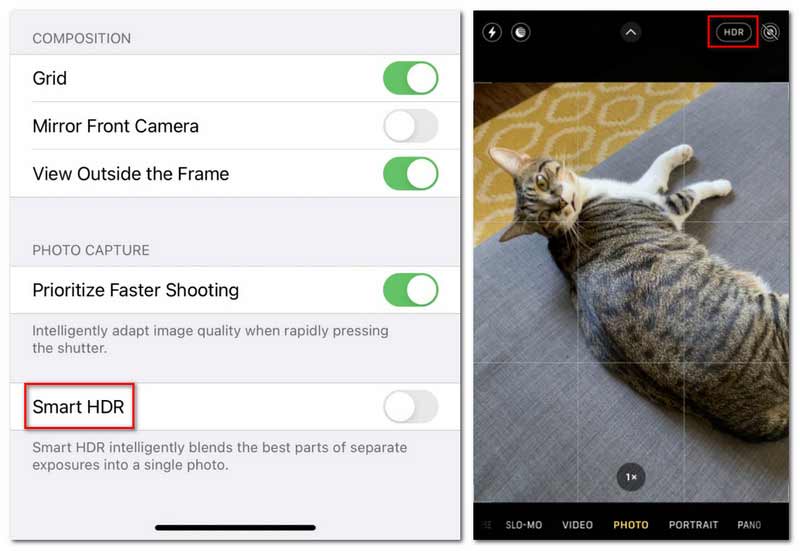
As for iPhone users of iPhone 12 and earlier:
Step 1. Go to Settings and find Camera from the interface, tap it.
Step 2. Scroll down to the bottom of the Camera’s settings and find the Smart HDR option. Enable it by turning it in green.
Then, you can open the Camera app and see it at the top right.
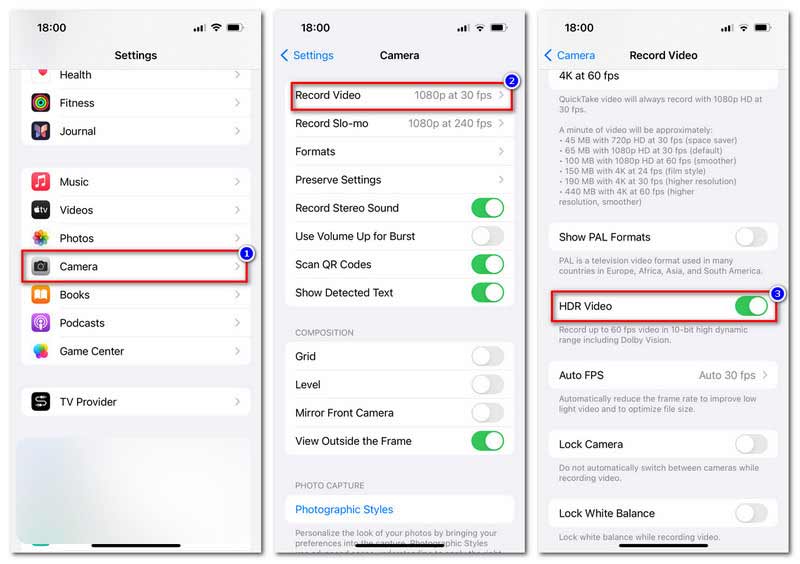
As for iPhone users of iPhone 13 to iPhone 16, it’s a little different.
Step 1. Go to settings and tap Camera.
Step 2. Tap Record Video from the first option.
Step 3. Scroll down from Record Video’s menu and find HDR Video. Enable it by turning it green.
2. Shoot HDR images on Android smartphones
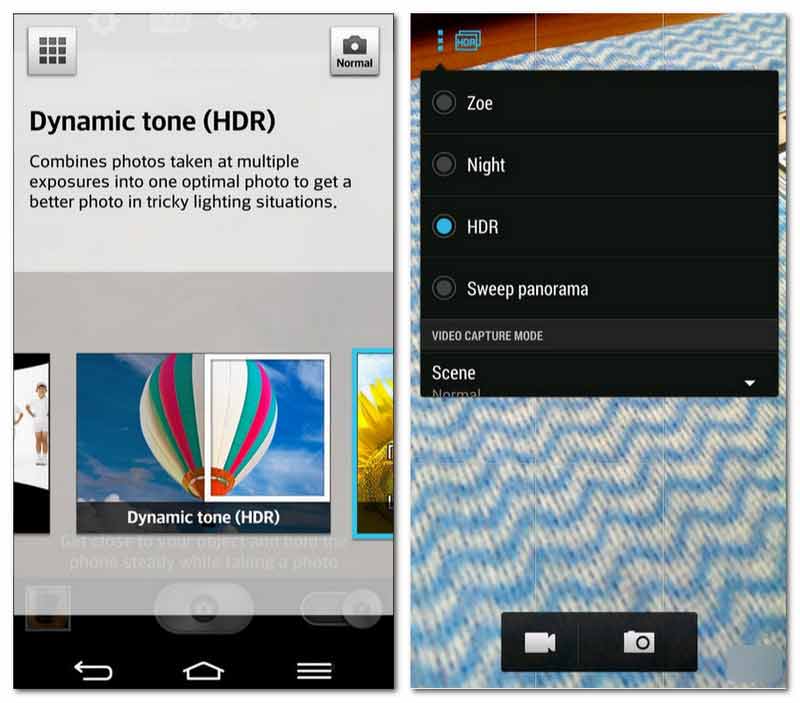
The way to enable HDR on Android devices is also easy but varies on different phone brands. We list several Android devices for you to find their HDR option.
- Sony Xperia T and Xperia V: Go to Camera > Settings > HDR.
- HTC One X and Desire X: Go to Camera > Camera Scenes > HDR.
- LG phones: Go to Camera > General mode > Settings > HDR.
- New Samsung phones: Enable the HDR option under the Shooting Mode of the Camera app. It’s called Rich tone.
3. Use a camera to film in HDR
At present, 90% of cameras in the market support taking HDR photos. Some directly have HDR mode, some can preset bitrate for HDR photography. You can follow the tips below to adjust your camera’s settings for taking HDR.
- Find whether your camera has HDR modes like Auto-bracketing mode, Auto-exposure mode, or Exposure Bracketing.
- Get yourself a tripod for always shooting on it. Because even a slight movement may make your HDR images in vain.
- Always shoot with a shutter speed below 1/60 and use the camera’s timer or remote to avoid any unexpected shakes.
- Set the camera in Manual or it will automatically change the exposure between the shots.
- Allow the camera to shoot in Aperture. Meanwhile, set the exposure as +1 or +2.
- Set the ISO as low as possible to denoise.
Part 3. How to Create HDR in Photoshop
Besides the above shooting tools to help you take HDR photos directly, the multiple desktop programs can also help you create exposure-balanced HDR images. Photoshop is one of them. This versatile program can handle many image issues like increasing resolution, removing background, resizing images, etc. Here is the step-by-step guide to using Photoshop to make HDR images.
Step 1. To create HDR in Photoshop, you’d better prepare at least two images, three to five would be better, taken at the same angle and with the same bitrate settings.
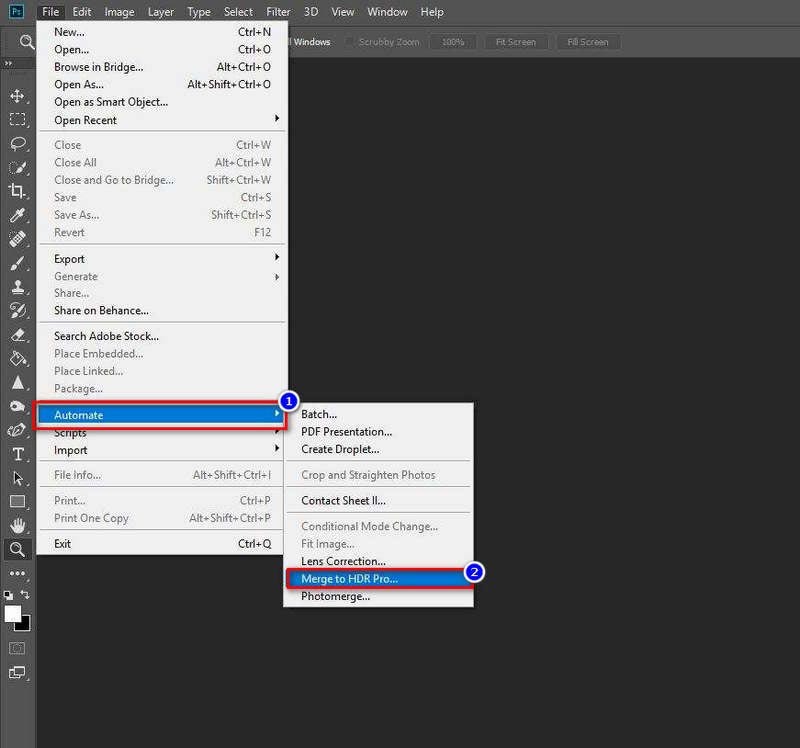
Step 2. Launch Photoshop and click File mode to select Automate from the scroll-down menu. Choose Merge to HDR Pro.
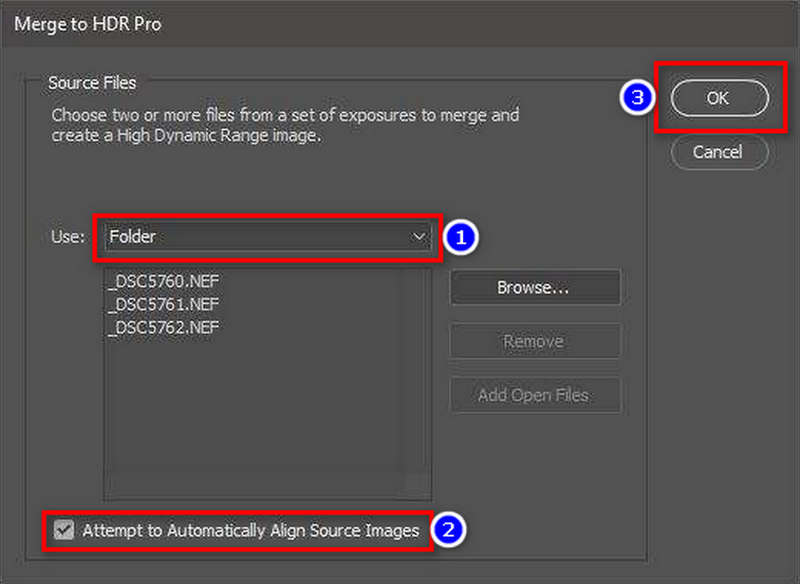
Step 3. In the new window of Merge to HDR Pro, click Use to add the images you prepared. Or you can directly put them in a folder to add. Remember to tick the Attempt to Automatically Align Source Images option. Then, click OK.
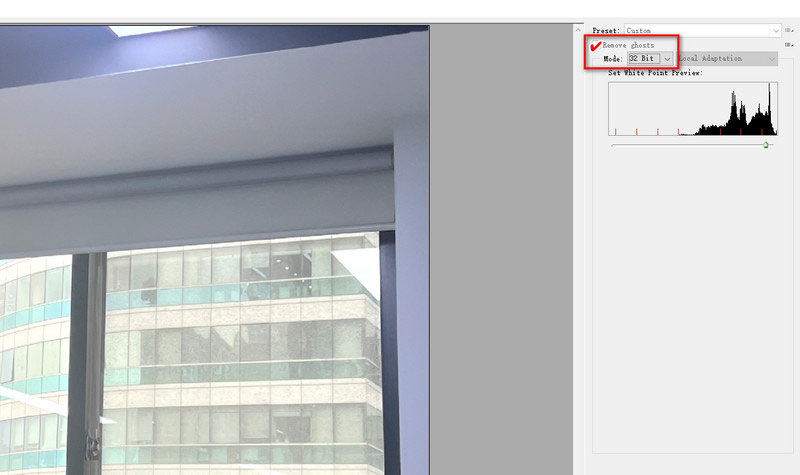
Step 4. You will receive a new window after a while, tick the Remove ghosts option and select 32 Bit of Mode. Then, click OK and you will receive your created HDR image soon.
However, Photoshop’s usage may be too complicated for most users, especially for beginners. Also, Photoshop is a paid software of Adobe, so it’s not that economical for those who just want to create HDR images for only one time.
Part 4. How to Upscale HDR Images
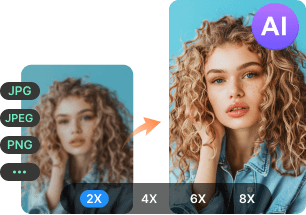
According to the above situation, how do I upscale HDR images with a free and easy-to-use tool? Well, Vidmore Free Image Upscaler Online comes to help. Trusted by hundreds of users, Vidmore Image Upscaler is 100% free to use for handling photo-upscaling issues. To improve the blurry part caused by different exposures of your original photo, this HDR photo editor adopts AI Super Resolution technology to remove the noise. Meanwhile, Vidmore Image Upscaler processes the blurry image between the lower layers and higher layers for overall enhancement. You can receive an upscaled image same as of HDR effect.
- Support upscaling HDR images with AI technology to deblur unbalanced exposure parts.
- Support processing HDR images of all layers with the learning of convolutional neural networks.
- Support converting images to 1080p and 1440p without quality loss.
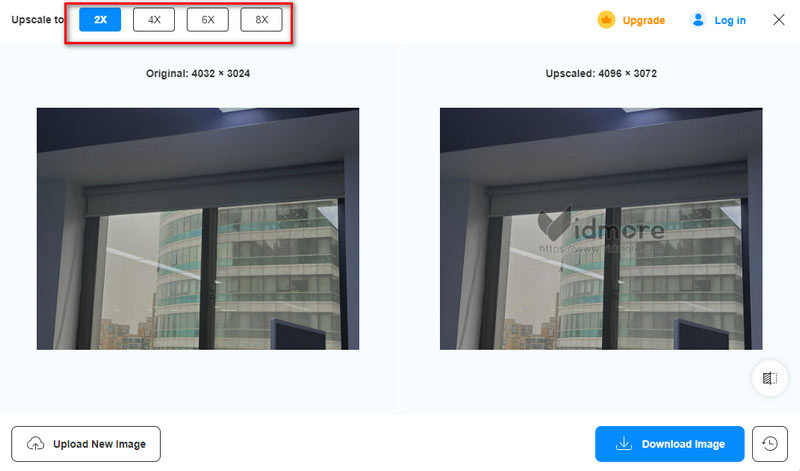
- Support to enlarge and zoom a photo at 2×, 4×, 6×, and 8×.
Here is the step-by-step tutorial to enhance HDR images with Vidmore Free Image Upscaler Online.
Step 1. Go to Vidmore Free Image Upscaler Online’s official site with the following link:
https://www.vidmore.com/image-upscaler/
Step 2. Hit the blue button of Upload Image to add the image file you want to upscale to HDR.
Try Image Upscaler Now!
- Improve photo quality.
- Enlarge picture to 2X, 4X, 6X, 8X.
- Restore old image, unblur photo, etc.
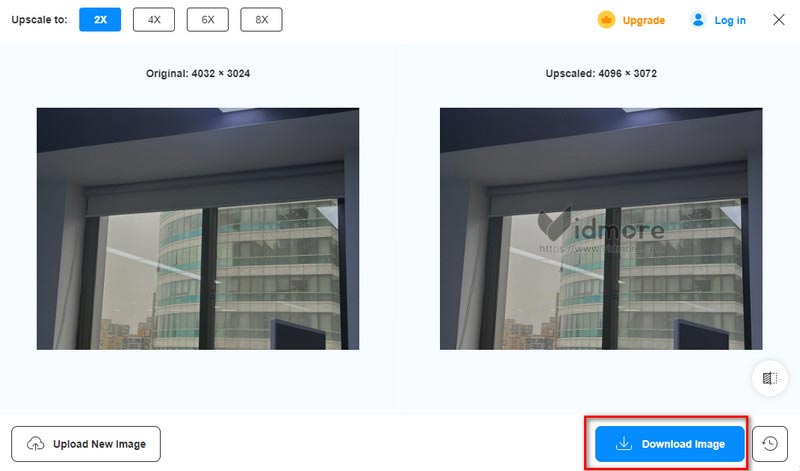
Step 3. Vidmore Image Upscaler will take a few seconds to automatically upscale your images at 2×. Or, you can use this online photo resizer to select the upscaled size to 4×, 6×, and 8×.
Step 4. If you’re satisfied with the upscaled HDR image, click the Download Image button to get the final image file.
Part 5. FAQs about HDR Photography
How to remove HDR from iPhone photo?
For users of iPhone 12 and earlier, go to Settings > Camera to turn off Smart HDR. And for users of iPhone 12 to iPhone 16, go to Settings > Camera > Record Video to turn off HDR Video.
Do professional photographers use HDR?
Well, it remains a controversial topic nowadays. Some photographers like HDR because it captures the full range of light to dark. Some don’t like HDR for making their image effects exaggerated or not natural.
Is HDR worth it for photos?
It depends on the subject you take. HDR suits the photo with strong contrast of exposures, so if you want to take photos of landscapes or other outdoor locations, HDR is worth it.
Conclusion
To sum up, HDR photography is a process of unbalanced exposure images. This post shows the complete steps of how to take HDR photos on iPhone, Android devices, or cameras. Also, you can create HDR with software like Photoshop. But the one you can’t miss most is Vidmore Free Image Upscaler Online. This online HDR upscaling tool is free and easy for all users. Go to its site and try to upscale one HDR on your own!