Complete Steps on How to Access and Utilize the Color Correction in iMovie
There are various reasons for your videos not having the perfect radiance you want. One factor that affects this most is the camera you use. Let us say you use a good iphone camera that you trust to provide you with a perfectly lighted and hued clip. Still, it turned out to be a disappointment since it went far beyond your expectation when you transferred it to your Mac. Then, how will you deal with it? Will you try to recapture the video? Such a waste of time, right? Then for that reason, we will give the most used way to fix your videos using Mac, and that’s through iMovie. For the next few minutes of reading this post, you will learn how to do color correction in iMovie and, at the same time, see a highly recommended option for this event.

PAGE CONTENT
Part 1. How to Use the Color Correction on iMovie
We cannot deny that iMovie is one of the most practical tools an Apple user shouldn’t miss. One of the potent skills that this tool has is its ability to correct video color. However, if you have already seen and know how iMovie works, you will be surprised at how it does on this subject matter. This is due to the adjustments that need to be done perfectly. Meanwhile, iMovie comes with a wide array of advanced settings, which you can customize your clip’s exposure, brightness, contrast, and saturation. In addition, it also offers adjustments where you can alter the red, green, and blue gains together with its auto denoise and enhance options. Anyway, here are the steps on how to do color correction in iMovie.
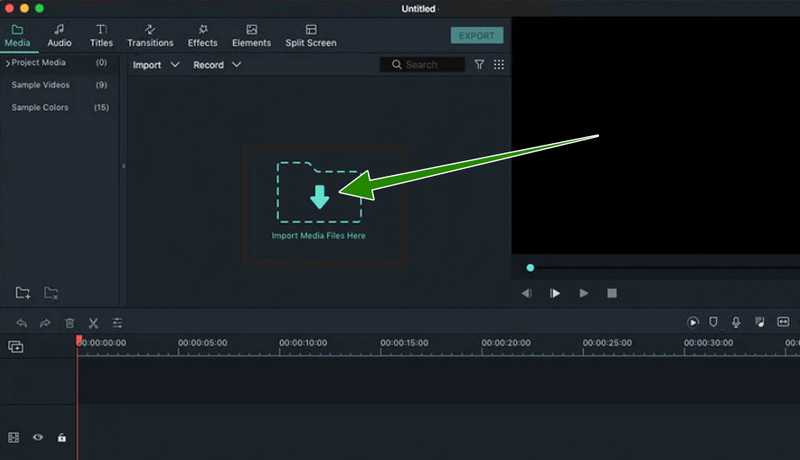
Step 1: Begin by launching the software using your Mac. Afterward, hit the Import Media Files button to upload the video file that you need to color correct, and drag it into the Timeline once it’s in.
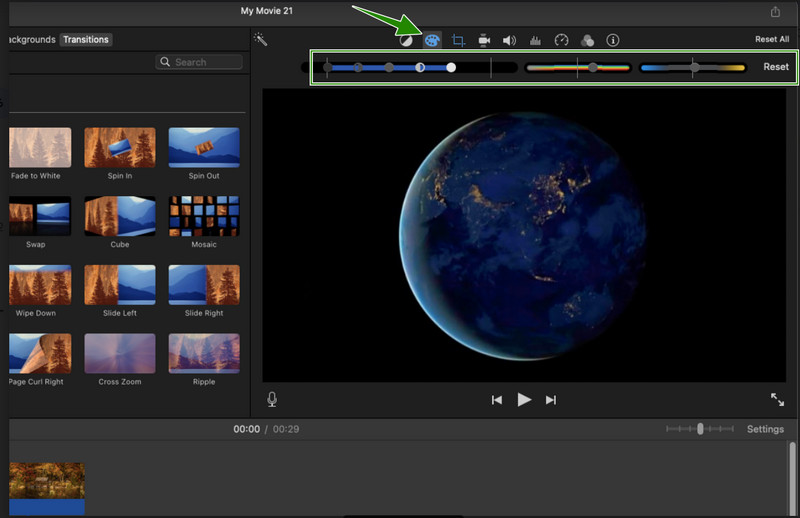
Step 2: Now, right-click the video on the Timeline and hit the Show Inspector tab among the options. Then, hit the Color Corrector icon on top of the preview part and adjust the options that popped up under it. It is crucial since you will need to adjust until you meet your desired set-up.
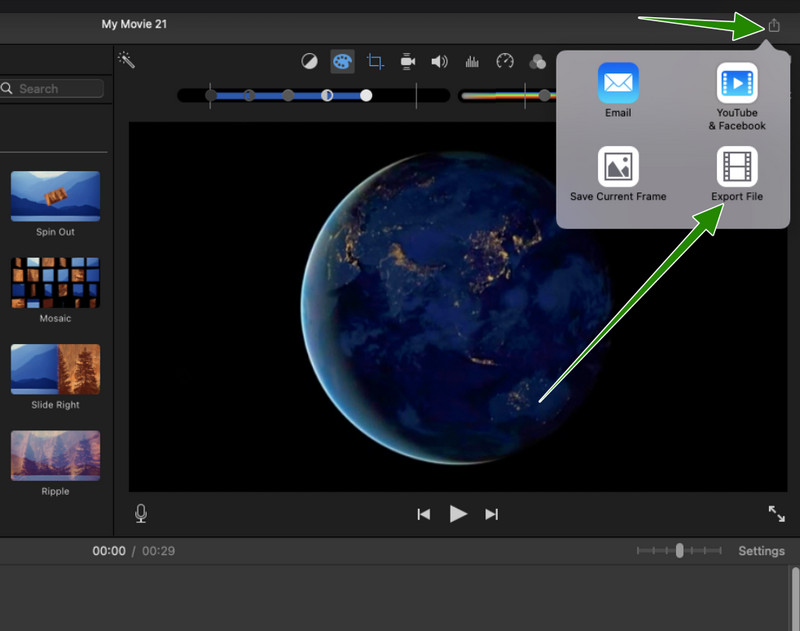
Step 3: Apply your changes to your video, then proceed to export it. How? Click the Export icon. Then, among the options from the popped-up window, select the Export File option and proceed to save it.
Part 2. A Better Option than iMovie for Video Color Correction
We cannot argue with how multi-functional iMovie is. However, how can it be a great help if you want to work on other platforms, such as on Windows? Unfortunately, iMovie cannot guarantee you the flexibility you are looking for, but this Vidmore Video Converter is the better option than iMovie. Vidmore Video Converter is a multi-platform software with advanced and powerful technologies that protect and accelerate your device. These technologies also help in color-correcting your videos swiftly and smoothly.
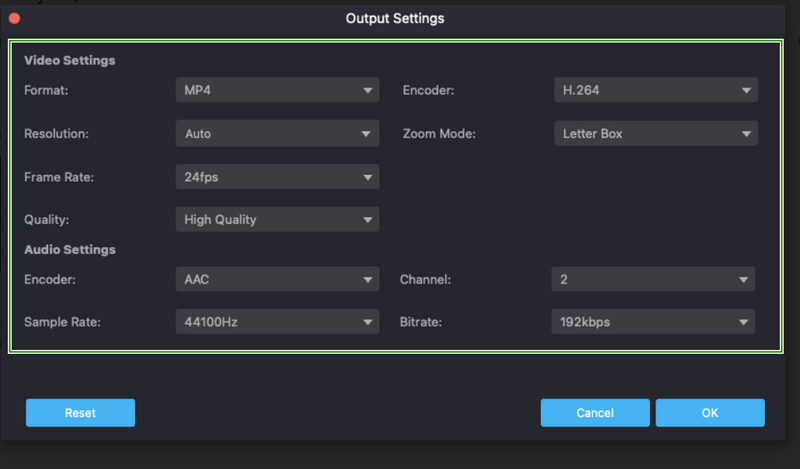
Furthermore, you will be surprised at how this mini function can make a big difference in your video file. Because aside from enabling you to adjust the hue, saturation, contrast, and brightness of your video, it will also allow you to alter the technicalities of your file. Wherein you can scrutinize your file’s format, resolution, quality, zoom mode, encoder, and frame rate!
What’s more? You can continue applying the other exciting enhancements this tool has for you. Such tools are its AI video enhancer, speed controller, reverser, merger, watermark remover, and t so much more. Not to mention the hundreds of video types it supports for input and output.
Main Features
◆ Great options to make your videos perfect while correcting their color.
◆ Infused with a multicore processor.
◆ Support advanced NVENC, Intel QSV, AMD APP, and NVIDIA technologies.
◆ Neat and professional-style interface with easy navigation.
How to Do Color Correction in iMovie’s Alternative
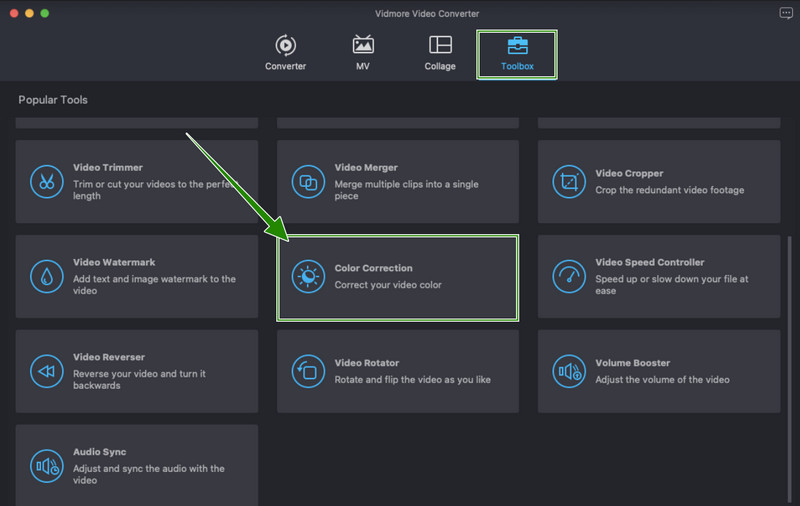
Step 1: Begin by acquiring this tool on your Mac or desktop freely. After installing the software, launch it and go to its Toolbox menu and look for its Color Correction tool. Click the tool, and be ready to upload the video that you need to edit by clicking the Plus icon.
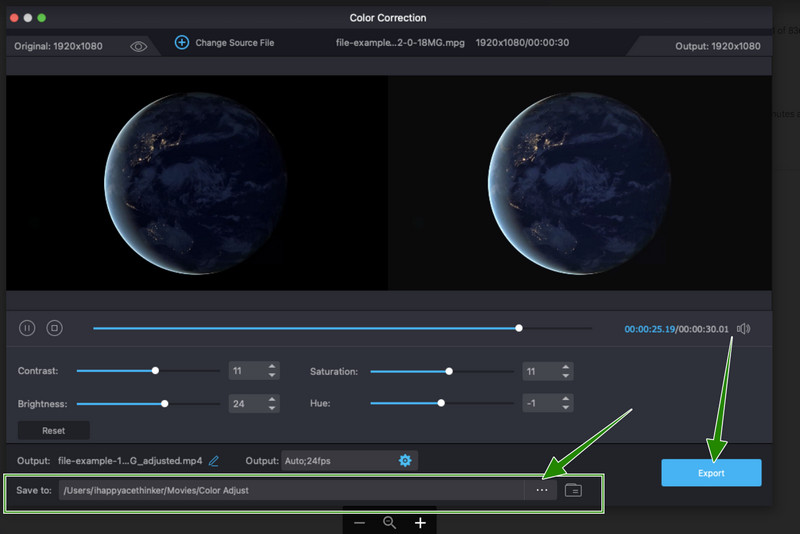
Step 2: After uploading the video, you can start working on the color by adjusting the options. You can adjust the options by sliding the bar or by clicking their up and down arrows.

Step 3: For additional adjustments, hit the Setting icon next to the Output section. Once clicked, a new window will appear, then adjust the Video Settings you want or need to modify.
Step 4: After that, you may already hit the Export button to apply and save the changes to your video. Meanwhile, before you export, you may also set a file destination for every color-corrected output you make. How? Hit the Ellipsis in the Save To portion, and choose a folder from your local drive.
Part 3. FAQs regarding Correcting Video Color in iMovie
Is there a color correction in iMovie on iPhone?
Yes. You can also have the iMovie app to correct the video color on your iPhone. To do so, you must first upload the video on your launched app and bring it to the Timeline. Then, tap the color balance button that is located on the top of the viewer, and adjust the color adjustments accordingly.
Can LUTs be used in iMovie?
No. Unfortunately, it is impossible to use LUts in iMovie since this software doesn’t support and accept third-party integrations and plug-ins.
Why can’t I find the color correction of iMovie on Mac?
Perhaps the advanced tools in your iMovie are not yet turned on. To turn on iMovie’s color correction, go to the iMovie Preferences and hit the General tab. After that, a new window will appear where you need to toggle the Show Advanced Tools selection.
Will my video have the same quality after correcting the color in iMovie?
Yes. However, suppose you want to improve the video quality on iMovie. In that case, you will need to use the tool’s other function for enhancement. Hence, to work on color correction and quality improvement simultaneously, use Vidmore Video Converter.
Conclusion
There you have it, the proper utilization of color correction in iMovie. So, for any reason you are dealing with having a low radiant video, you can fix them anytime as long as you know how. You can use iMovie if your guts tell you so. Still, if you want a better video editor for Mac and desktop, Vidmore Video Converter got you covered.