How to Improve Quality of Video on Facebook [Ultimate Guide]
Facebook is one of the most used social media platforms worldwide. It has a total of 2,630,000,000 users as of today. Undoubtedly, it reached more users as it provided better service. Facebook is commonly used to share and upload content like pictures and videos. If you scroll over the application using your account, you will see a lot of captured moments by your friends and following. Therewithal, it enables users to react like, heart, commenting, and sharing regarding the post.
Have you ever considered why users get thousands of likes when posting video content? To answer your question, they have a better video quality that provides a better viewing experience. Video quality plays a significant role in having a better-quality video output. With that, you need to ensure that you upload a better-quality video. This post will provide details on how to upload high-quality videos to Facebook. Also, it will provide a video enhancer application you can use to improve video quality. Continue reading to learn more about this information.

PAGE CONTENT
Part 1. How to Improve Video Quality for Facebook
1. Best Way to Unblur Videos with Vidmore Video Converter
VidHex Video Enhancer is a video-editing program with built-in AI models and editing functions. It can unblur, denoise, upscale, colorize, convert SDR to HDR, etc., your low-quality footage. You can count on this if you want the best program to unblur a video. Its AI model can intelligently upscale video resolution, optimize brightness and contrast, remove video noise, and reduce video shaking in just a few clicks. Are you ready to learn how to make a video clearer using this program? If so, rely on the instructional guide presented.
Step 1. Download and Install VidHex Video Enhancer
To have full access, download and install the program on your desktop, whether you are using a Mac or Windows. After the installation process, launch the program to start unblurring your videos.
Step 2. Import Blurry Footage
Once you open the program, navigate to the importing area, and from the appeared folder, look for your blurry footage. Click it to add.

Step 3. Choose an AI Model
A new window will appear on your screen where the following AI models to enhance video quality are presented. For video unblur, we can select the General Enhancement Model on the right. And the Preview button can help you check out the unblurred effect. If satisfied, you can click the Export All button to send out the result.

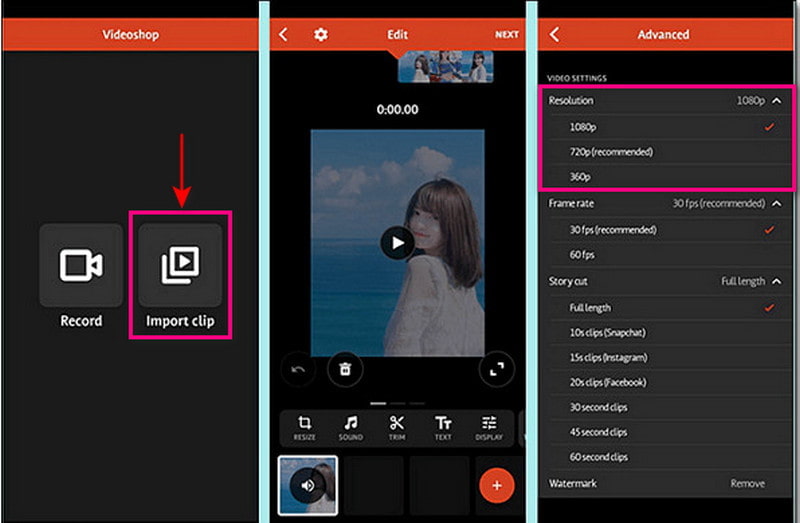
2. VideoShop
VideoShop is a cross-platform mobile application that is capable of enhancing your video. It has editing options such as trimming, applying music and sound effects, and slow and fast motion. This video enhancer lets you change basic effects like brightness, contrast, temperature, saturation, etc. In addition, you can improve the quality of the video by picking a higher resolution from the exporting process. Proceed to the instructional guide below to learn how to improve video quality using this application.
Step 1. First and foremost, download and install the application on your mobile device. Once the installation process is done, launch the application to get started.
Step 2. On your screen, hit the Import clip button to add the video you want to improve the quality. Afterward, hit the Adjust Display button to change the video's brightness, contrast, saturation, and more.
Step 3. Once settled, hit the Tick, leading you to the saving options. After that, locate the Resolution section, and choose a higher resolution to incorporate into your video. Once done, proceed to save your improved video quality. Afterward, you can upload it to your Facebook account and share it with your friends and followers.
Part 2. Tips for Using Facebook
This part will provide tips on how to post a high-quality video on Facebook. By changing one setting, you can start uploading videos in high-definition output. Below are the guidelines on how to upload a better-quality video.
Step 1. Open your Facebook account, and head to the Menu icon. The menu includes your profile picture with three horizontal lines on the lower right corner of your screen.
Step 2. Scroll down, and click the Settings & Privacy option. Next, click Settings, scroll down, and select Media, leading you to the Videos and Photos settings page.
Step 3. Head to the Video Quality option and ensure to enable the Optimized.
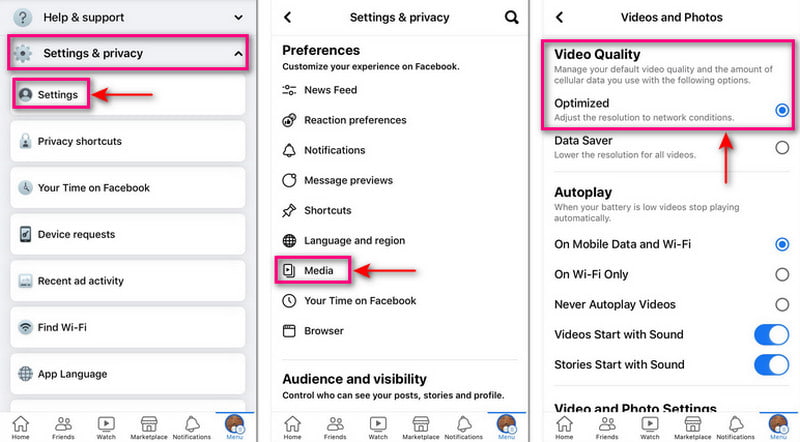
With this setting, Facebook will improve the quality of your videos based on how fast or stable your internet connection is. If you have a strong internet connection, Facebook will upload your videos in the highest quality possible. Changing the Facebook video quality can help you achieve your goal of posting a better-quality video.
Part 3. FAQs about Facebook Video Quality
How do I fix low-quality videos on Facebook?
Your video appears low-quality on Facebook or any social media platforms because of the compression. The platform must compress your video to save server space, which usually happens to any platform.
Why are my Facebook uploads low-quality?
Facebook compress, resize, and format pictures or videos to enable the page to load faster and save space on their servers.
What is the highest video quality on Facebook?
The video resolution should be at least 1080P or less. Facebook supports file sizes up to 10 GB, and videos must not exceed 240 minutes long.
Does Facebook upload in 4K?
Facebook does not support 4K resolution video. It can only hold a resolution of 1080 or under, and files up to 10 GB are not supported. If you have a larger video file and a poor and slow internet connection, it will take time to upload.
Conclusion
Facebook is one of the on-the-go applications when you are resting and want some entertainment. If you want to watch video content, Facebook offers various videos uploaded by different users. Consider having a better-quality video when planning to upload a video on this application. Through that, your video will gain more likes, reactions, and comments. In this post, you have learned how to improve Facebook video quality. Also, it presents video enhancer applications you can use to improve the quality of your video.