How to Remove a Filmora Watermark from a Video Effectively
One of the best and most used video editing software on the market is Filmora. It comes with easy and practical tools to make a creative and eye-pleasing video. Using this program, you can cut, trim, merge, crop, and add visual effects to enhance your videos. There are also loads of samples, pieces of great texts, and interesting animations.
You can use the tool for free with its trial version. However, it still leaves a noticeable watermark on the exported videos. Users can remove the watermark by subscribing to their plans. Here, we will geek out on some great tools to answer your query on how to remove the Filmora logo from a video.

- Part 1. Why It Is Difficult to Remove Filmora Watermark
- Part 2. How to Remove Filmora Watermark
- Part 3. Remove Filmora Watermark for Free: Record Screen
- Part 4. FAQs on Removing Filmora Watermark
Part 1. Why It Is Difficult to Remove Filmora Watermark
Most watermarks are placed in the corner of the videos, so it is easy to remove them. You can quickly clear out the watermark using the trim and cut methods. However, in the case of Filmora, the watermark is placed in the middle-lower part of the screen. Applying these methods could damage or compromise the integrity of the video. In a way, they are forcing the free users to upgrade to the pro version to remove the watermark and enjoy other features.
On the other hand, we researched for some workable means to help you remove the Filmora watermark on your videos. You will not have to spend a big amount of bucks on upgrading to its pro version. Learn more about these tools to remove the Wondershare Filmora watermark from your videos.
Part 2. How to Remove Filmora Watermark
1. Vidmore Video Converter
Vidmore Video Converter is a functional program jam-packed with helpful tools allowing you to remove watermarks from a video. It enables you to remove multiple watermarks from the same file. Therefore, whether the watermark is still or moving, you can remove it using this program. Moreover, both professionals and amateurs may use this program due to its intuitive user interface. In just a few clicks, the watermark from your Filmore videos will disappear. Aside from that, you can also use it to crop, trim or replace watermarks with a new object or logo. Follow the steps listed below and learn how to use this Filmora video editor watermark remover.
![]() Vidmore Video Converter - Watermark Remover
Vidmore Video Converter - Watermark Remover
- Remove watermarks of different formats like MP4, MPV, AVI, WMV, etc.
- Delete moving and still watermarks.
- Process watermarks in different parts of the video.
- Clean and straightforward interface.
- Multi-platform watermark remover.
Step 1. Download the application
First, get the program by clicking on any Free Download buttons provided. Then, run the installer and proceed to the installation of the program. After that, familiarize yourself with its interface.
Step 2. Load a video
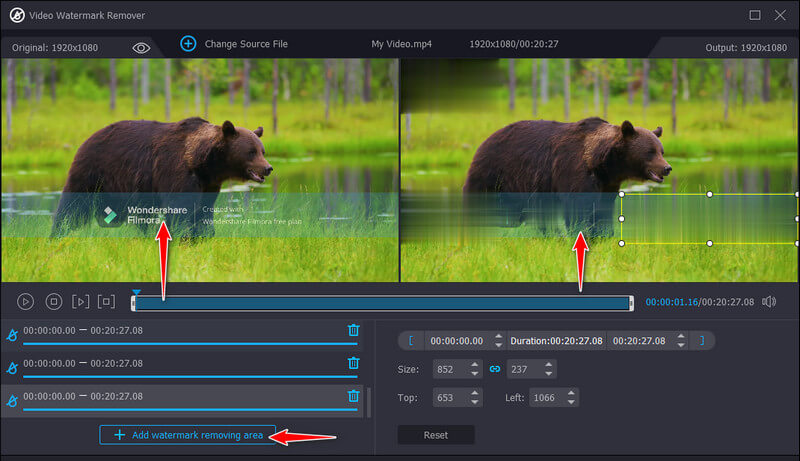
Then, go to the Toolbox tab on the top of the interface. You will see a list of functions offered by the app. Click the Video Watermark Remover function and hit the Plus sign button to add your target video.
Step 3. Delete the watermark from the video
After that, click on the Add watermark removing area button and place the aspect ratio on the watermark. Move and resize according to the watermark’s size and position.
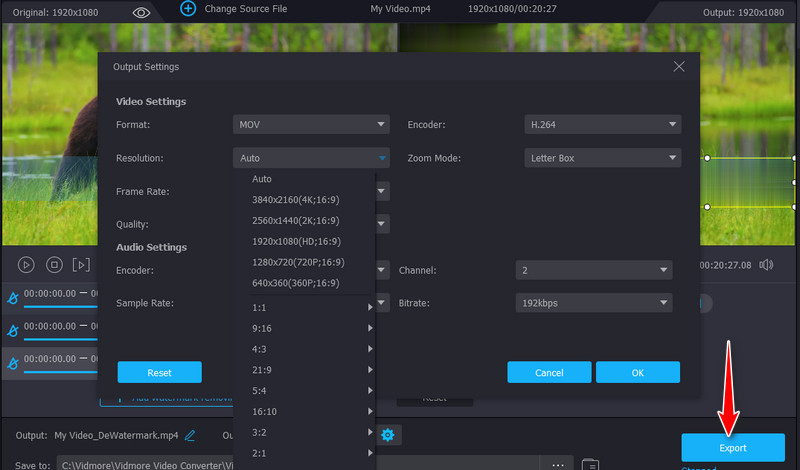
Step 4. Save the edited FIlmora video
Once you are done removing the watermark of the video, open the output settings. From here, you will be able to change the format, resolution, frame rate, and the audio’s sample rate, channels, etc.
2. Remove Logo Now
With Remove Logo Now, you can delete watermarks from almost any video. It offers an automatic and manual way of removing watermarks. The tool comes with a Find Logo tool that automatically detects and removes the watermark. You can optionally select the watermark by yourself for accurate and precise watermark selection. Moreover, the manual selection can be made using the Select or Marker tool. Now, if you are interested in using this program, follow the steps about how to remove the watermark in Filmora Go videos.
Step 1. Visit the official site of Remove Logo Now to download the software. Run the install and launch it on your computer.
Step 2. Now, add the video you wish to edit and hit the Remove button at the top of the interface. You should see the settings on the right-side panel.
Step 3. After that, select the watermark on the Filmora video and hit the Start button to export the video's final version.
3. Apowersoft Online Watermark Remover
Apowersoft Online Watermark Remover is a free program that enables you to remove the watermark from a Filmora video if you wish not to shell out some money. It can remove the watermark for MP4, AVI, MKV, WMV, MOV, etc. Check out the Wondershare Filmora how to remove watermark permanently tutorial below.
Step 1. Open the program’s official website using a browser on your computer.
Step 2. Click on the Remove Watermark from Video to erase the Filmora watermark from your videos.
Step 3. Then, upload the video you want to edit and hit the Add Box(es) button to select the area of watermark you wish to remove.
Step 4. Lastly, tick the Erase button to process and download the finished video.

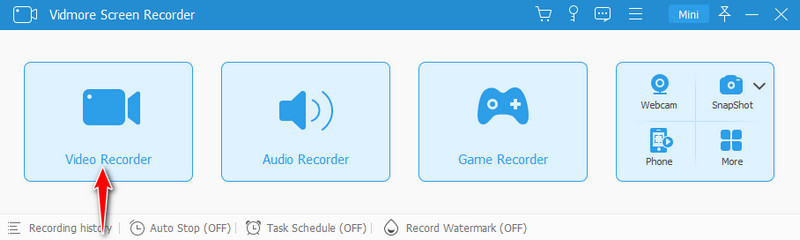
Part 3. Remove Filmora Watermark for Free: Record Screen
One of the best workarounds to get the video without any watermark is by recording it. There is no need for you to blur, crop, or trim parts of the video. It is the best video screen recorder for Windows and Mac that provides a user-friendly interface. Moreover, the program can record both the video and the audio. Not to mention, you can save the video in several formats like MP3, MOV, AVI, etc.
Step 1. First off, go to the program's download page and get the tool. Proceed with the installation after opening the installer. Launch it afterward.
Step 2. You should see the tool's main interface, which shows four major tabs. From here, select the Video Recorder and adjust the recording frame to the frame size of your Filmora video.
Step 3. Hit the Record button to commence the recording and play the Filmora video.
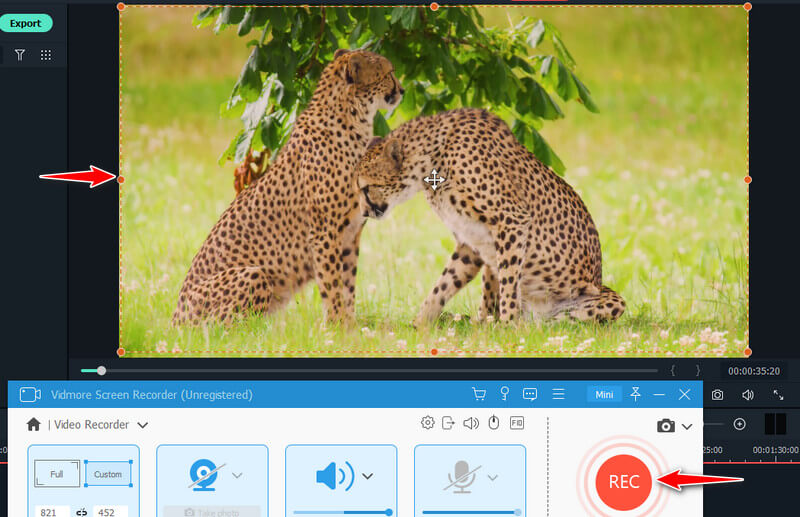
Step 4. Once done, click the Stop icon. Hit the Export button and edit the metadata of the video. Finally, hit the Complete button to finalize the video.

Part 4. FAQs on Removing Filmora Watermark
Is it possible to erase the watermark without blurring?
Apparently, you cannot remove the watermark from Filmora except by blurring it. But a feasible and straightforward workaround is to record the video and audio of your Filmora videos.
Can I remove the filter in Filmora?
You cannot remove a Filmora video filter unless added using the Filmora application. Yet, if you add the filter from other video editing software, you cannot remove it from another video editor.
What is the best alternative to Filmora?
You can use video editors that compete with Filmora’s functions like Final Cut Pro, iMovie, Camtasia, Adobe Premiere Pro, etc.
Conclusion
The programs mentioned above can help you remove the Wondershare Filmora watermark. Yet, not all of them are free to use. If you wish to delete a watermark from Filmora without buying, you can consider Remove Logo Now. However, it uses the blurring method to remove watermarks. On the other hand, you may use the Vidmore Screen Recorder to save your Filmora video without any watermark on the screen.