Experience in Separating Audio from Video in DaVinci Resolve
When we record a video, background noise may be mixed in. We may need to adjust the background sound or replace it with a new dubbing. Before performing this operation, we must separate the video image from the original audio and add the edited audio. Another common situation is that when we watch a film or TV show, we may like a particular background music but cannot find the corresponding audio source. In this case, we can also export the audio from the video to be listened to. In both cases, it is impossible to do this manually, and we need the help of a professional video editor, such as DaVinci Resolve. In the following, you will learn how to separate audio from a video in DaVinci Resolve and the advantages and disadvantages of doing so. If you find DaVinci Resolve too cumbersome, we will also introduce you to another, more user-friendly video editor as an alternative to DaVinci Resolve.
PAGE CONTENT
Part 1. How to Separate Audio from Video with DaVinci Resolve
DaVinci Resolve is a truly professional video editor. It can help us edit the length of the video and add special effects to the screen, and it also provides audio editing and export functions. It is an excellent choice when we want to separate the video from the audio. First, let's get right to the heart of the matter: how to operate it. You can try it by following our steps.
Here are the steps to separate audio from a video with DaVinci Resolve.
Step 1. Download and install DaVinci Resolve on your computer. Launch it on the desktop.
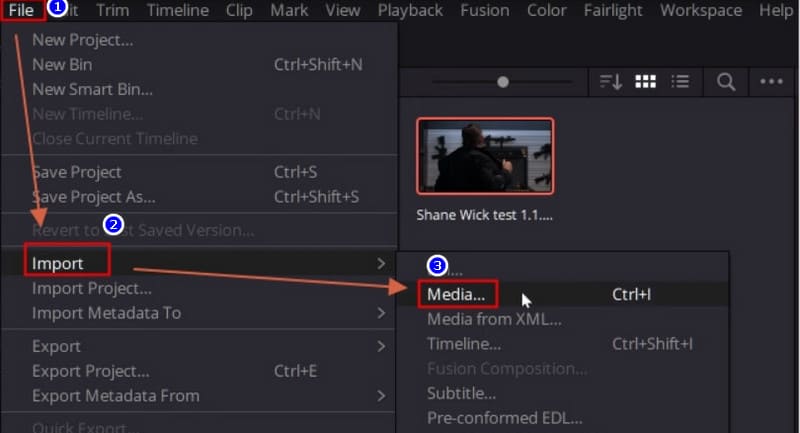
Step 2. Now, you need to upload the video you want to edit. Click on the File option and choose Import > Media. Add your video to the timeline for the edition.
Step 3. Go to the Edit panel. Right-click on the video clip. Find the Link Clips option and uncheck it. Then click on the clip and choose the Link button.
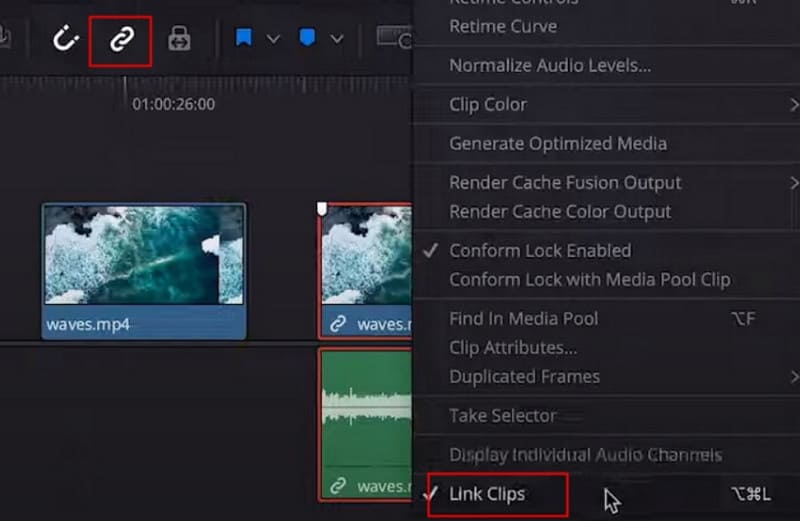
Step 4. Now, the video and audio clips can be moved, respectively. If you want to delete the clips, right-click on them and choose Delete Selected.
If you find this method of clicking too cumbersome, you can also use the shortcut keys on your keyboard directly.
Step 1. Launch DaVinci Resolve on your desktop and upload your video.
Step 2. Click the audio and press the Alt button. It will be selected in the Edit tab.
Step 3. Press the backspace button to disable the audio.
Thus, you can separate audio from video with DaVinci Resolve.
Part 2. Pros and Cons of Using DaVinci Resolve to Separate Audio from Video
Now we know how to do it. So, what advantages and disadvantages does using DaVinci Resolve as a tool bring me? Is it the only option? We will answer this question based on our own experience.
Pros
Has Advanced and Professional Level
When we use DaVinci Resolve to process videos, we find that its user interface is very professional and has many functions. Professional content creators can also find everything they could possibly need here. And it also provides a clear timeline. You can make extremely detailed adjustments to video and audio.
Offers Various Features
DaVinci Resolve can do more than just separate video and audio. We can also use DaVinci Resolve to export audio only or replace the audio track for the video. Even better, This video editing software comes with its own video and audio recording tools. You can even experience a one-stop audio production and upload service. We don't need to switch between multiple platforms to create beautiful works.
Cons
Very Expensive
As a professional and comprehensive desktop application, DaVinci Resolve does not provide its services for free and is quite expensive. It will cost a lot if you want to use it to extract audio using DaVinci Resolve. This is not a good choice for users with a limited budget.
Not Friendly to Beginners
It takes a long time to download and install. And because DaVinci Resolve can perform many specialized operations, its user interface is relatively complex. Inexperienced users may have difficulty finding the function they need.
Part 3. Best Alternative Way
As mentioned earlier, DaVinci Resolve is more expensive and has a more complicated interface with many buttons. Suppose you want to avoid these problems when editing videos or don't want to use such a complicated tool. In that case, we recommend you try one of the best alternatives, Vidmore Video Converter. Its interface is quite user-friendly and has detailed tutorials. You can complete the operation with just a few clicks. Vidmore Video Converter currently supports more than 200 multimedia formats, so you can edit any kind of video or audio. Equipped with the most advanced hardware acceleration function, the Vidmore Video Converter can export the modified video quickly.
Here is what you need to do to separate audio from a video using Vidmore Video Converter.
Step 1. Download and install the Vidmore Video Converter on your computer. Open it, and follow the on-screen guide to upload your video.
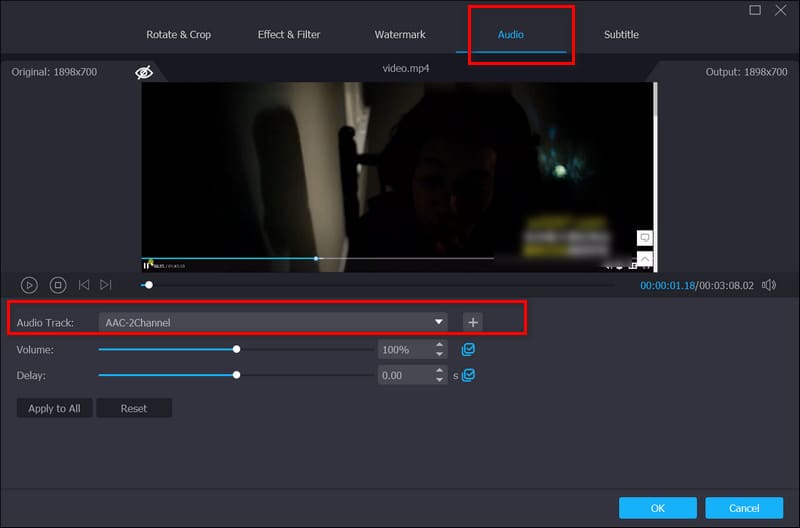
Step 2. Click the Edit button and find the Audio tab. From the menu, choose Audio Track > Audio Track Disabled. Then, select OK.
Step 3. Click Convert All to export the video.
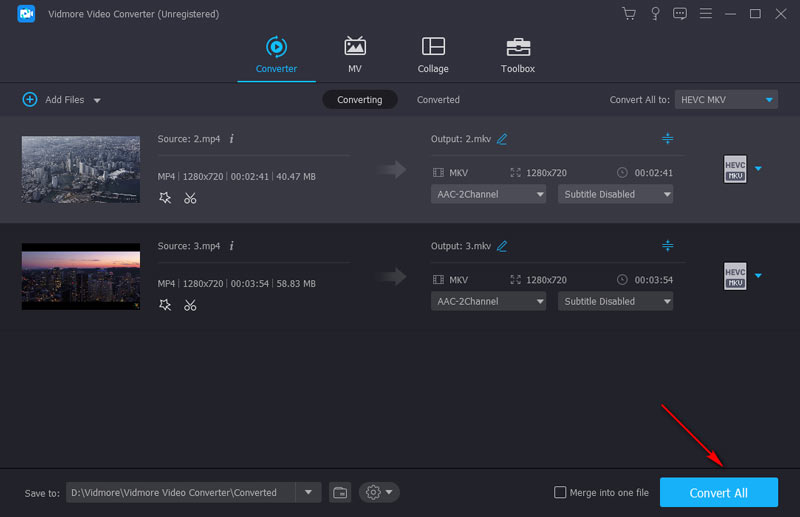
If you want to extract audio only from the video, choose an audio format under the Convert All to tab. Then, choose Convert All. Your video file will be converted to an audio file.
Part 4. FAQs of Separating Audio from Video in DaVinci Resolve
How can I separate audio from video?
In this case, you can convert the video to an audio format and export the file. Alternatively, you can use some professional video editing tools to help you separate the audio.
How do I trim audio and video in DaVinci Resolve?
You must upload the video to the platform and place it on the timeline. Then, you can drag the transition point to select the parts you want to edit and delete.
What is the shortcut for split audio in DaVinci Resolve?
D provides many shortcut keys for user convenience. If you need to split the audio, try Ctrl+B.
Conclusion
In this post, we showed you how to separate audio from a video in DaVinci Resolve. The whole process is pretty simple. However, you may need to subscribe to a paid plan to start editing. Downloading and installing DaVinci Resolve may take a long time. If you want to avoid these problems, we recommend you use its best alternative, Vidmore Video Converter.