How to Fix Premiere Pro Playback Choppy Problem Smoothly
Adobe Premiere Pro is one of the most professional-grade video editors in the market. Almost all professionals use it to create music videos, YouTube videos, engaging films, and more. However, playback lagging is a common problem when using the software. This issue can lead to more complicated video editing and production. So, if you are searching for the best solution to fix such a problem, you must read everything from this article. We are here to give you the best solutions you can use to fix the Premiere Pro playback lagging issues effectively. You will also learn to know if the program has a problem. Thus, to explore all the best solutions you can use, start reading all the information from this article.

PAGE CONTENT
Part 1. How to Know if There is a Premiere Pro Lagging Playback
There are various signs that your video is lagging on Premiere Pro. See all the details below to learn more about the issue.
Choppy and Stuttering Playback
You will see if there is a lagging issue when the video freezes or skips frames during the playback. You will also notice that the audio can play smoothly, but the footage jumps or delays.
Dropped Frames Indicator (Red or Yellow Line)
If you want to know if your video has a lagging issue, you must look for the frames. It is the yellow or red line above the timeline. If the program monitor indicates 'Dropped Frames,' the playback lags.
Audio Glitches or Cracking
If your audio breaks up or stutters during the playback, there's something wrong. Check your file and software to find out the main issue.
High GPU/CPU/RAM Usage
If the resources are maxed out, there's a higher chance of video lagging when using Premiere Pro. Always check the Task Manager or Activity Monitor for the software's performance and status.
Part 2. Why is Premiere Pro Lagging
Do you want to know why Premiere Pro is lagging? In that case, see the information below. We will explain why the program gives you a poor performance level.
Hardware Limitations
The Premiere Pro software might lag because of hardware limitations. It can be your CPU, GPU, RAM, and storage. Always use high-spec hardware for smooth playback and navigation when accessing the program.
High-Resolution
The software can show lags or bugs when dealing with high-resolution videos. You might also encounter software lags when using a heavy codec like AVCHD.
Playback Settings
If your playback setting is in full resolution, the software may show lags. In addition to that, unrendered effects can also cause lags.
Background Apps
When using the Premiere Pro program, ensure that unnecessary apps are closed. Background apps can also be the reason why your software is lagging.
Outdated Software
If you are using outdated software, you might encounter bugs that cause performance issues.
Heavy Workflows and Effects
Multiple effects, such as volumetric color, color grading, and noise reduction, can cause strain playback. If you are dealing with complicated projects, expect the software to show poor performance, such as lagging, bugs, slow loading process, etc.
Part 3. How to Fix Premiere Pro Playback Lagging Issue
It is dissatisfying when the video is choppy or stuttering. So, come to this section as we provide various solutions you can check and follow to solve your problems.
Solution 1: Lower Playback Resolution to Fix Premiere Pro Playback Issue
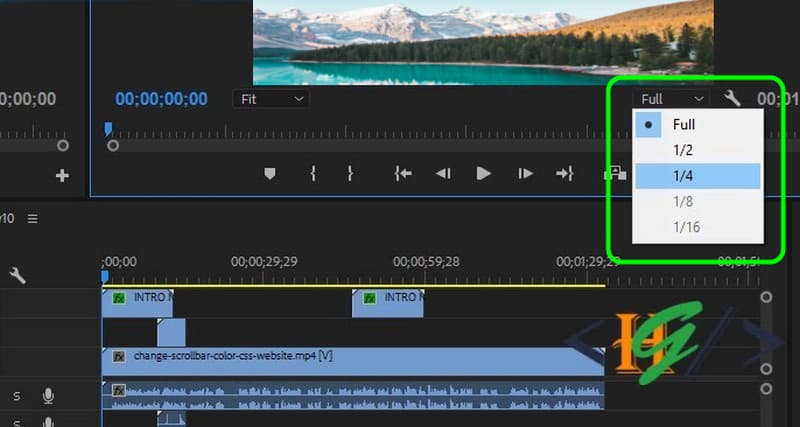
If your device or computer cannot give you enough space to deal with high-resolution videos, then you might encounter video lagging issues. With that, one of the most effective methods you must try is to lower the playback resolution. To do that, proceed to the bottom right corner of the Preview section and hit the drop-down button or the playback resolution menu. After that, choose the ½ or ¼ options to reduce the playback resolution.
This solution is also working when Premiere video and audio is not syncing.
Solution 2: Turn Off or Disable Quality Playback
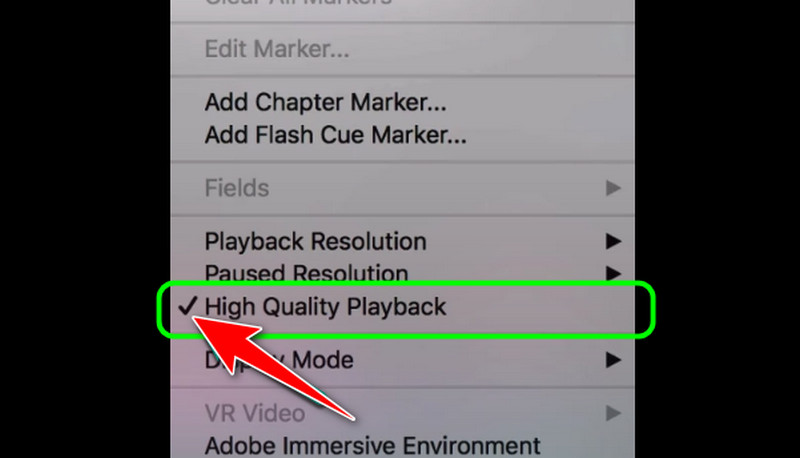
Another solution to fix the Premiere playback issue is to disable or turn off the quality playback option. It is enabled since its main objective is to help you watch videos smoothly. However, if you are encountering any trouble with lagging playback, it would be better to turn it off to fix the playback issue. To resolve the problem, open the software, navigate to the Settings section, and deselect the High-Quality Playback option. Once done, you can now try playing the video.
Solution 3: Turn On GPU Acceleration
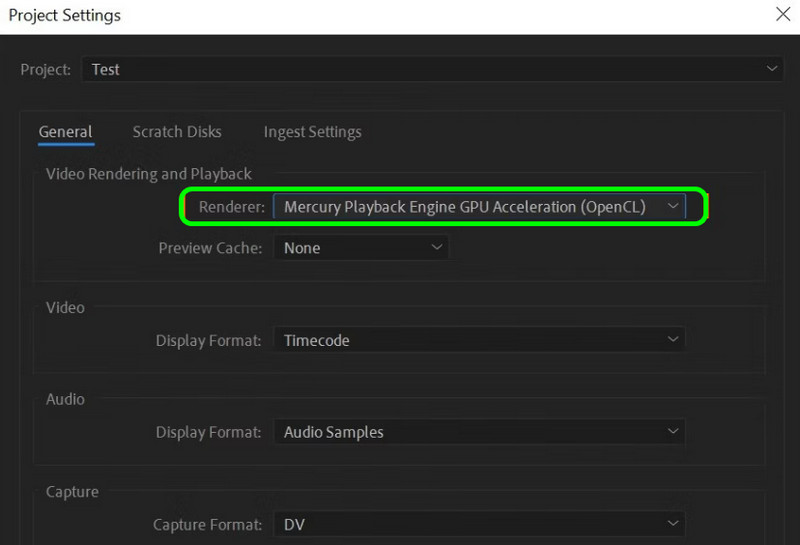
You can also turn on the GPU Acceleration. It is for enjoying smooth video playback when using Premiere Pro. Take note that the render must be set up to GPU acceleration. To do that, proceed to the File > Project Settings > General option. Then, see if the Render is set to the Mercury Playback Engine GPU Acceleration. It is under the Video Renderer and Playback section.
Solution 4: Get Rid of Media Cache Files
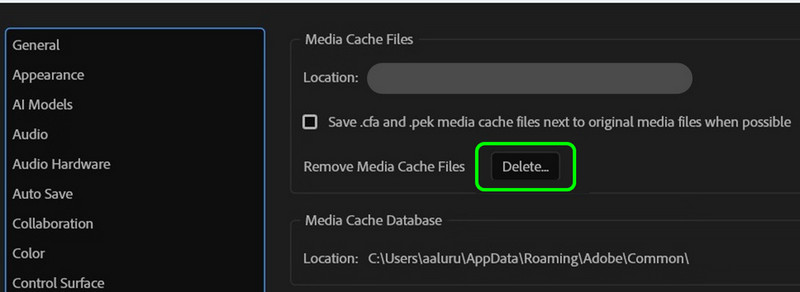
The next solution you can do is to delete the media cache files. These files can take up a lot of space and cause playback lagging issues in Premiere Pro. So, to optimize the performance and fix the problem, deleting the cache files is among the best methods. To do that, go to the Edit > Preferences > Media Cache section. Once done, hit the Delete button to get rid of the cache files.
Solution 5: Use Proxy Videos
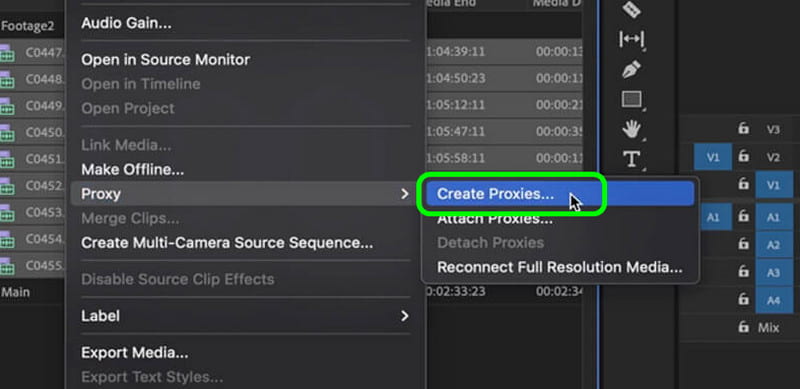
In Premiere Pro, the proxy videos are low-resolution copies of the original video. Creating a proxy copy is ideal if the software can't deal with high-resolution videos. With this method, you can fix the playback lagging and choppy issues.
Solution 6: Mute FX
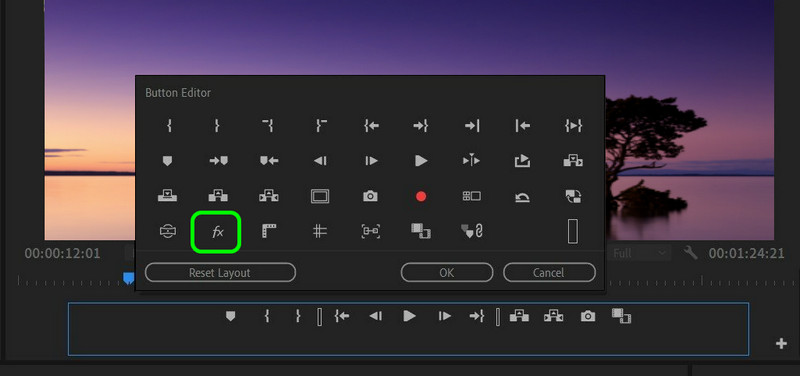
Visual and audio effects can also be a factor in playback lagging. It can even significantly increase the working size of the video files. With that, the best solution is to mute the effects or FX from the software. Proceed to the playback toolbar and click the FX button to do that.
Solution 7: Increase Memory Allowance
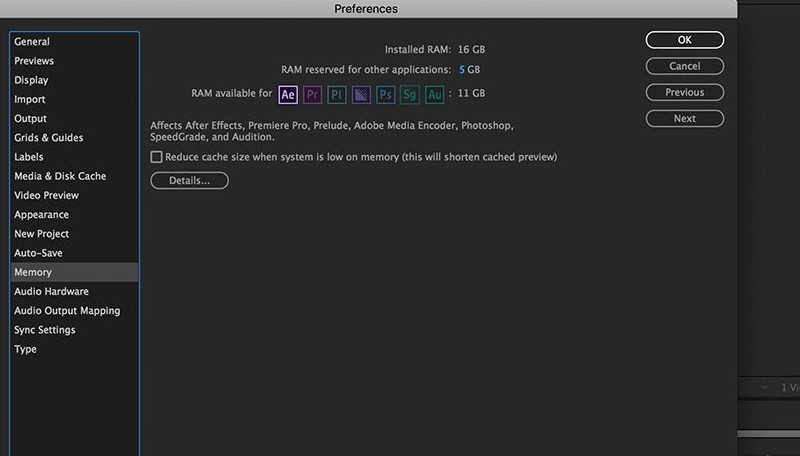
You can increase the memory allowance when encountering a choppy playback to fix the issue. Navigate to the Edit > Preferences > Memory option and change the value of RAM reserved for the application to a lesser value. This way, it can increase the available RAM for Premiere Pro.
Part 4. Bonus: Best Video Repair Software
Can't you play your video on your multimedia player? There is a chance that the video is corrupted or doesn't have the proper codec. In that case, the best thing to do is to fix your video. If you are searching for the best way to fix the video, use Vidmore Video Fix. With this video repair software, you can instantly restore your corrupted or damaged video easily and quickly. Plus, you can navigate all the functions smoothly since it can offer a comprehensive layout, making it suitable for all users. Aside from that, it can also provide a preview feature, allowing you to see the result before proceeding to the saving process. See more features below if you want to learn more about the software.
More Features
• It can offer an ultra-fast video repair procedure.
• It can turn video to a higher quality.
• The program supports various input formats, such as MP4, MKV, VOB, AVI, MOV, M4V, etc.
• It can provide a neat and simple design for more straightforward navigation.
• The software can fix various video issues, like pixelation, blurry, no sound, flickering, stuttering, choppy, and more.
You can follow the simple video repair procedure below to learn how to fix corrupted and damaged videos.
Step 1. Download Vidmore Video Fix on your Windows or Mac computers. Then, launch it to start the video repair process.
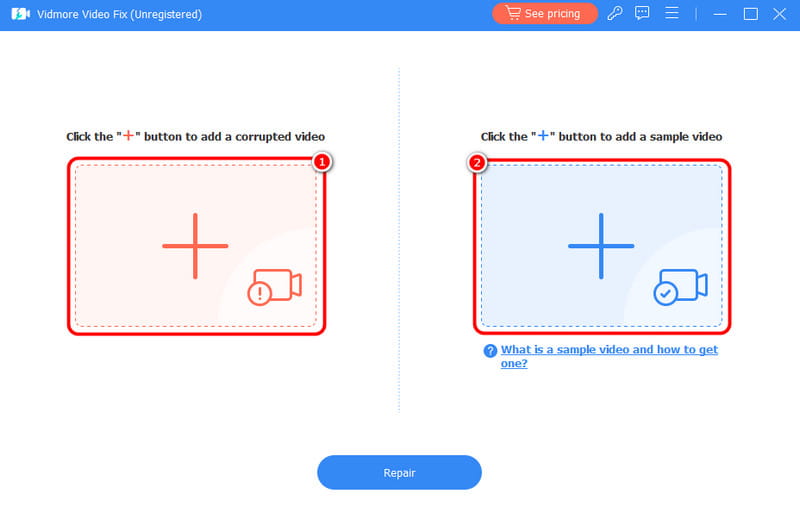
Step 2. After that, click Red Plus to add the corrupted or damaged video you want to repair. Then, add the sample video by hitting the Blu Plus option.
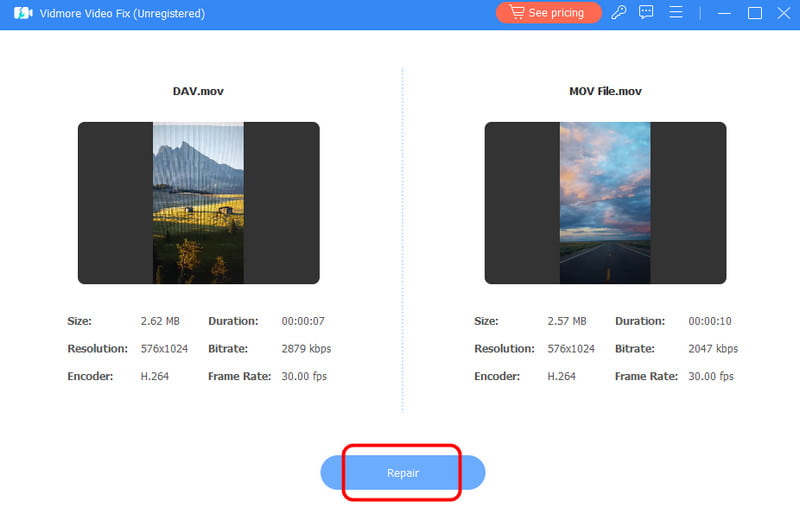
Step 3. For the next process, click the Repair button below. After that, you will see that the software will quickly give you the desired results.
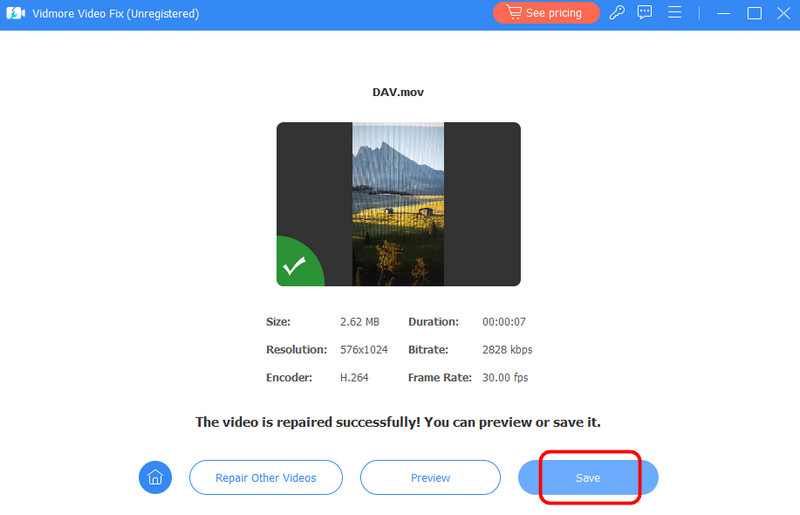
You can also click the Preview option to see the fixed video before the saving process.
Step 4. Click Save to save the repaired video on your computer.
This helpful method lets you fix your corrupted video quickly and efficiently. With that, you can start playing your repaired video on your MP4 player and other multimedia players. Thus, use Vidmore Video Fix to fix your video files for smooth playback.
Conclusion
To fix Premiere Pro lagging playback issues, you can use all the methods provided in this article. You will also get more ideas on how to know if the video is lagging and why the software is not performing well. Plus, if you have a corrupted or damaged video, we recommend utilizing Vidmore Video Fix. This software is ideal to repair your video while enjoying the best quality for a better viewing experience.