How to Take A Screen Capture on A Laptop for On-Screen Activities
People buy and use laptops for various purposes. They use it for work, school, or even for entertainment. But there will come a time when they’ll need to record their laptop screen. In most cases, the reason is for preservation, and they want to revisit it. If you’re one of them but struggle to find a reliable screen recorder, read this post. Not only will we provide screen capture recommendations, but we will also show you how to use them. Without further discussion, let’s learn how to screen record on a laptop.

PAGE CONTENT
- Part 1. Record Laptop Screen with Vidmore Screen Recorder (Windows and Mac)
- Part 2. How to Screen Capture on Laptop Using Built-In Recorder on Windows
- Part 3. How to Screen Record via Built-In Recorder on Macbook
- Part 4. How to Record Video on Laptop Using Bandicam
- Part 5. How to Capture Laptop’s Screen via OBS
- Part 6. FAQs About How to Screen Record on Laptop
Part 1. Record Laptop Screen with Vidmore Screen Recorder (Windows and Mac)
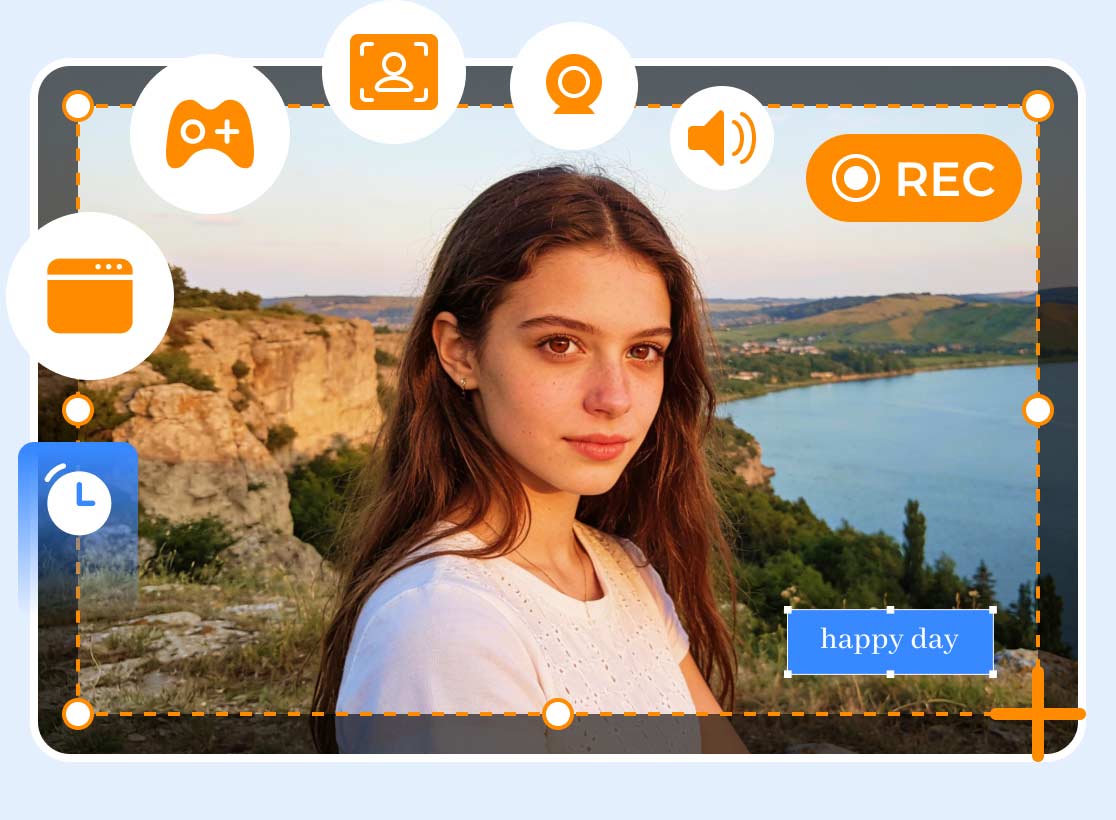
Whether you’re a Windows laptop or Macbook like Macbook Pro, Macbook Air 13, etc. user, Vidmore Screen Recorder can help you. It is a popular video and audio recorder that lets you record all your on-screen activities on your computer. Also, it can capture your webcam, meetings, gameplay, microphone, and more. It also features scheduling your recordings. So that, even if you’re away from your laptop, you can begin your recording. Not only that, but clipping recorded video before saving it is also possible. Thus, it gives you more ways to personalize it by removing excess parts. Now, let’s learn how this laptop display recorder works below.
Step 1. Begin by acquiring Vidmore Screen Recorder using the Free Download button below. After that, install and launch it on your laptop.
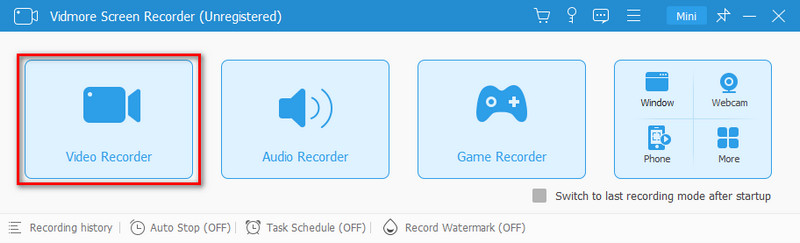
Step 2. From the tool’s interface, click the Video Record option. Then, you can adjust the recording area. Decide what to include in the recording, like webcam, sound, and microphone.
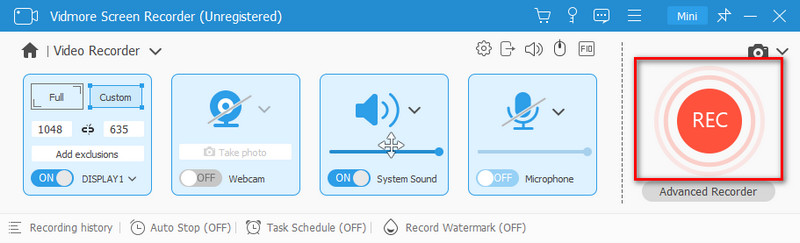
Step 3. Once ready, hit the REC button to start recording what’s happening on your laptop screen. When you’re done, you can click Stop to finish recording.
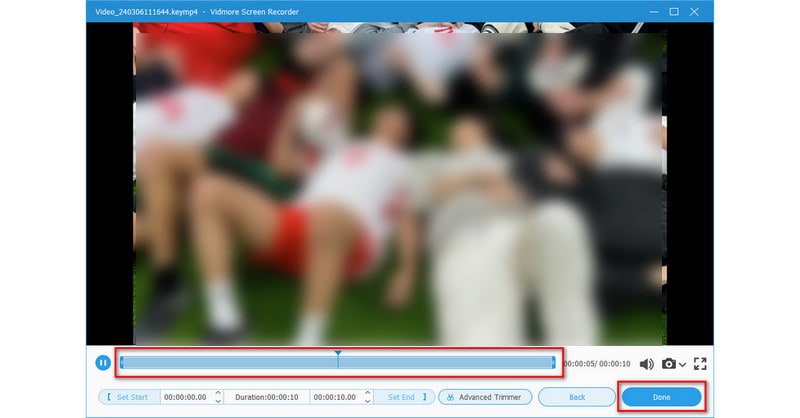
Step 4. Before saving the video, you can trim it to remove unnecessary parts. Finally, click the Done button to export the captured video screen.
Pros
- Offers an intuitive and easy-to-operate user interface.
- Provides different recording modes, like recording the entire screen, specific areas, etc.
- Infused with a real-time drawing feature, letting you add text, arrows, and so on.
- Allows trimming, setting output format, quality, etc., of the recorded video before saving.
- Saves recordings in popular formats like MP4, MOV, WMV, AVI, etc.
- It can record and export high-quality videos without affecting the normal operation of your laptop.
Cons
- It is paid software, yet it offers a free trial version.
Part 2. How to Screen Capture on Laptop Using Built-In Recorder on Windows
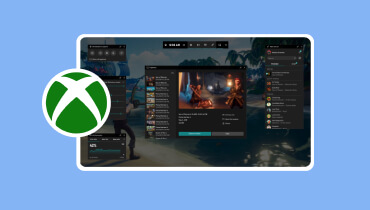
The Xbox Game Bar is the built-in screen recorder of Windows laptops. It is also a vital part of the Windows operating system. It was originally designed to capture gameplay on Windows PCs. Then, it has evolved into a versatile tool for recording various screen activities. Now, it offers a convenient and available option to record your laptop screen. Thus, you don’t need to download any software. Here’s how to use it:
Step 1. Open the Xbox Game Bar by pressing the Windows + G keys at the same time.
Step 2. In the Game Bar panel, you’ll find several options. Click the Record button or press the Windows key + Alt + R to begin recording.

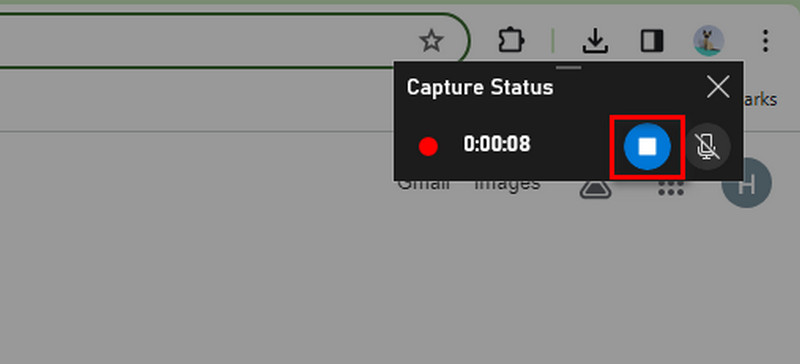
Step 3. Once recording starts, the Game Bar will minimize. Once done, click the Stop button in the Capture Status. Optionally, you can press Windows Key + Alt + R again to finish recording.
Step 4. Finally, recordings are saved in your Videos' local storage folder by default. It has a subfolder named Captures.

Pros
- No need for downloads or installations.
- Simple interface with intuitive controls.
- Doesn't consume significant system resources.
Cons
- It has limited recording options. You cannot choose specific areas or applications.
- It cannot record content from a webcam or a secondary device.
Part 3. How to Screen Record via Built-In Recorder on Macbook
QuickTime Player is a default software on macOS. Yet, it is not just a media player but it can also be your screen recording tool companion for your Mac. If you’re a Macbook user, you can capture your screen using this built-in solution. With that, you don’t need to look or install software to record your Macbook screen. But note that it offers limited screen recording options. Despite that, learn how to use this with the guide below.
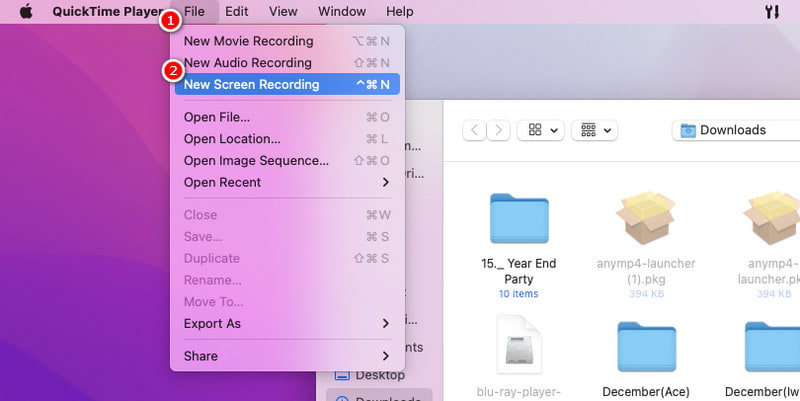
Step 1. In the Applications folder, search for QuickTime Player on your Macbook. In the menu bar at the top of your screen, click File and select New Screen Recording.
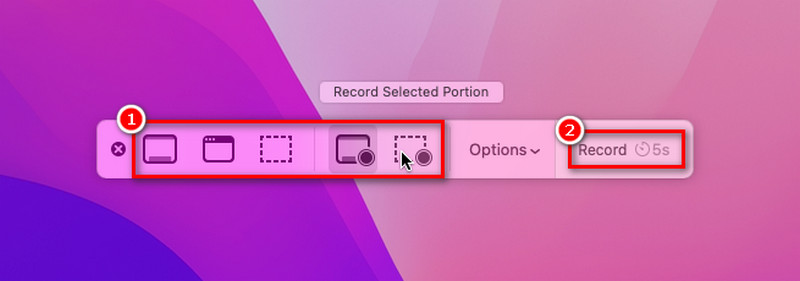
Step 2. Then, choose to record the whole screen or select a specific portion. Now, click the Record option to start recording your screen.
Step 3. After recording your desired screen, press Command + Control + Esc to stop the recording.
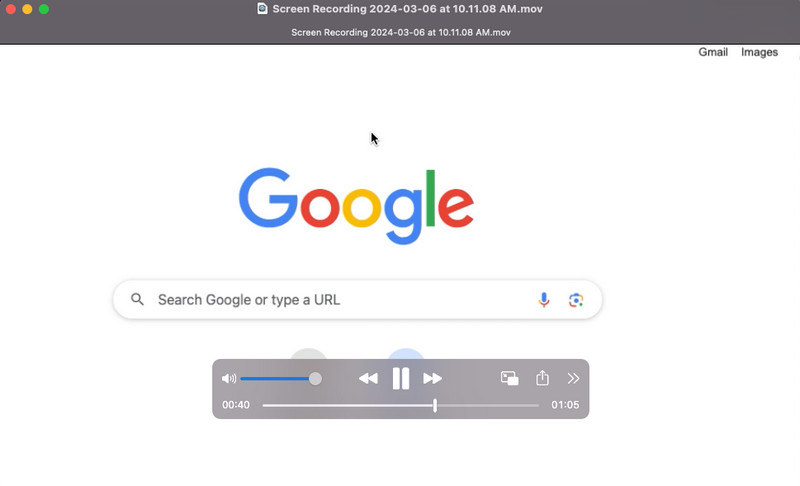
Step 4. The QuickTime Player will open the recorded video in a new window. From here, you can review your recording. Finally, save it by choosing File > Save or press Command + S.
Pros
- Pre-installed on Macbook computers.
- It can also record system audio and external microphone input.
- Allows trimming the beginning and end of recordings.
Cons
- It has no scheduled recording option.
- Lacks advanced editing functionalities like adding text overlays, transitions, or effects.
Part 4. How to Record Video on Laptop Using Bandicam
Another laptop screen recorder software you can try is the Bandicam. The tool is designed for Windows PCs. It caters to the needs of users, from gamers to professionals. It can capture high-quality screen recordings, gameplay, and even external device input. Yet, it can be challenging to navigate this tool, especially for new users. The main reason is due to the extensive features provided in its interface.
Step 1. Get Bandicam from its official website to download and install it on your laptop. Then, open it after installing.
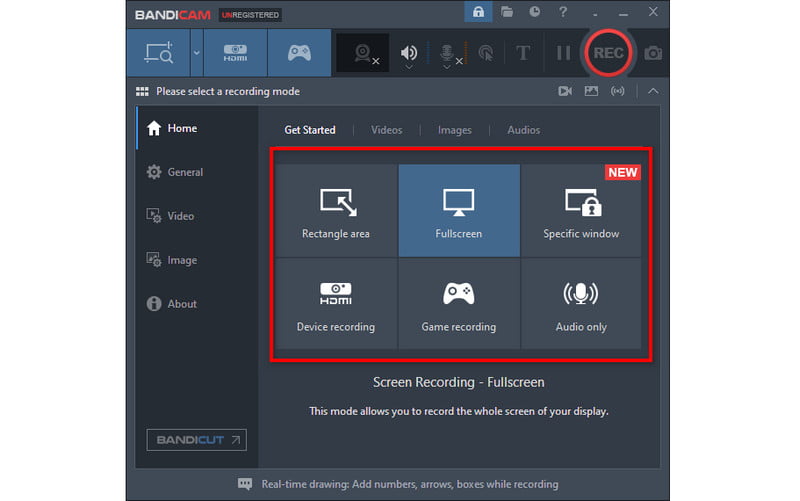
Step 2. Next, select your recording area, audio options, and other settings.
Step 3. Then, click the Record button or use the hotkey (default is F12) to initiate the recording.
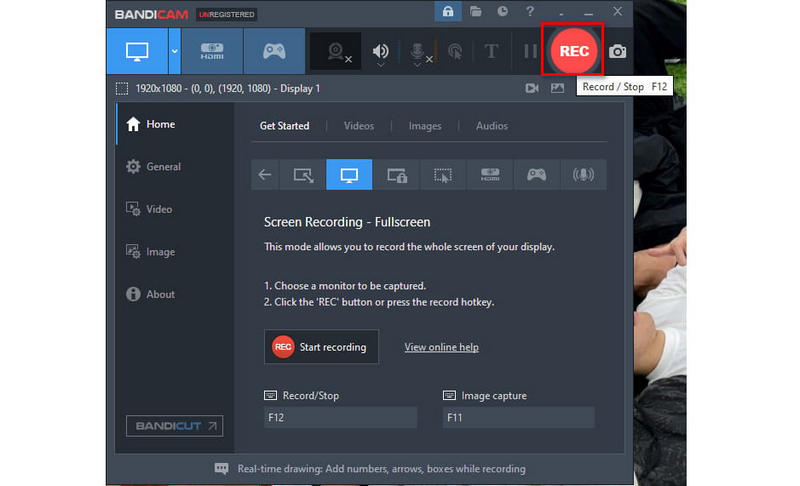
Step 4. Lastly, hit the Stop button to finish recording your screen. You can do it on the minimized version at the top of your screen or in the tool itself.

Pros
- Ability to capture high-quality recordings.
- Provides control over frames per second (FPS) settings while recording.
- Includes real-time drawing and annotating tools.
Cons
- It includes a watermark on the recorded videos.
- It has a steep learning curve to explore its full range of capabilities.
Part 5. How to Capture Laptop Screen via OBS
Last but not least, we have OBS, a popular free and open-source software. It stands out as a screen recording and streaming tool for Windows, macOS, and Linux. That said, you can use this to capture your laptop screen. At the same time, it offers advanced control and customization for your recording needs. However, given its extensive functions, some find it complicated to use. Click here to get OBS alternatives.
Step 1. Firstly, download OBS and install it on your laptop. Once done, launch the software.
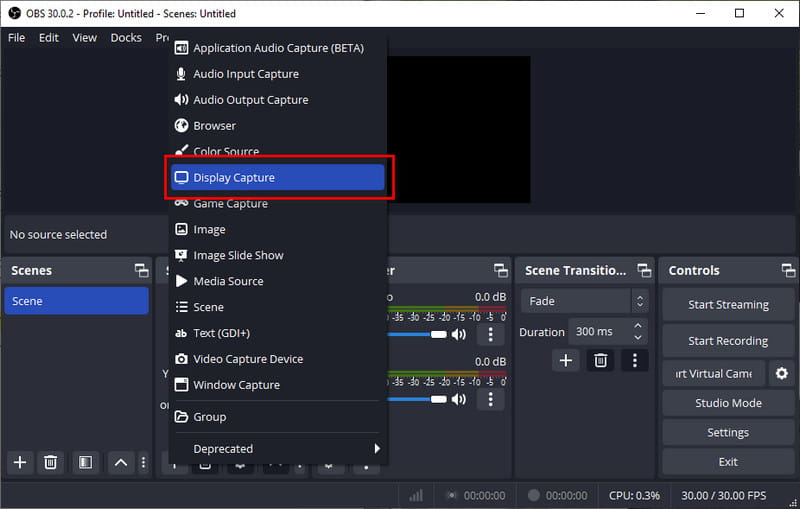
Step 2. Next, click the + button under the Sources section. Select Display Capture and name it if needed. Now, hit OK.
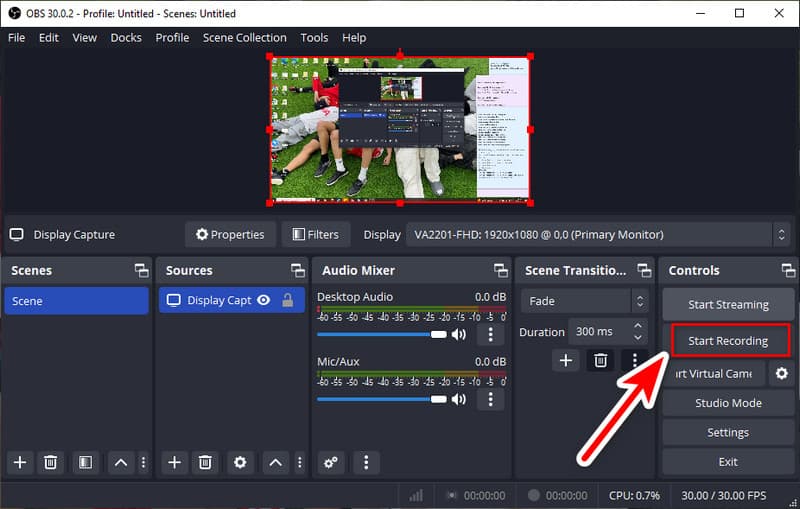
Step 3. Then, choose the Start Recording button at the bottom right corner of your current window. When finished, select Stop Recording.
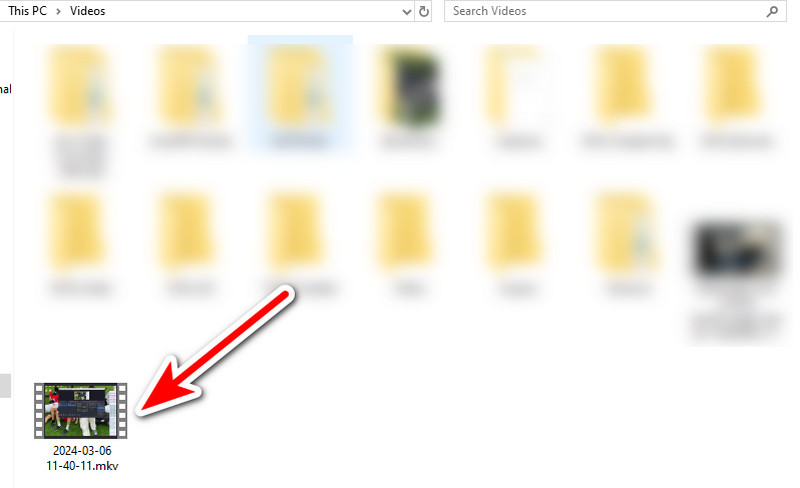
Step 4. Recorded videos are saved by default in the Videos folder under your user directory. Finally, you’ll find the captured video.
Pros
- It is free to use and open-source.
- Allows fine-tuning recording settings, adjusting audio sources, etc.
- Supports plugins and extensions.
Cons
- It offers a steeper learning curve for new users.
- The software is resources-extensive, which requires a powerful computer.
Part 6. FAQs About How to Screen Record on Laptop
How do I record full screen on my laptop?
If you wish to record full screen on your laptop, there are many ways to do it. You can use the built-in methods or use reliable software. One such tool you can use is the Vidmore Screen Recorder. With it, you can adjust the aspect ratio or recording area and choose full screen.
How do I record my screen on my laptop with sound?
Ensure you toggle on the required audio settings when recording your laptop screen with sound. Also, ensure microphone access and system audio recording are allowed.
Does Windows 10 have a screen recorder?
Of course, yes! Windows 10/11 has a built-in screen recorder. As mentioned above, it is called Xbox Game Bar. Press Windows Key + G to access it. You can also follow the steps above to learn how to use it.
How to record audio on a laptop?
There are several options to record audio on a laptop. But the one we highly recommend is Vidmore Screen Recorder. It has an Audio Recorder feature that allows you to record your audio on the laptop. From there, you can choose to record the system or microphone only or choose them both. This is also the same method you can try to know how to record music on a laptop.
How to record myself on my laptop?
To record yourself, including your laptop screen, you can use Vidmore Screen Recorder. First, ensure that you enable using the camera in the tool. Then, toggle on the webcam option in the Video Recorder section. Finally, you can record yourself.
Conclusion
To wrap it up, learning how to screen record on laptop has become much easier through this guide. Among the options provided, one method stands out the most. It is the Vidmore Screen Recorder. Indeed, it is a reliable software that you can use both on a Windows laptop and a Macbook. It can also be your all-in-one solution for your screen recording needs with smooth running.