How to Make Screenshot on Windows Computer and Laptop Easily
Taking screenshots on Windows may be a bit mundane as far as tech skills go, but it is still a hard job for average people. What a screenshot is used for? It is handy at work, especially when you need to record your screen, save it as an image and send it to your college, tech support, customer, or business partner.
If you are planning on taking a screenshot on PC, you should know that you have more than one method. This guide intends to show you four ways to do the task in detail.


- Part 1: One-Stop Solution to Screenshot on Windows
- Part 2: How to Screenshot on Windows with Shortcuts
- Part 3: How to Screenshot on Windows via Snipping Tool
- Part 4: How to Screenshot on Windows 10 Using Game Bar
- Part 5: How to Take Scrolling Screenshot on Windows
- Part 6: FAQs of Screenshot on Windows
Part 1: One-Stop Solution to Screenshot on Windows
No matter shortcuts or command is difficult to learn compared to GUI. Vidmore Screen Recorder is the tool you are looking for. It is not only easy to use, but also offers extensive tools, such as edit it once you take a screenshot. More importantly, it is totally free to use without any restrictions.
Main features of the best screenshot tool for PC
- Take a screenshot for full screen, certain window, or custom region.
- Add text, shapes, and paintings on screenshot directly.
- Save screenshots in plentiful formats, like PNG, JPG, GIF, TIFF, etc.
Briefly speaking, it is the best way to make partial screenshot on Windows 10/8/7 and Mac OS X.
How to Take a Screenshot on PC
Step 1: Install screenshot tool
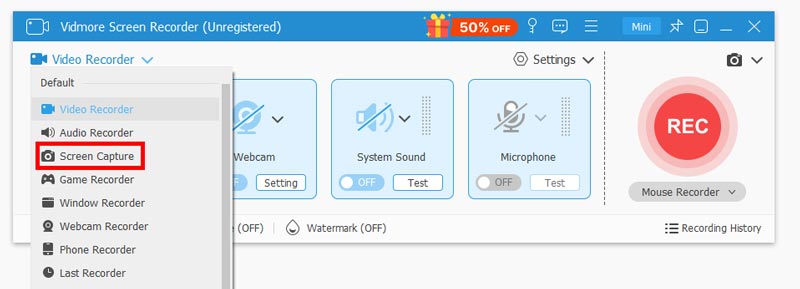
Launch the best screenshot tool after you install it to your PC. It is free to use with no sign-up or other restrictions. Select Screen Capture in the main interface to trigger the screenshot tool.
Tip: To set the output format and other options, click the Settings icon to open the Preferences dialog. Go to the Output tab from left hand column, and customize Location of screenshot files and Screenshot formats.
Step 2: Make a screenshot
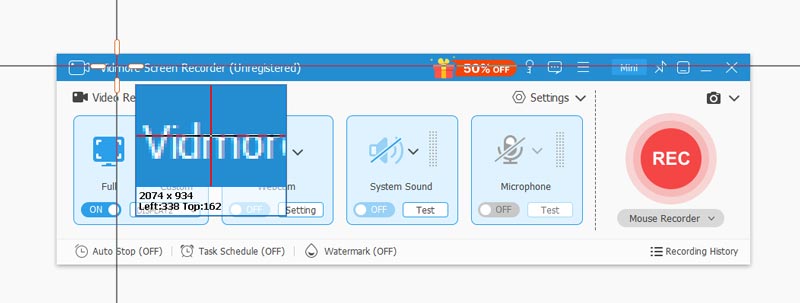
Now, you have two options. To take a screenshot for a window on desktop, click the window directly. If you want to take a partial screenshot on Windows, click one corner, keep press the left mouse and drag it to cover the entire region.
Step 3: Preview and save screenshot
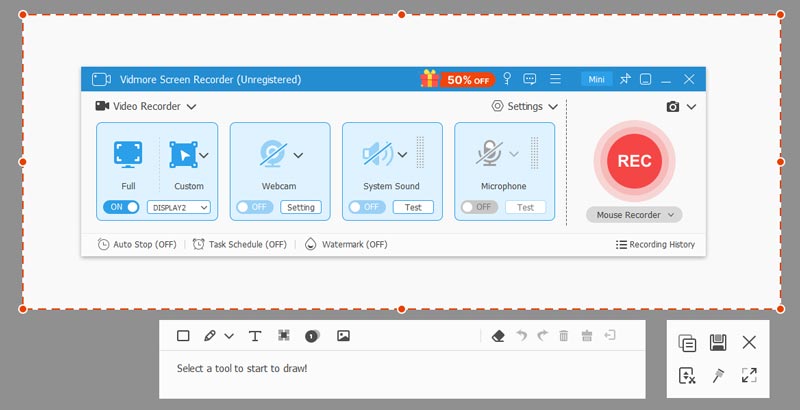
Once you release the left mouse, the screenshot will show up for previewing and editing. On the menu bar, select T icon, customize the color, font and more, and add text on the screenshot. If you want to draw on the screenshot, select the Pen tool, size and color, then do what you want. It also provides plentiful shapes. After editing, press the Save button to save a screenshot on Windows.
Moreover, this software also works as the video and audio recorder for Windows, which lets you capture the music and videos on Windows computer easily.
Part 2: How to Screenshot on Windows with Shortcuts
If you look at your keyboard, you will find a key labeled PrtScn. On laptop, the Print Screen command may be combined with another function on a single key. In such case, it must work with the Fn key together. To help you understand Windows screenshot shortcuts, we list them below:
1. PrtScn or Print Screen: Take a screenshot for full screen and save it to your clipboard.
2. Alt + Print Screen: Take a partial screenshot for the topmost window on your desktop and save it to your clipboard.
3. Win + Shift + S: Take a partial screenshot for a custom region and save it to clipboard. Once you press the shortcut, your cursor will become a cross. Click on one corner and drag it to make a screenshot. Let your mouse go, and the screenshot will be saved to clipboard.
4. Win + Print Screen: Make a screenshot for entire screen and save it to your library. Where are screenshots saved on Windows 10? By default, the path is C:Users to user name to Pictures to Screenshots.
If a screenshot is saved to clipboard, follow the steps below to save it to your hard drive.
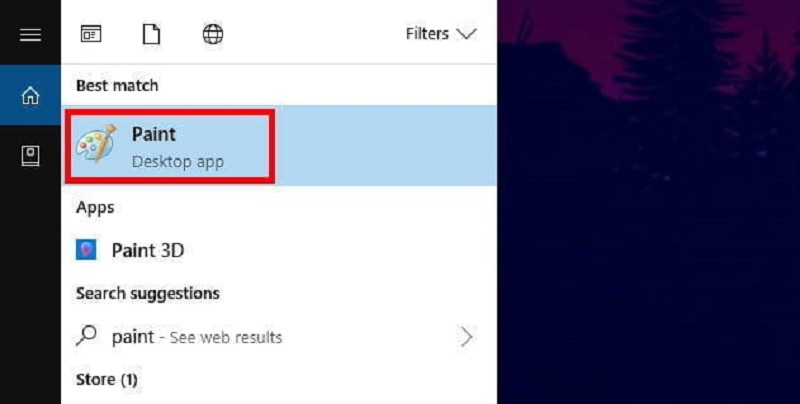
Step 1: Open Paint or Paint 3D. Go to the Start menu at the bottom left corner, search for paint and open it.
Step 2: Create a new image, and press Ctrl + V keys on your keyboard or click the Paste menu to paste the screenshot. Then you can edit the screenshot as you wish.
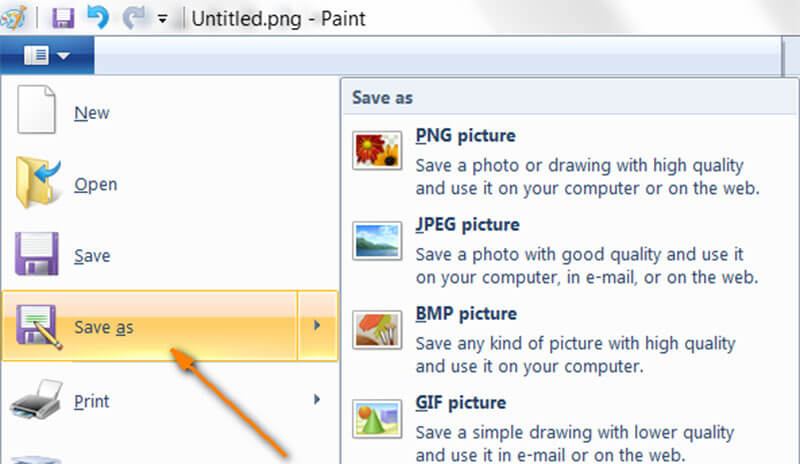
Step 3: To save the screenshot on PC, go to the File menu on the top ribbon, select Save as, and pick your favorite format, such as JPEG, PNG, and more.
Step 4: On the save-image dialog, enter a filename, find the destination folder, and click on the Save button.
Part 3: How to Screenshot on Windows via Snipping Tool
The Snipping tool is not something new on Windows. Of course, you can use this built-in tool to screenshot on Windows 7/8/10. As Microsoft keeps improve it, the Snipping Tool works a bit different on old and new systems. We use a Windows 10 to show you the workflow.
Step 1: Expand the Start menu on Windows 10/7, search for snipping tool and select Snipping Tool from the list. For Windows 8/8.1, swipe the right side of the screen, select Search and find the Snipping Tool.
Step 2: Open the screen or window you wish to screenshot on your desktop. Turn to the Snipping Tool menu bar, open the Mode menu and select a proper mode. For some versions, the Mode menu is compacted into the downward button next to New menu. The Free-form Snip lets you draw any shape with your mouse and take a screenshot for selected area. Other modes work as their name.

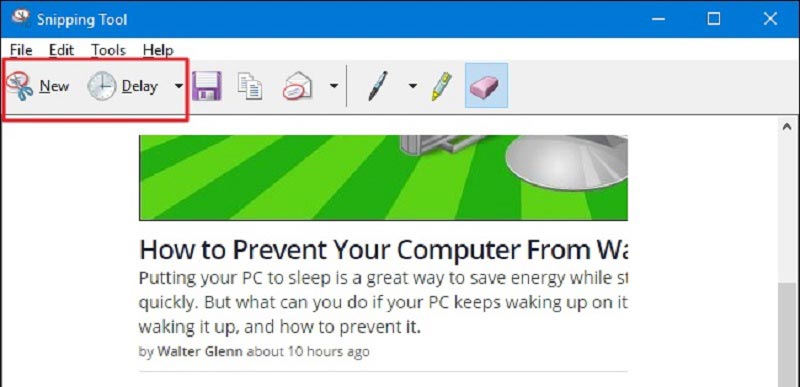
Step 3: Optically, click the Delay menu and pick a number for countdown. Selecting 5, for example, will make a 5-sencod countdown. If you want to set custom options, click Options menu.
Step 4: Once you are ready, click the New menu, and make a screenshot on PC according to your setting. The screenshot will appear in the Snipping Tool. Now, you can draw on it with the Pen tool.
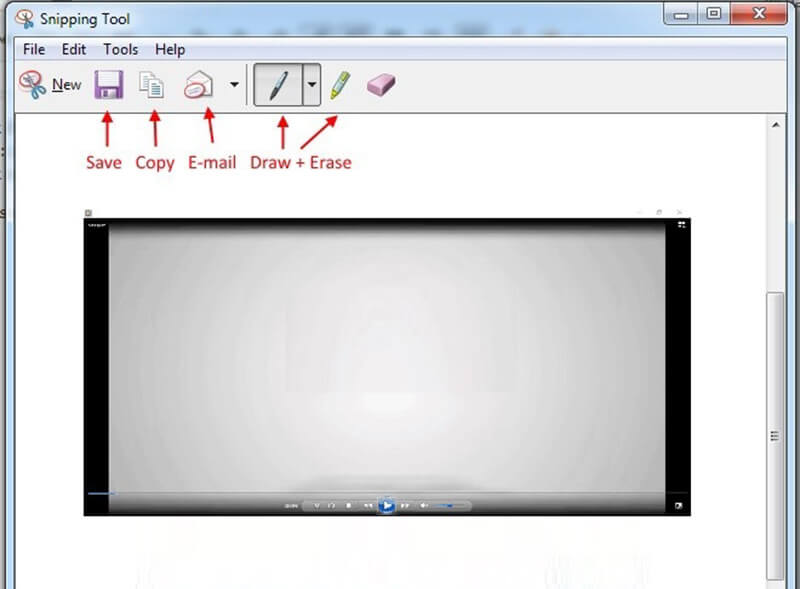
Step 5: Finally, you have three options to process the screenshot, Save to your hard drive, Copy it to clipboard, or send it to your friends via E-mail. If you pick Save, the save-screenshot dialog will pop up. Navigate a proper directory, enter a filename, select a preference image format, and click the Save button.
Part 4: How to Screenshot on Windows 10 Using Game Bar
Game Bar is the new function on Windows 10. Microsoft introduced it into Windows aiming to help users to record and capture gameplay. The Screenshot tool lets you take a screenshot on desktop or while recording screen.
Step 1: Go to the Start menu, open Settings, and locate the Game DVR tab.

Step 2: Toggle on Record game clips and screenshots using Game DVR. Plus, you can customize the hotkeys at Take screenshot area. Scroll down to find the Saving captures section and click Open folder to reset the destination folder.
Step 3: Press Win + R keys on your keyboard to bring up the Game Bar window. When prompted, check Yes, this is a game. Then the Game Bar will pop up.

Step 4: Select the Camera icon to take a screenshot on Windows 10 directly. Alternatively, hit the Record button to capture the gameplay. During the process, pick the Camera icon to make a screenshot.
Note: The Game Bar is only able to take a screenshot for entire screen, but it can do it while capturing your gameplay. The screenshots will be saved as PNG files in the Captures folder in your video library by default.
Part 5: How to Take Scrolling Screenshot on Windows
Unfortunately, the built-in utilities cannot take scrolling screenshot on Windows. A scrolling screenshot enables you to take a screenshot longer than one screen. It is useful when you want to capture webpages and programs with long interface. ShareX is an open-source and free tool that can help you take scrolling screenshots on PC.
Step 1: Open the screenshot utility from your desktop. You can download it from the official website for free. Then start the program or visit the webpage you wish to screenshot on PC.
Step 2: Click and expand the Capture menu on the left hand column and select Scrolling capture. The utility will display a capture area with dotted lines. Next, click on the target area to bring up more options.
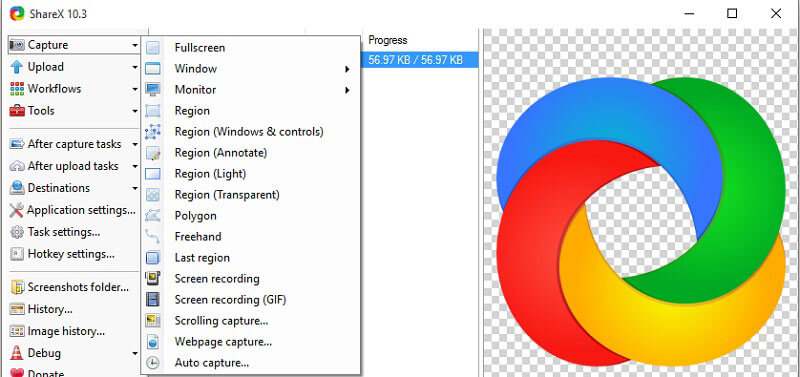
Step 3: Then click Select window or control to scroll. The utility will select the entire webpage by default. Hit Start scrolling capture button. Now, you have two options. To take a partial screenshot, scroll down to the desired position and click the Start capture button. If you wish to screenshot entire webpage or interface, scroll down to the end directly.

Step 4: Now, the output window will show up. Set the options based on your need. Then click Upload/save depending on after capture settings button. Close the output dialog and look at the path under URL.
Part 6: FAQs of Screenshot on Windows
How do I take a screenshot without PrintScreen button?
You have more than one way to take a screenshot on Windows. Even though the Print Screen key is not working, you can use Snipping Tool or Game Bar to screenshot entire screen, specific window or custom region. Moreover, there are plentiful third-party screenshot tools for PCs, such as Vidmore Screen Recorder. Whether you're a Lenovo, Dell, or HP user, you can take screenshots with this powerful tool.
Where can I find the Print Screen key?
Many people reported that they cannot find any key on keyboard labelled Print Screen. In fact, the key may be printed with various letters, such as PrtSc, PRTSCN, Prt Scrn, etc. Moreover, the location of the print screen key is varied on different machine. Most of laptops, for example, have the Print Screen key on the top row. For PCs’ keyboards, it usually locates between number keys and letter keys. You can read the manual or contact your manufacturer to find the right key.
How do you take screenshots on Google Chrome?
Google has introduced the screenshot function into Chrome. It means that you can take screenshots on Google Chrome directly. Open your Chrome, visit the webpage you wish to capture. Then click the Options button with three-dot icon at the upper right corner, select More tools, and then Developer tools. Press Ctrl + Shift + P, type Screenshot in the line and pick the proper command, such as Capture full size screenshot. Now, the webpage will be saved as s a screenshot. Bear in mind that this feature is only available to viewable screen but not web apps.
This article has shared the best ways to take screenshots on Windows. If you just want to capture your screen and save it as a still image, the key combinations and built-in Snipping Tool can meet your need. For advanced demand, you have to use a third-party tool. ShareX, for example, is able to take a scrolling screenshot for webpages or long interface. Vidmore Screen Recorder is a good way for beginners and average people. More questions? Please write down below.