How to Take a Screenshot on Surface Pro
If you’re one of the adopters of Surface Pro or Surface Laptop, it will take you some time to figure out how to screenshot on Microsoft Surface. For those Surface computers with keyboard, it is easy to capture anything on the desktop with a simple press of a keyboard’s Print Screen key. But what if you want to take a screenshot on Surface Pro without PrtScn button or keyboard? Don’t worry, whether you use a Touch or Type Cover, use the tablet by itself, or rely on a Surface Pen, this comprehensive guide will show you different methods for taking screenshots on your Surface Pro effortlessly.


Part 1. How to Take a Screenshot on Surface Pro without Keyboard
There are three different ways to make screenshots on Surface Pro without Keyboard. Choose one and have a try.
Option 1. Screenshot on Surface Pro with Screen Capture Tool
For doing the screenshots on Surface Pro with high quality image, you may try a professional tool called Vidmore Screen Recorder. It allows you to take a screenshot on Surface Pro or Microsoft Surface Laptop easily and also lets you crop screenshots in a fuss-free way. Besides, you can draw a rectangle, arrow, line, etc., on the screenshot, and add the captions into the picture and more. Follow the steps to take a screenshot on Surface Pro using this tool.
Screen Recorder
- Take a screenshot on Surface Pro with high image quality.
- Screenshot on Surface Pro with full screen or customized area.
- Save Surface Pro screenshots in any image format like JPG, PNG, and more.
- Powerful editing features to edit screenshot and add various elements to it.
- Record online videos, 2D/3D gameplay, webcam, video/audio chats, music and more.
Step 1. First, you can click the download button above to install and run this free Surface Pro screenshot software on your computer. Choose the Screen Capture feature when you enter this screenshot program. The screenshot function is totally free.
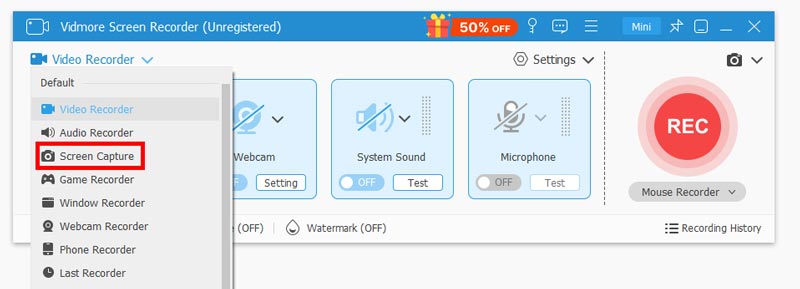
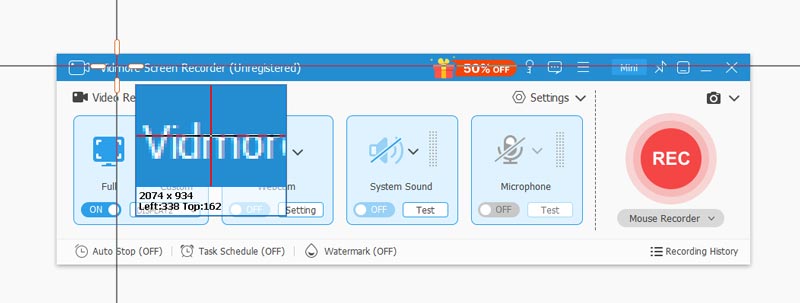
Step 2. After you choose the Screen Capture feature, you can see a pop-up window appears. During this step, you can freely capture a rectangular screen by dragging your mouse. Or you can choose to capture a full-screen screenshot or a custom window as you like.
Step 3. When you take a screenshot in Surface Pro, you are allowed to edit it. You are offered many editing options. For instance, you can freely draw a rectangle, arrow, or line on the Surface Pro screenshot, or add some elements to it.
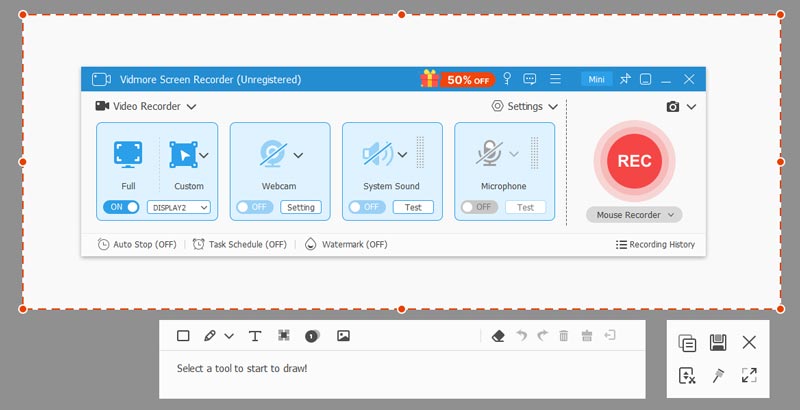
Step 4. After editing, you can click the Save button on the bottom right corner of the screenshot window to save the Surface Pro screenshot. You can save it in JPG/JPEG, PNG, BMP, GIF, or TIFF format based on your setting.
Besides taking screenshots, it also allows you to record screen on Windows 10 with high quality.
Option 2. Screenshot on Surface Pro with Pen
You can also use Surface Pen that works as active digitizer in the display section to take a screenshot on Surface Pro. Double click on the top button (eraser button) on top of the Surface Pen. Then, you can edit, crop, and save the screenshot by click on the Save as button on the top right of the screen.
Option 3. Screenshot on Surface Pro Using Buttons
Or you can use Surface Pro buttons to take a screenshot. Press and hold the Power/Windows logo button and the Volume Down button. Then, it takes the screenshot of your active screen and saves the screenshot to the device folder as an image.
Part 2. How to Take a Screenshot on Surface Pro with Keyboard
If you have a Surface Type Cover attached, you can follow the traditional ways to take screenshots by using the dedicated PrtScn (Print Screen) key on the keyboard.
For capturing all entire screens:
Step 1. Press PrtScn key to taking a screenshot.
Step 2. Paste to your preferred programs like Paint or Word.
For capturing the active window:
Step 1. Press Alt + PrtScn key to taking a screenshot of the active window.
Step 2. Paste to your preferred programs like Paint or Word.
Here you may like: How to Crop a Screenshot on Windows
Part 3. FAQs of Surface Pro Screenshot
1. Does Surface Pro have keyboard shortcut for print screen?
Depending on your hardware, you may use the Windows Logo Key + PrtScn button as a shortcut for print screen. If your device does not have the PrtScn button, you may use Fn + Windows logo key + Space Bar to take a screenshot, which can then be printed.
2. How to find Surface Pro screenshots?
To locate your screenshots, open File Explorer from the taskbar. On the side navigation pane, select the Pictures folder, and select Screenshots.
3. How do I use Snipping Tool to take screenshots on Surface Pro?
There is a built-in screenshot program called Snipping tool that has more controls and functionalities to do screenshots. To open this too, type Snipping Tool into Cortana or search the Windows Accessories folder under All Apps. After launching the tool, you can take a screenshot in 4 ways such as Full desktop, specific program windows, any size of rectangle shape, and any form you draw manually.
4. How do I screen record on Surface Pro?
To record the screen on Surface Pro, you can use Vidmore Screen Recorder. It is specially designed to make the video and audio recording on both Windows 10/8/7/XP PC and Mac. It has the ability to capture anything displayed on your Surface Pro with the original quality.
Conclusion
After reading this post, you can get 4 methods to take a screenshot on Surface Pro. Leave us a message if you still have any doubt about the Surface Pro screenshot.