Various Methods to Compress Audio: Desktop, Mobile & Online
Audio compression enables sound editors to control the dynamic range by reducing the level when it rises above a particular threshold. This method reduces the span between the softest and loudest parts of the audio signal. It squeezes audio into smaller files without losing any audio data. Are you planning to reduce the audio file size by undergoing audio compression?
This post will present several audio compressors you can access to compress your audio into smaller files. It will provide a web-based, mobile, and desktop audio compressor to help you, and you can choose from it. Without further ado, please continue reading to learn how to compress audio.

PAGE CONTENT
- Part 1. Best Way to Compress Audio
- Part 2. How to Compress Audio in Audacity
- Part 3. How to Compress Audio in Premiere
- Part 4. How to Compress Audio in Audition
- Part 5. How to Compress Audio Files on iPhone and Android
- Part 6. How to Compress an Audio File Online
- Part 7. FAQs about Audio Compression
Part 1. Best Way to Compress Audio
An audio compressor application is considered best if it can compress audio files without spending much of your time and is hassle-free. With that, you can count on Vidmore Video Converter. It can help you, especially if you need a background or idea about compressing audio. This program has a section where several tools are located; one of them is what you will use to compress the audio. It can reduce your audio file size and get your compressed audio file in seconds.
- Reduces the audio file's size with high quality.
- Change the bitrate of the audio file as you like.
- Equipped with converter, ready-made themes, collage makers, etc.
- Support numerous audio and video file formats.
Below are steps on how to reduce audio file size using Vidmore Video Converter:
Step 1. To have complete access, download and install the program on your computer. After that, run the application to get started.
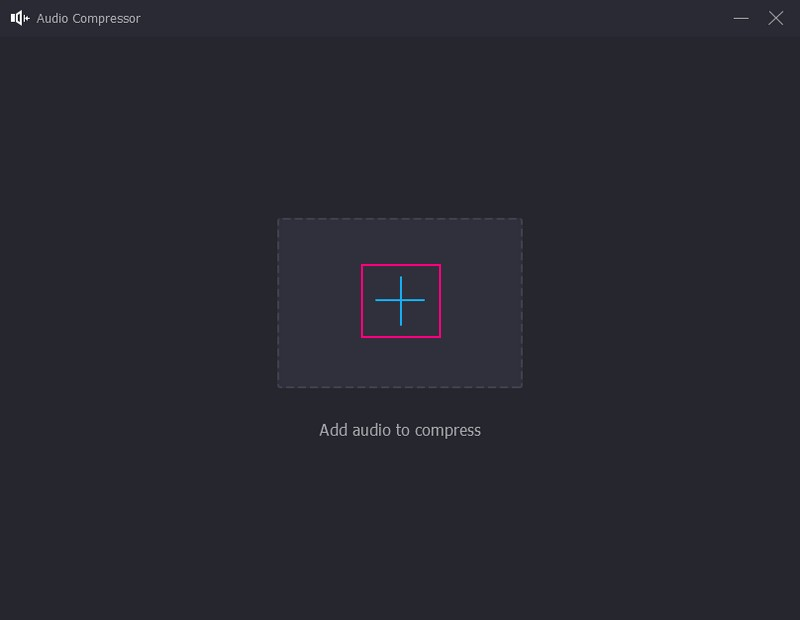
Step 2. Once the program is opened, head to the Toolbox tab, look for Audio Compressor on the list and click it.

Step 3. Hit the (+) icon to open your computer's folder and add the audio file you want to compress using the program.
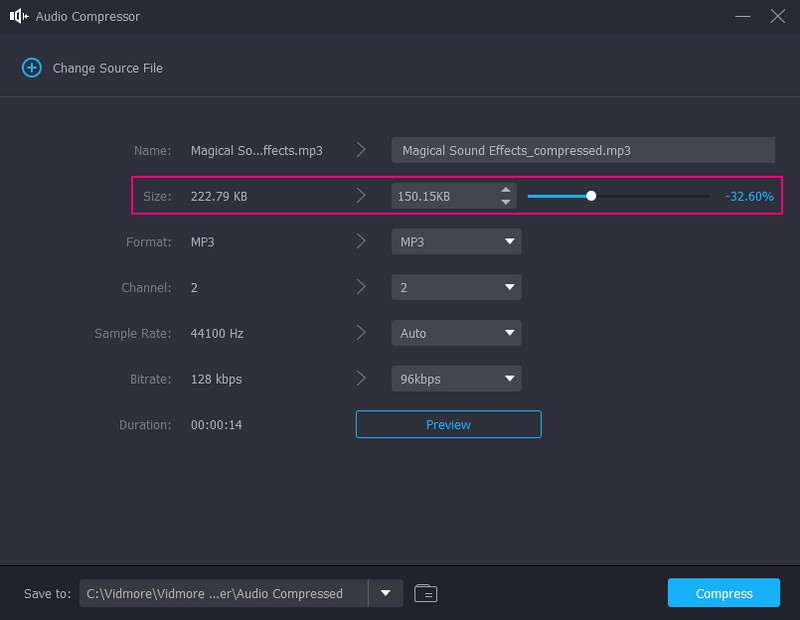
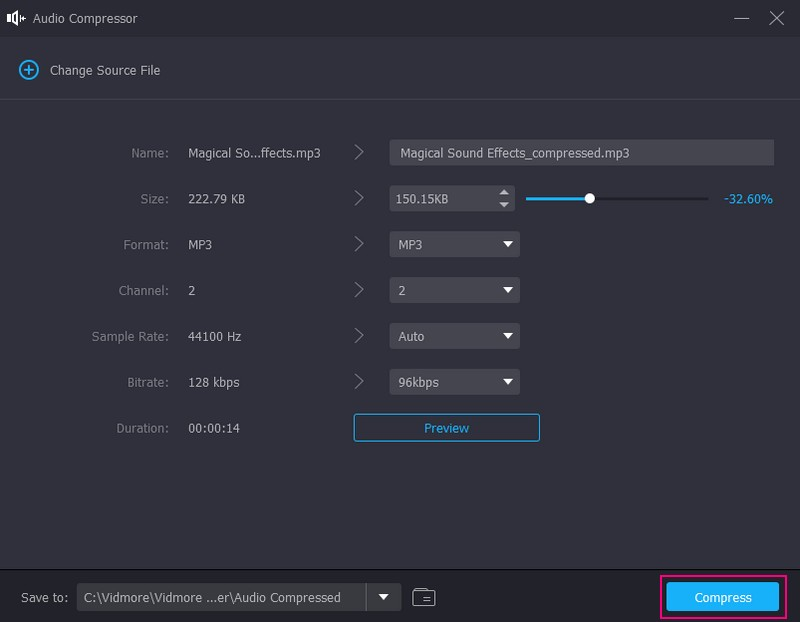
Step 4. You are directed to the main compression section, where you can see the several audio compression setting. Head to the Size option and adjust the audio file size by dragging the slider.
Therewithal, head to the Bitrate option, click the drop-down button, and choose the KBPs you prefer on the list. Remember, the higher the bitrate number, the better the outcome of the sound.
Step 5. Once done, hit the Compress button, and the compression will begin. After the procedure, a folder will appear where the audio file is located.
Part 2. How to Compress Audio in Audacity
Audacity is known as a free and open-source audio recording and editing program that is widely used across the globe. It can record via the microphone, import an existing audio recording, and remove background noise. This program has numerous features for recording and editing audio but compresses audio files. It has a built-in compressor that can help you compressor located in one section that can help you compress the audio file.
Below are steps on how to compress audio in Audacity:
Step 1. Download and install the program on your desktop by going to the official website.
Step 2. Open the program, head to the File menu, press Open, and locate the audio file you want to compress.
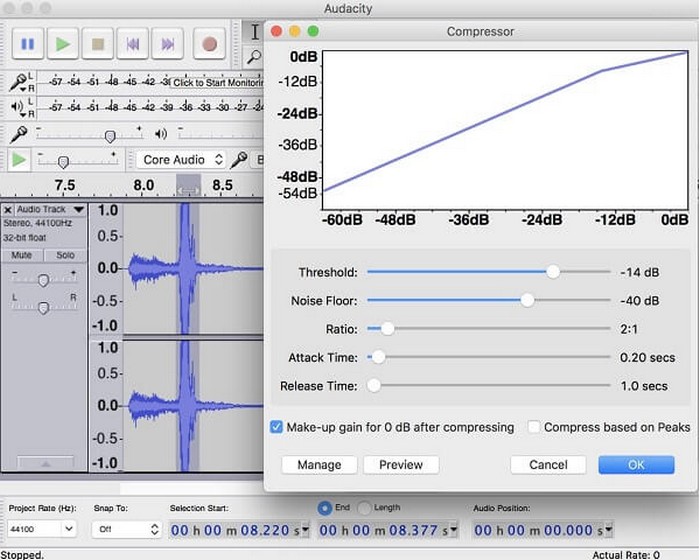
Step 3. Once the audio file is added, press CTRL + A on your keyboard to select the track you add. After that, once the track is highlighted, hit Effect, followed by Compressor.
After that, you will see the compression settings, where you can modify the Threshold, Noisefloor, Ratio, Attack Time, and Release Time. Adjust them based on your preference. You can also put a checkmark on the other two options. Next, tap the OK button to save the dynamic range you make.
Step 4. Once satisfied, head to the File again, click Export and select the format, whether MP3, WAV, or OGG. After that, your audio file will be saved in your desktop folder.
Pros:
It is accessible for free.
It is compatible with plug-ins.
It offers free effects.
Cons:
The previewing effect is slow.
It only has limited multi-track capabilities.
The spectral view is not confusing.
Part 3. How to Compress Audio in Premiere
Adobe Premiere Pro is a paid multi-functional program with numerous useful tools for improving video and audio quality. It enables you to add effects, distort, edit, and modify clips and tracks that you are working on. Besides that, it is packed with easy-to-adjust parameters to compress the audio file.
Below are the steps to learn how to compress audio in Premiere:
Step 1. Download and Install the program on your computer. After that, you should see the program prompt because of the loading pop-up that appears.
Step 2. Click the New Project button on the main interface to get started. Next, press the File menu and Import settings to add the audio file you like to compress.
Step 3. Once your audio file is added to the timeline, you will see your audio's loud with decibel measurement on the side. Head to the Effects, look for Dynamics under Audio Effects, and then Amplitude and Compression.
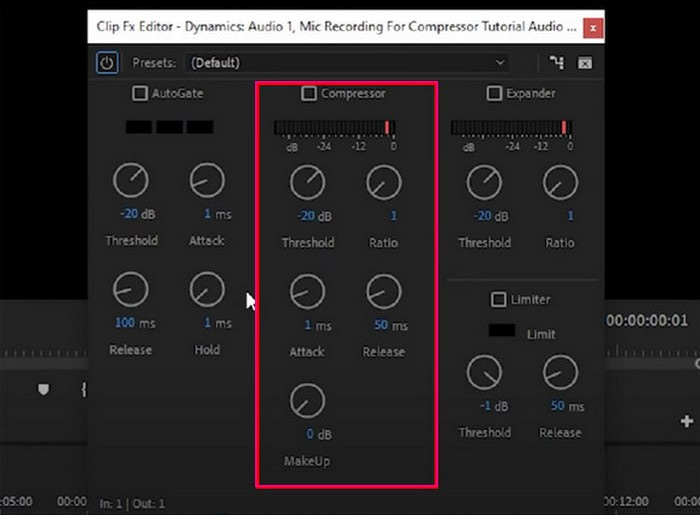
Next, open the Effect Control, then look at the effect you added. After that, hit the Edit button to start the compression process.
Step 4. Set the Threshold on how many decibels you like your audio to have. Next, go to Ratio and set 2-4, which are recommended. Next, keep the Attack and Release. Next, set the MakeUp to 7.
Step 5. After compressing, you can listen to your audio by clicking the Spacebar. Once done, return to File, select Export and Export As, and save your audio output.
Pros:
It is a professional audio and video editor.
It offers many options for audio and video editing.
It supports numerous audio and video file formats.
Cons:
The program is not free to use.
The program is challenging to manage and navigate, especially for beginners.
The program holds a massive space on your desktop.
Some users experience that when a project gets a little heavier, their computer will hang, or the program will crash.
Part 4. How to Compress Audio in Audition
Audition is a comprehensive program that enables users to create, edit, mix, and restoring audio content. It uses multi-track, spectral display, and waveform. Therewithal, it provides audio production and audio compression - excellently. Using this tool, you can access various controls for the audio compressor of the program. You can fine-tune the threshold, ratio, attack time, release time, and more. Besides that, it comes with different kinds of compressors suitable for different purposes.
Below are the steps on how to compress audio in Audition:
Step 1. First and foremost, go to the official download page of the program and get the installer. Next, follow the setup procedures to install it on your desktop. After that, launch the program after the installation.
Step 2. Head to the File at the top menu bar, select Open, and find the audio file you want to compress. After that, you will see green sound waves in the interface, indicating that your audio file has been added.
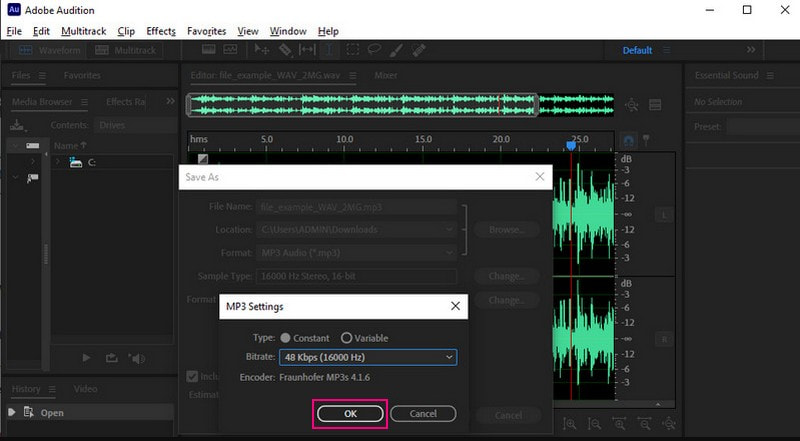
Step 3. Return to the File menu and select the Save As option to open a dialog box. From there, you will see the compression settings.
Step 4. Now, click the Change button linked with the Format settings. Here, you can adjust the Bitrate by clicking the drop-down menu list and selecting a bitrate option.
Step 5. When done, tap the OK button to save the changes.
Pros:
It has a professional-looking interface and easy-to-understand functionalities.
It can handle multiple tracks in one project.
It provides several ways to edit sections of audio within a wavelength.
Cons:
It demands high memory and CPU power.
It requires skill to utilize the program, making it hard for first-time users.
Part 5. How to Compress Audio Files on iPhone and Android
If you want an application that can compress an audio file on iPhone and Android, you can rely on Lexis Audio Editor. This application is primarily used for recording audio and editing existing audio files. It provides features like reversing, changing pitch, tempo, and speed, enabling noise reduction, and more. Besides that, it has a helpful feature that can compress audio files hassle-free.
Below are the steps on how to compress audio files on iPhone and Android using Lexis Audio Editor:
Step 1. Download and Install the application using your mobile device. After that, run the application to get started.
Step 2. Open the audio file you want to compress or record using the built-in recorder of the application.
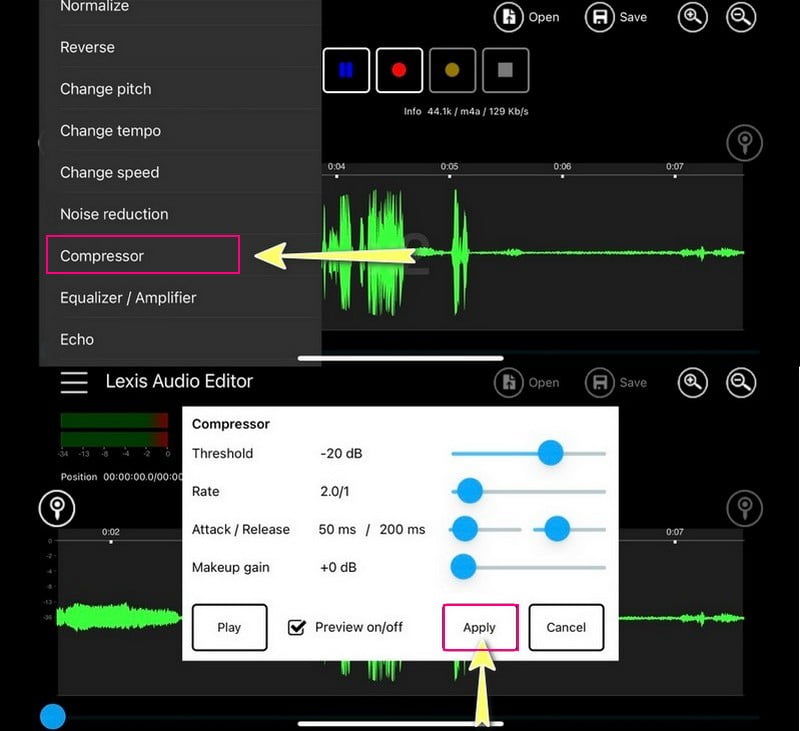
Step 3. Click the three-lateral bars at the upper right corner of your screen, choose Effects, followed by Compressor. A dialogue box will appear where you can configure compression parameters. Here, you can adjust the Threshold, Rate, Attack and Release, and Makeup gain.
Step 4. Once done, hit the Apply button to save the changes.
Pros:
Users can create new audio recordings and edit existing audio files.
It allows users to save the audio files in their desired audio format.
The free version has all the features of the paid versions.
Cons:
The MP3 format is only available in the paid version.
Part 6. How to Compress an Audio File Online
Free Convert - MP3 Compressor is a web-based compressor that is free to use and works on any web browser. It enables you to add audio files and select a target audio file size and quality level for the output. Besides that, it can hold large audio file sizes, which can be drastically reduced after the compression process.
Below are the steps on how to compress an audio file online using Free Convert - MP3 Compressor:
Step 1. Visit Free Convert - MP3 Compressor's official website.
Step 2. Hit the + Choose Files button to open your desktop folder and choose the audio file you want to compress.
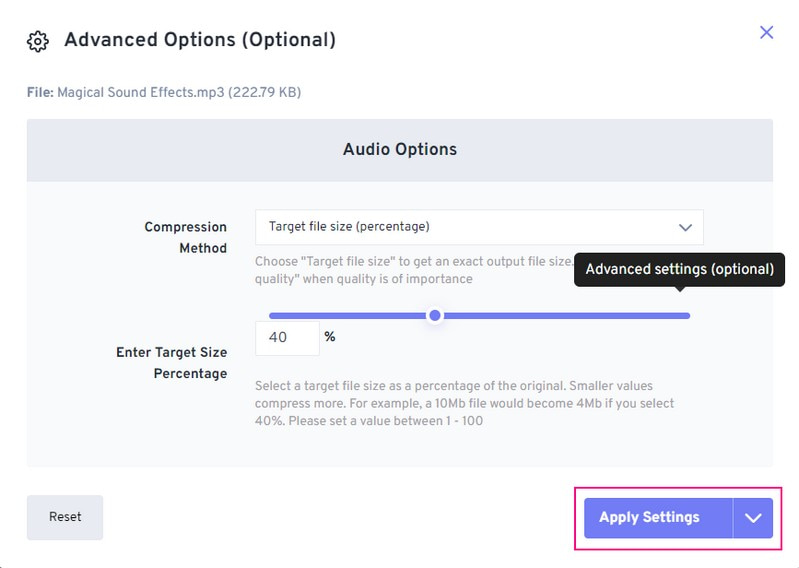
Step 3. Click the Gear icon to open the advanced compression you can do using the compressor. Here, change the compression method to the Target audio quality option. Next, press the drop-down and select the quality you prefer. Once done, click Apply Settings to save the changes.
Step 4. Press the Compress button to begin the compression process.
Pros:
It has a straightforward process to compress the audio files.
The max audio file size it can hold is 1 gigabyte.
Cons:
A fast internet connection is needed.
Part 7. FAQs about Audio Compression
How to compress an audio file for email?
To compress an audio file for email, right-click on the file, and select Send to. Next, select the Compressed (zipped) folder. After that, name your new zipped folder.
Does zip file compress audio?
Yes, a zip file can compress audio, which is a quick method to compress your audio. If you plan to send or store it, your data's integrity will remain intact.
How big of an audio can you email?
Most email providers have a size restriction for files. For Gmail, it is 25 megabytes; for iCloud Mail, it is 20 megabytes; for Outlook, it is 34 megabytes.
Conclusion
This post proves you can quickly learn to compress audio using different audio-compressor tools. Although these tools work as audio compressors, they still differ in their use. We suggest using Vidmore Video Converter to compress your audio; it is the best audio compressor you can access. On top of that, it has numerous built-in features for advanced audio and video editing. Want to know what makes the program the best? If so, download the program on your desktop right now.