









How to Cut Audio Files on Windows, Mac, Online, iPhone & Android
Do you need to cut an audio clip? You can easily cut unnecessary parts of an MP3, WAV, M4A, or any other audio file on Windows, Mac, iPhone, Android, or right in your browser. Here's how to do it with several tested options.

PAGE CONTENT
Part 1. What Does It Mean to Trim Audio?
Trim vs. Cut vs. Crop vs. Split
Trim: Remove unwanted content from the beginning or end of an audio or video file to shorten it.
Cut: Remove a specific section from an audio or video file.
Crop: Remove unwanted edges or areas of a video or image to change its frame or composition.
Split: Divide an audio or video file into two or more separate clips.
Although trimming and cutting aren't the same, you can do both with one feature. Therefore, the methods in this article can help you trim and cut audio at the same time. We can think of them as essentially the same.
Part 2. 3 Ways to Trim Audio on Windows and Mac
Method 1. Cut Audio via Vidmore Video Converter
Vidmore Video Converter is a multi-platform audio editing software that is available for Windows and Macintosh. This is perfect for instances that you need to cut and split audio files in an easy and fast manner. By using this tool, trimming or cutting files can be done in four simple steps: download the app, add files, cut, and save the final output. When cutting, you can use the handlebar to cut the best audio part or cut audio into multiple segments automatically using the fast split feature. On top of that, it can be used for making iPhone and Android ringtones if you want. Without further explanation, here is how to trim audio files using this amazing program.
Step 1. Acquire the app
Get started by grabbing the installer of the app. Simply hit one of the Free Download buttons provided underneath. Once finished downloading, open the file extension and run the quick installation. Run it on your computer afterward.
Step 2. Load a sound file
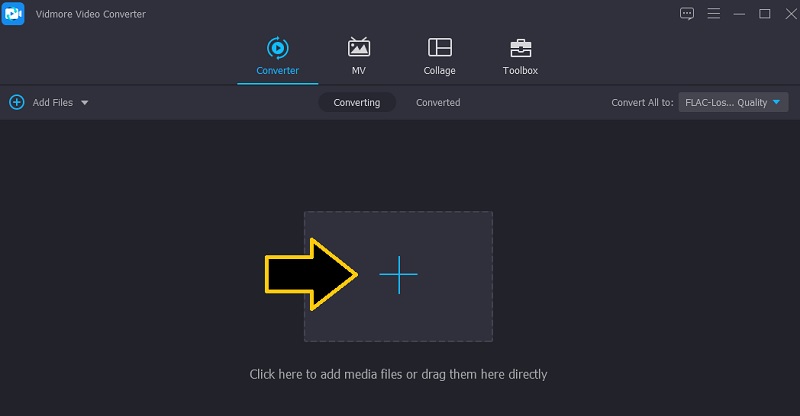
Next, click the Plus sign button to upload an audio file. It should open a folder where you can locate your audio files. Locate the file and upload it by clicking the Open button from the folder interface. Optionally, drag and drop the file(s) to upload your desired audio files.
Step 3. Cut the chosen audio
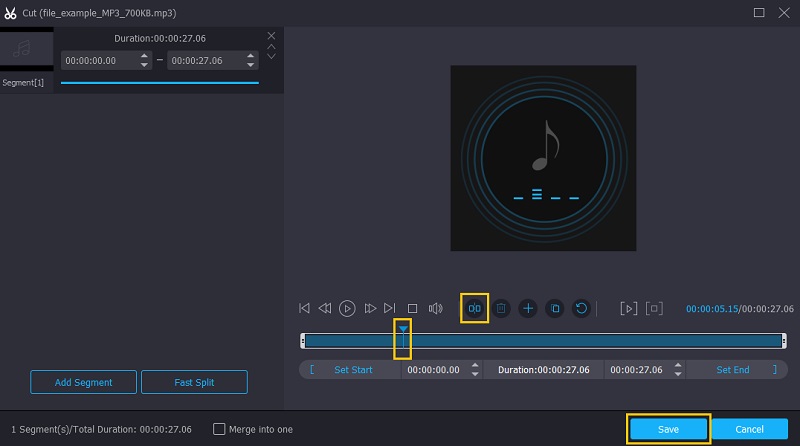
When your chosen file is uploaded, click the Cut button and you will be directed to the music working station where you can access different audio editing tools. Choose the part that you wish to remove and keep by moving the Playhead. Once decided, click the Split button and it will delete the left portion of the audio. Click the Save button if you are satisfied with the results.
Step 4. Save the cut audio file
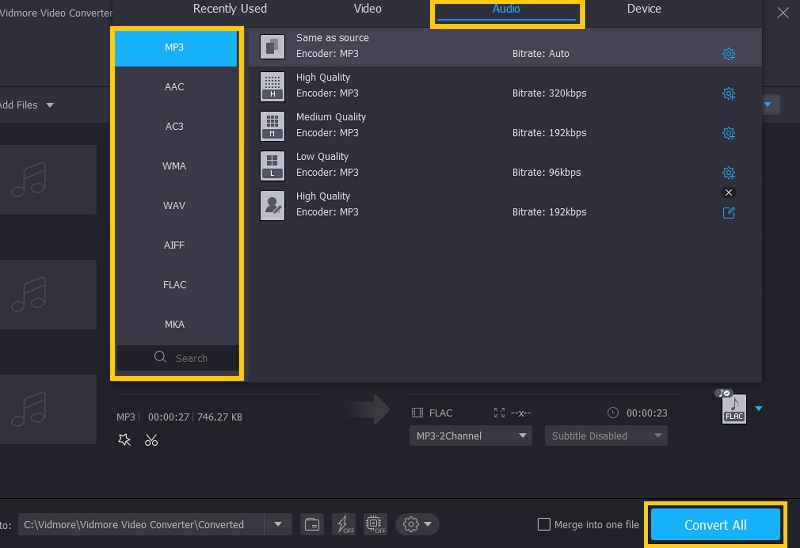
Resume to the Converter tab to finally save the final version of the file. To save it, click on the Profile menu and select your desired audio format for the sound file under the Audio tab. Then, tick the Convert All button to process the file.
Method 2. Trim Audio with Audacity
Another capable app is Audacity to trim audio files across all platforms including Mac, Windows, and Linux. It is a free desktop program that boasts functions that are helpful for splitting audio tracks. Besides splitting audio, it also offers other functions like audio recording, converting format, burn music files to a CD and so much more. The only downside is that it does not accept all audio formats unless you convert them to WAV or AIFF. Yet you can resolve these issues and directly import audio files by integrating the FFmpeg library into the app. See the steps below to learn how to split audio in Audacity.
Step 1. Grab the app's installer from its official website and install it on your computer. Run the app to start using the program.
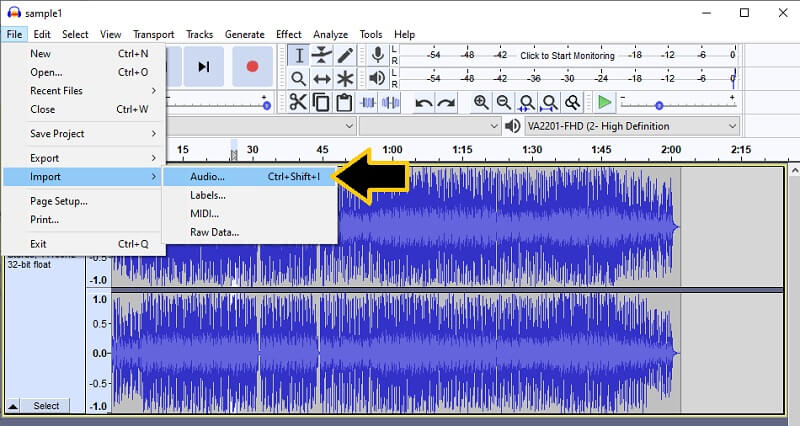
Step 2. To upload an audio file, navigate to File > Import > Audio and then select the file that you wish to cut.
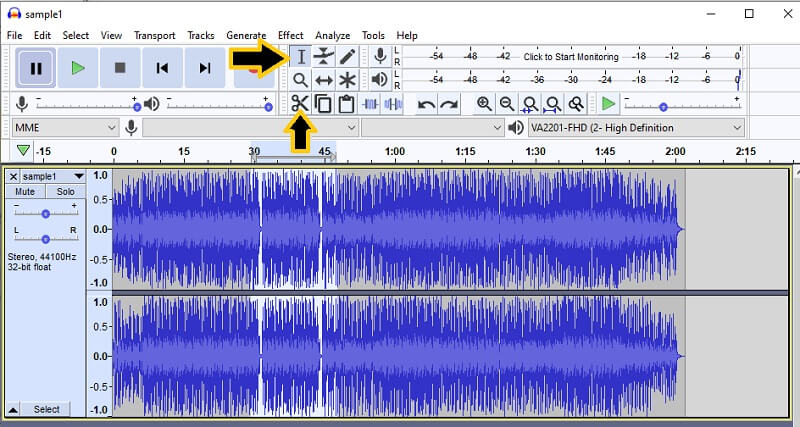
Step 3. From the toolbar, click on the Select Tool button and mark the part that you wish to remove. Once done click the Cut button. Prior to exporting the file, you can modify the volume of the audio from the left section of the uploaded audio file. You can adjust the left and right volume as well as increase or decrease the volume.
Step 4. To save the cut audio file, open the File menu and hover your mouse to the Export option, and select an output format. That's it! You've just learned how to cut audio in Audacity.
Method 3. Cut Audio with iMovie
If you are looking for an app tailored for Apple devices alone, you can simply rely on iMovie. This works well with Mac, iPhone, and iPad allowing you to cut video/audio files in just a click. This also lets you adjust the speed or tempo of the audio and sound effects from its built-in music library. Now here is an instructional guide on how to cut audio in iMovie.
Step 1. In the Applications folder or Launchpad on your Mac, open iMovie. The app looks like a purple start labeled iMovie.
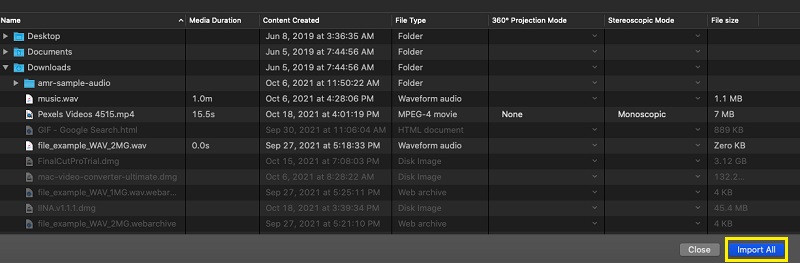
Step 2. Click the Import icon. It is one of the icons at the top-left corner of the window. Locate the audio file from your file folder, select and click the Import All at the bottom-most right part of the interface.
Step 3. Click the Plus icon associated with the media file to add it to the timeline. You can also drag it to the timeline to make an edit with the file.
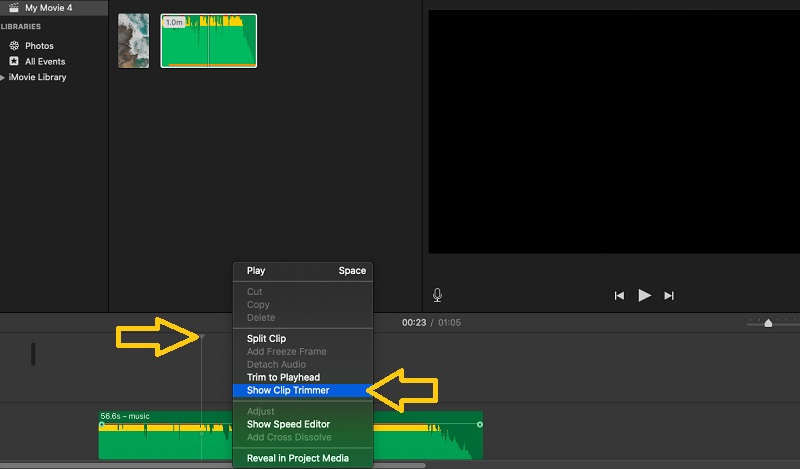
Step 4. To demonstrate the actual way on how to trim audio in iMovie, drag the iMovie playhead to your desired position and right-click on the media files, and select Trim to Playhead.
Part 3. How to Trim Audio Online
You can also accomplish the cutting of audio files from the comfort of your web browser with the help of Clideo. This grants you access to different uploading options including the ability to import from the cloud and from the local drive of your computer. The best part is you can apply fade and fade-out effects. Follow the guide below to learn how this audio editor online cuts audio files.
Step 1. First off, go to the official website of Clideo using any browser on your computer.
Step 2. From the selection of tools look for the Cut Audio function to access the Audio cutter of Clideo. This is usually located at the end of the page.
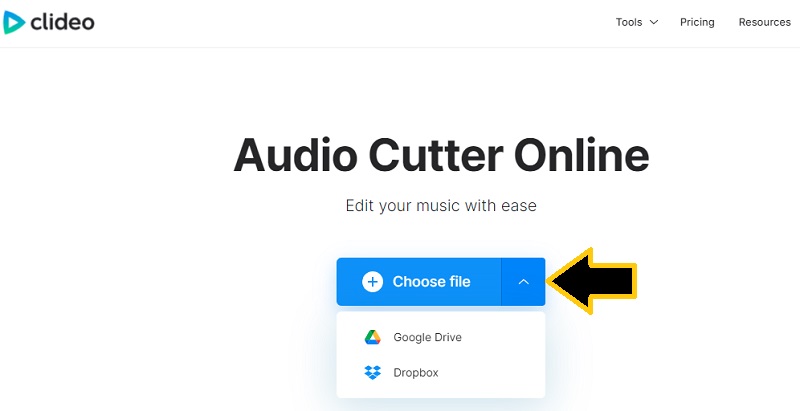
Step 3. Click the Choose file button to upload from the local drive or click the drop-down to upload from Dropbox or Drive. Select the audio that you would like to cut.
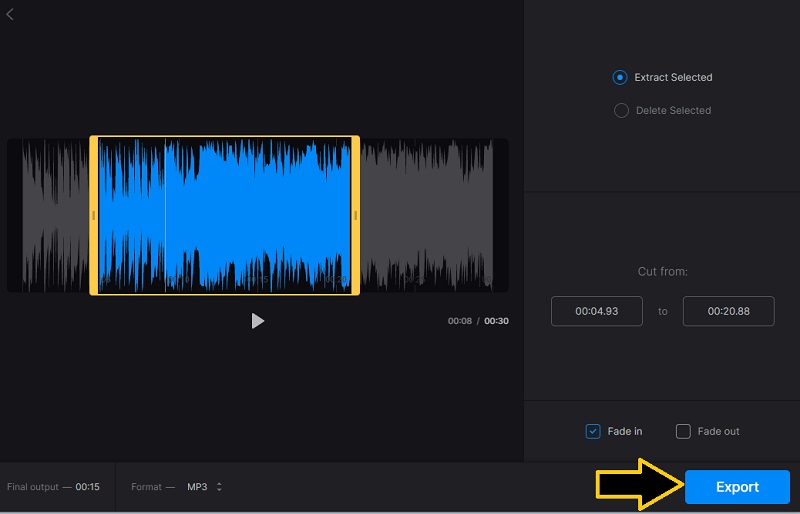
Step 4. Then drag the left handle to the desired starting point and the right handle to your desired ending position. Finally, click the Export button at the bottom right corner to process the file.
Part 4. Trim Audio on iPhone & Android
A. Cut Audio by GarageBand on iPhone
GarageBand lets you import an audio file and trim unwanted sections directly on your iPhone. Here are the detailed steps.
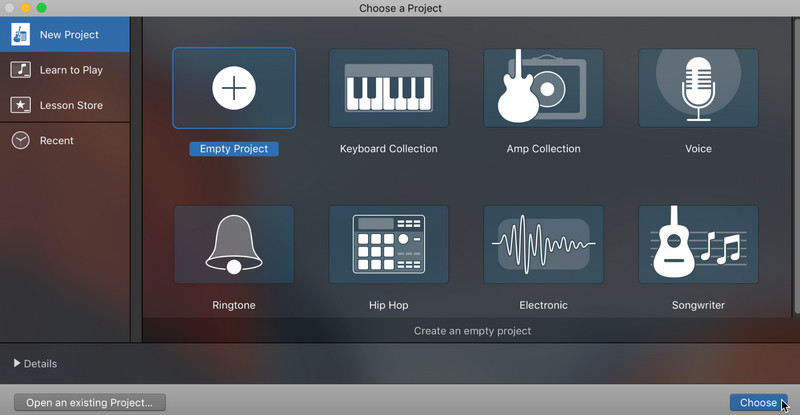
Step 1. Launch GarageBand. Then, create a new project and select Audio Recorder as the project type.
Step 2. Tap the Tracks button, tap the Loop Browser button, and select Files to find and import the audio file you want to edit.
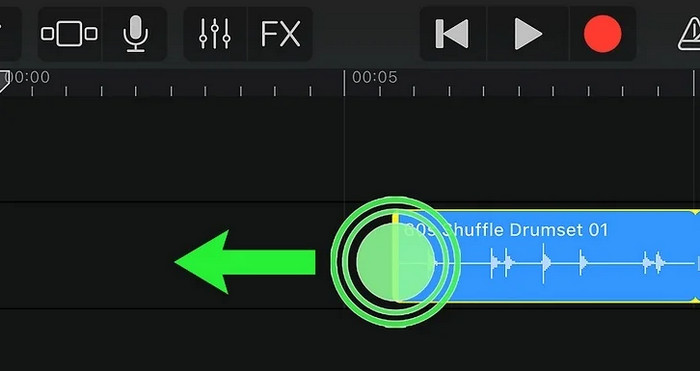
Step 3. Touch and hold the audio file, then drag it into the Tracks area. The audio waveform will appear on the timeline. Next, tap the audio clip to select it. Drag the left or right edge of the clip inward to remove unwanted parts from the beginning or end.
To remove a section from the middle, split the clip at the desired points first, then delete the unwanted segment.
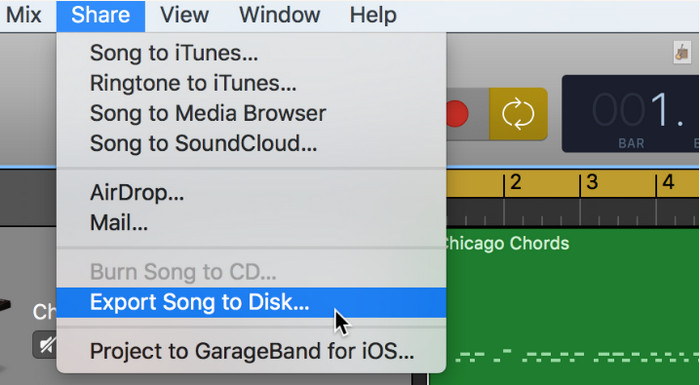
Step 4. Finally, tap the Navigation button and choose My Songs to save the project. Touch and hold the project, select Share, and choose the location you want to save it.
B. Cut Audio by Audio Cutter App on Android
You can use an audio cutter app on Android to quickly remove unwanted sections from an audio file.
Step 1. Download a trusted audio cutter or audio trimmer app on your Android phone.
Step 2. Tap Audio Cutter, Trim Audio, or a similar option, and select the audio file you want to edit from your device.
Step 3. On a timeline, drag the start and end markers to choose the section you want to keep.
Step 4. Tap Play to preview the selected section. Adjust the start and end points if necessary. Finally, tap Trim, Cut, or Save to process the audio. If prompted, choose an output format and file name, then save the trimmed audio to your Android device.
Part 5. FAQs about Trimming Audio
How to cut audio in the middle?
Using an audio editing tool, select a portion in the middle of the song and the tool should provide a cutting button function to successfully cut audio in the middle. One of the introduced tools above to help you accomplish this is Audacity.
How Can I trim audio files on iPhone?
You can use the above-mentioned tool which is Garageband. However, it has a bit of a steep learning curve. For this, you may use Hokusai audio editor which is a beginner-friendly app and comes with an audio cutting feature.
How to trim audio files on Android?
In case you are wondering what tool you can use to trim audio files on your Android device, you may opt for Lexis Audio Editor. This is available for Android users allowing you to cut audio without any hassle.
Conclusion
There are six different methods to trim audio files. If you don't want to install anything, use an online solution. You can also use desktop apps like Vidmore as your daily driver for cutting audio if you prefer an internet-independent tool. On the other hand, if you need a handy tool that you can access right from your smartphone, then opt for GarageBand or Android Audio Cutter apps.