Various Methods to Compress Photos at Ideal Quality in Seconds
Image compression comes to the rescue when the number of images on your system increases, and deleting is not the best choice. The compression method is an excellent solution for storing all your favorite images while creating some space for other files. With that, you will no longer be stuck to the decision to delete them. All you need to do is reduce your images’ file size with the help of an image compressor.
This post will present several image compressors you can use to compress images. It will help you eliminate some of the photo’s data, making the image file size smaller and retaining its quality. Without further ado, learn about these popular image compressors below.

PAGE CONTENT
Part 1. How to Compress Images Online
There is nothing better than when you can access an application for free. You do not need to expend money to use the application and, simultaneously, have the advantage of the features. Therewithal, it is accessible online and does not require you to install an application on your computer. With that, you can do your task and get the result straight on the website. This part will present image compressors you can access online. To learn how to compress images online, proceed to the following information.
1. Free Image Compressor Online
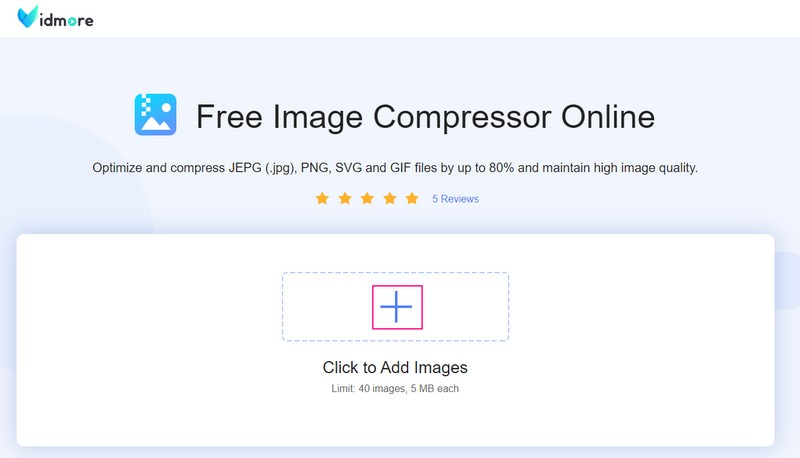
Do you want to use a web-based image compressor you can use for free? With that, consider choosing Vidmore Free Image Compressor Online, which can compress your images for free. It works entirely online, so you do not need to download any program on your computer to compress images. This web-based image compressor has an easy-to-use and understandable interface, making it easier for first-time users or professionals to access.
Vidmore Free Image Compressor Online supports JPEG, PNF, SVG, and GIF formats. It can optimize and compress these image file formats up to 80% and maintain high-quality images. Also, it can compress images up to 60% of their original size without losing the features and quality. On top of that, it can reduce image size in seconds without limitations. After compressing, the server deletes images or photos to protect your privacy.
Here, we provide a step-by-step procedure to assist you on how to compress images using Vidmore Free Image Compressor online:
Step 1. Visit Vidmore Free Image Compressor Online
First, you must use your browser to visit Vidmore Free Image Compressor Online's official website. Once on the main interface, start compressing your images using the web-based image compressor.
Step 2. Add Images to Image Compressor
Here, as you can see, you can upload 40 images, and each image should have 5 megabytes. Therefore, you can import and compress many images simultaneously to save time.
You can see a button to add the images you want to compress. Click the (+) icon in the center of your screen to open your desktop folder. Next, select the images you want to undergo the compression method.
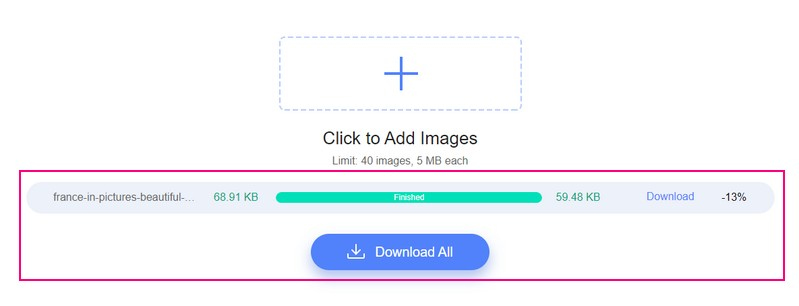
Step 3. Download Compressed Images
Once you add the image, it will automatically be placed in the compressor section. As you can see, when the images are added, the image compressor immediately compresses the images. You can see Finished covered with green next to your image file, meaning the compression process is done. Besides that, you will notice that your image was compressed from 68.91 KB size to 59.48 KB.
Click the Download All button to save your compressed image file to your computer. After that, a folder will appear on your screen, where you can locate your compressed image.
Pros:
- It can reduce image file size in seconds.
- It can optimize image files by up to 80%.
- It can compress image files up to 60% of their original size.
- It supports bulk-upload up to 40 images and 5 MB each.
Cons:
- It is not accessible offline.
2. 8MB Image Compressor
Simple Image Resizer is an 8MB image compressor that can help you compress, reduce, and shrink the image file size to 8 MB. Therewithal allows you to resize to 8 MB to the following image formats: JPG, JPEG, PNG, BMP, GIF, HEIC, and WebP.
Here, we present a step-by-step procedure to assist you how in compressing images using Simple Image Resizer:
Step 1. First and foremost, visit Simple Image Resizer - Resize the Image to 8 MB’s official website using your browser.
Step 2. Click the Select Images button presented in the center part of the interface. Afterward, your desktop folder will automatically open and appear on your screen. Select the images you want to compress using this web-based image compressor. In addition, you can drag & drop the image files to make the process faster.
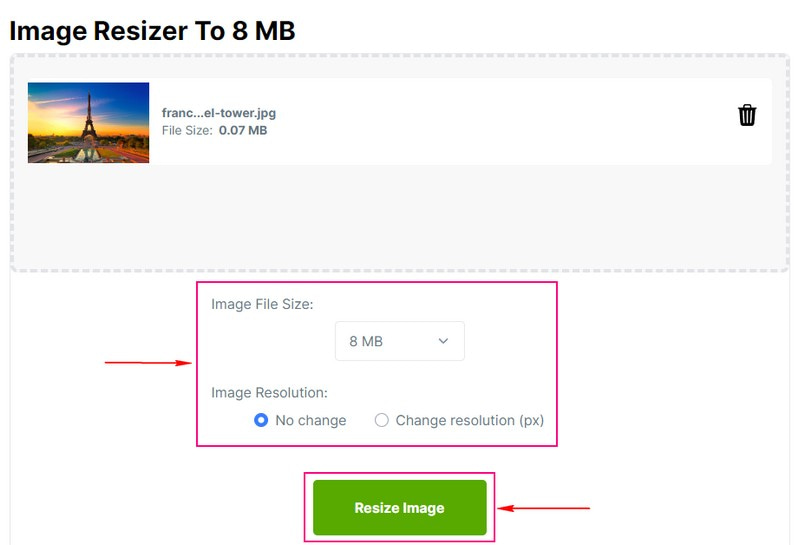
Step 3. When your image file is uploaded, proceed to the following options, which you can see below the uploaded section. Go to the Image File Size, click the drop-down menu list, and select 8 MB from the list available. Next, go to the Image Resolution, and select whether No change or Change resolution (px).
Step 4. When done, hit the Resize Image button and wait seconds or minutes to compress your image file. The compression process will take time, depending on the stability of your internet connection. After that, click the Download icon to save your compressed image file to your computer folder.
Pros:
- It has a straightforward interface.
- It has options to select the image file size and image resolution.
Cons:
- It can only compress images one at a time.
- A stable internet connection is needed.
3. Tiny Image Compressor
TinyPNG uses lossy compression methods to reduce the file size of your image. It supports the widely used formats JPEG, PNG, and WEBP, which can store partially transparent images. Therewithal, it supports bulk compression of up to 20 images and a maximum of 5 megabytes each.
Here, we provided a step-by-step process to assist you with how to compress images using this tiny image compressor:
Step 1. Visit TinyPNG’s official website using your browser.
Step 2. Once the web-based image compressor is opened, you will see an option to add your image files. Head to the Click the Drop your WebP, PNG, or JPEG files here! button, which will automatically open your desktop folder. Then, select the image files you want to reduce the file size.
Step 3. The image compressor will automatically compress your file once you have added them. Here, the word Finished is covered in green next to your image file, saying that your image file has been compressed. As you can see, your image file is reduced from 70.6 KB to 67.5 KB.
Tap the Download button to save your compressed image file output on your desktop folder. If you want to save your compressed image file output using your Dropbox, tap the Save to Dropbox button.

Pros:
- It supports bulk-image file compression.
- It can reduce image file size quickly.
Cons:
- It only supports limited image file formats.
Part 2. How to Compress Images Offline on Windows and Mac
If you are the kind of user who prefers to do your task offline, we got your back. This part will present image compressor software you can access using your Windows and Mac devices. The best thing is that you do not need an internet connection to compress your images. As long as the program is installed on your computer, you are good to use the program and do your thing. Without further ado, continue reading to check these image compressors offline.
1. Windows Photos
Microsoft Office can reduce file size and image dimension based on how you intend to use the picture. You can compress the image for documents, e-mail messages, and web pages. These options enable you to select where you will use your compressed image. With that, the exact size will be placed in your image file.
Learn how to compress a photo on Windows using Microsoft Office:
Step 1. To begin with, open Microsoft Office using your desktop device. Next, select the image or images you want to undergo the compression method with your open file using the program.
Step 2. Under Picture Tools, on the Format tab, look for Adjust group, and select Compress Pictures from the list. If you cannot find the Picture Tools, ensure that you selected an image. Double-click the image to select it and open the Format tab. In addition, you might see the icons for the Adjust group, depending on your screen size.
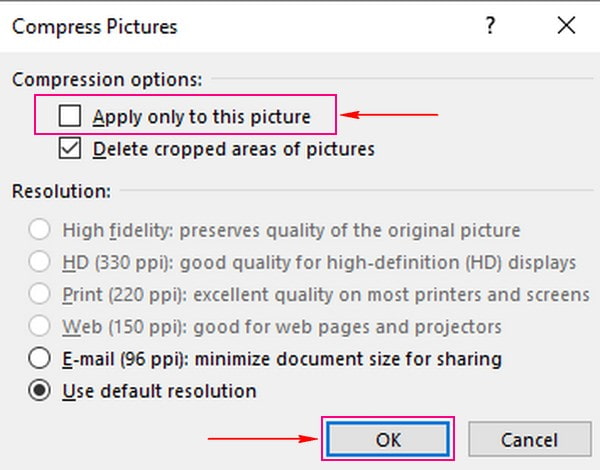
Step 3. Select the Apply only to this picture check box to compress your selected images and not all the images in the document. If not, it will override any previous changes you have made for other individual images in the document.
Step 4. Here, this program offers three ways to compress your image file. First, Under Resolution, click Print to compress your image for insertion into a document. Second, Under Resolution, click Web to compress your image for publication on a web page. Third, Under Resolution, click E-mail to compress your image to send an e-mail message.
Step 5. Once done, press the OK button to name and save the compressed image, and select where to locate your image file.
Pros:
- It enables users to select what kind of compression will apply to the image.
- It supports various image file formats.
- The compression process is quick and hassle-free.
Cons:
- It takes up a lot of space on your computer.
2. Preview
Preview is a built-in application for every Mac device that permits you to compress your images without encountering any intricacies. With this, you do not need to install a third-party application to resize your photos if you are a Mac user. The good thing is that it supports popular formats, including JPEG, TIFF, PNG, and PSD. Besides that, it works with Google Photos to reduce image file size. That is possible because you can save your image to JPEG, PNG, or PSD files.
Learn how to compress a photo on Mac using Preview:
Step 1. Using your Mac device, launch the Preview application.
Step 2. Head to the File tab from the top menu bar and select Open. After that, choose your target image from the Finder.
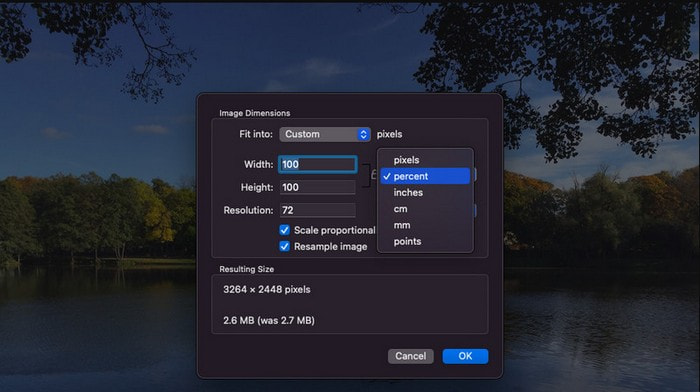
Step 3. Next, head to the Tools tab, select Adjust Size, and a dialog box will appear on your screen. From the drop-down menu list to the Height and Width fields, select Percent to resize the photo by percentage. After that, modify the Height and Width fields. In addition, you can also enter your preferred resolution for your image.
Step 5. After resizing, you will see the file size output of your image under the Resulting Size on the dialogue box. When done, click the OK button to reduce the size of your image. It will only take seconds to reduce your image file. After that, you can locate your compressed image file in your desktop folder.
Pros:
- It allows users to control the image dimensions.
- It showcases the output image file size.
Cons:
- It can only compress image files one at a time.
3. Mass Image Compressor
Mass Image Compressor is a decent bulk image compressor for image optimization, storage issues, and other purposes. The images’ quality and size can be modified by more than 90% to compress and reduce size. The procedure preserves Metadata, and batch processing is also supported.
Learn how to compress a photo using Mass Image Compressor:
Step 1. Download and Install Mass Image Compressor using your Windows device.
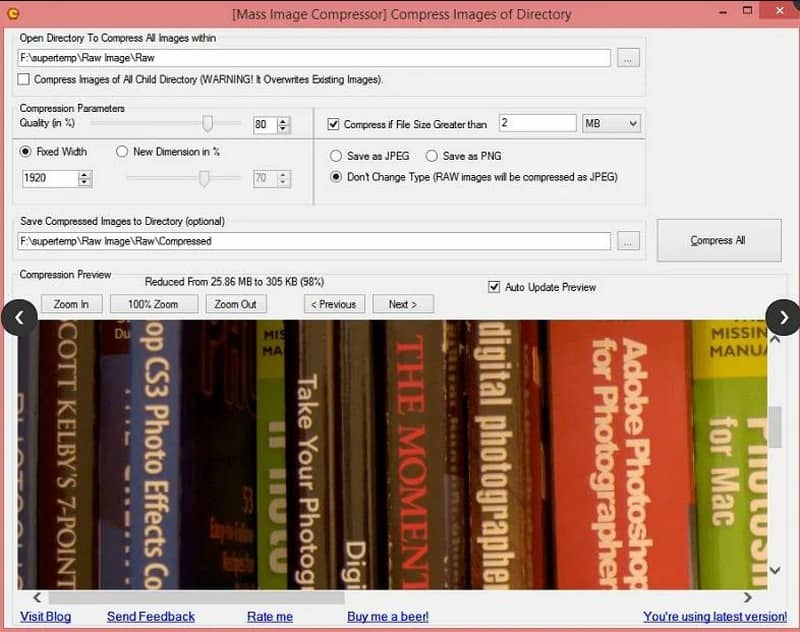
Step 2. Choose the source folder with the photos you want to undergo the compression process.
Step 3. Next, modify the Compression Parameters (Quality and Dimensions) before compressing.
Step 4. After that, select your preferred final format and hit the Compress All button to start the compression process. The program will create a new folder within the chosen source folder called Compressed.
Pros:
- It supports batch processing.
- It supports JPEG, PNG, and other raw formats.
Cons:
- It is only compatible with Windows.
- The interface needs to be more complex.
Part 3. How to Compress Images Offline on iOS and Android
Usually, nowadays, more users use smartphones to edit images, convert images, or even compress images. Because they are accustomed to smartphone use, most prefer to do their task with it. This part will present different image compressors you can access using your mobile device. Even if you are an iOS or Android user, we have something for you to rely on. Without further ado, check out the following image compressors presented.
1. Compress Photos & Pictures
Compress Photos & Pictures can help you save space on your mobile phone by reducing photo file size. It enables you to reduce the image file size without reducing the quality. With the two compression settings, it can quickly shrink photos by 90% or more without a notable difference. On top of that, it can optimize compressed image files for the best image quality possible. Besides that, it supports image formats, such as JPEG, PNG, HIEC, and HEIF files.
Below is the step-by-step process to learn how to reduce photo size iPhone using Compress Photos & Pictures:
Step 1. First and foremost, download and install the Compress Photos & Picture application on App Store.
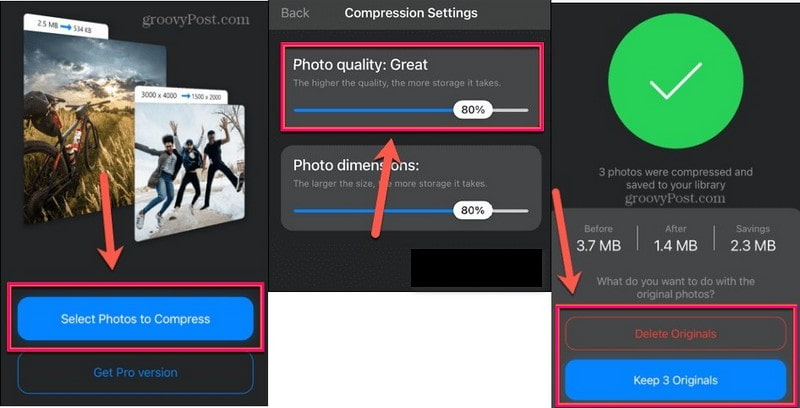
Step 2. Once the application is opened, click the Select Photos to Compress button and select the images you want to add.
Step 3. When your image is added, select your Photo Quality. The lower the setting, the smaller the image file size. The application recommends using 80% to main a better-quality image. Next, Select your Photo Dimensions. It will reduce the image’s file size, which can help you make the file size smaller. Otherwise, 80% is an excellent sweet spot.
Step 4. When done, click the Compress button, and the compression process will begin. Once the compression is done, you can keep or delete the original image.
Pros:
- It is an easy-to-use image compressor application.
- It can quickly compress images before posting them to social media platforms.
- It keeps the image quality sharp.
Cons:
- It can only compress one picture at a time.
- It asks you to subscribe to the pro version to remove ads.
- Sign up for the pro version to compress more than three at a time.
2. Photo Compressor and Resizer
Photo Compressor and Resizer help you compress and resize images to save storage space. It can quickly compress images and adjust image size and resolution. It supports image formats, such as JPG, JPEG, PNG, and WEBP. Besides that, it allows you to compress large images into smaller-size images; the loss of image quality is minimal or negligible. This image compression function offers auto and compression modes to a specified file size.
Below is the step-by-step process to learn how to compress pictures on Android using Photo Compressor and Resizer.
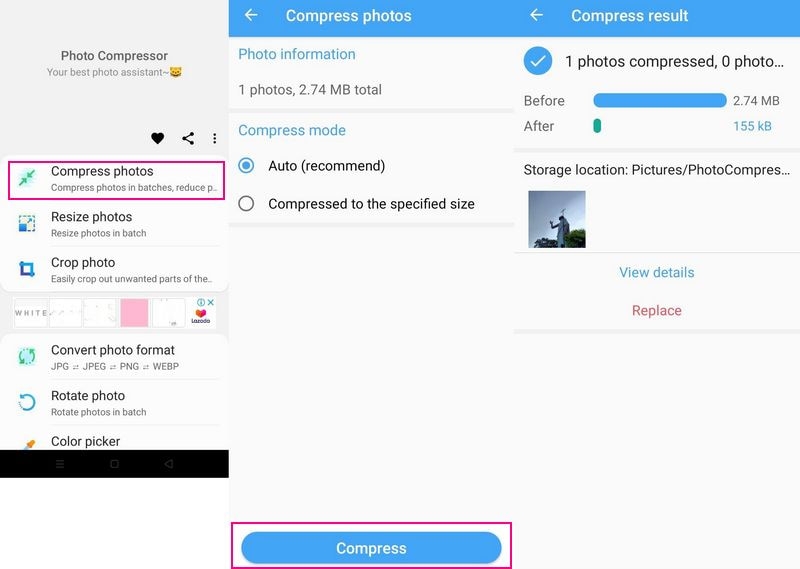
Step 1. Download and Install Photo Compressor and Resizer on Google Play Store. After the installation process, proceed to open the application.
Step 2. Hit the Compress Photos button to direct you to your phone gallery, and select the images you want to compress. Afterward, information will appear on your screen, presenting the photo information. Head to the Compress Mode, and put a checkmark, whether to Auto or Compressed to the specified size.
Step 3. Once done, tap the Compress button, and the compression process will begin. Then, on the new window, you will have the compressed result. You will see the before image file size and the after image file size output.
Pros:
- It is straightforward to use.
- It gives users two options whether to compress by the app’s recommended size or based on their preferred size.
- It supports batch compression.
Cons:
- Users encountered some bugs while using the application.
3. Image Compressor - MB to KB
Image Compressor: MB to KB is a free application you can install from Google Play Store. It can compress multiple PNG and JPG images concisely. This application can assist you in reducing over 80-90% of your image file size. It can compress large images into smaller-sized images without compromising the quality of the images. Besides that, your compressed image file can be shared directly from the application.
Below is the step-by-step procedure on how to compress an image on Android using Image Compressor:
Step 1. Download and Install the application from the Google Play Store. When the installation process is done, open the application to get started.
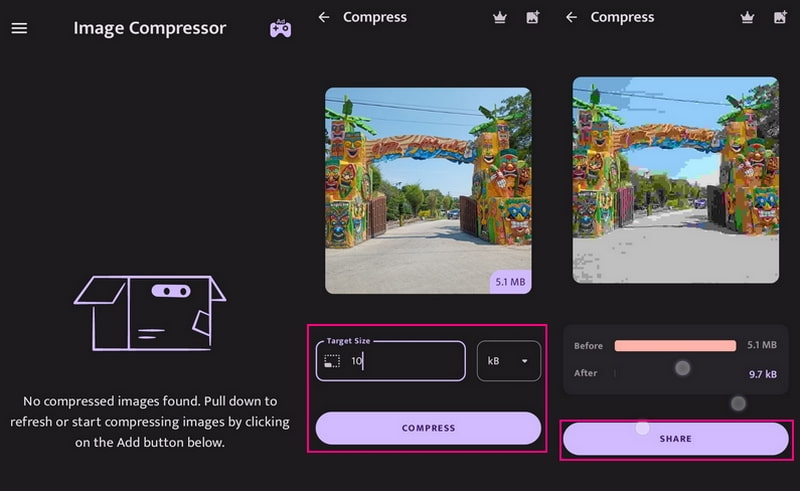
Step 2. Hit the (+) icon at the lower right of the interface. You can choose whether to add one image or bulk compress.
Step 3. You are directed to the compression section. Here, click the Target size option, and enter your preferred size. Then, select kB on the other option for a smaller file size.
Step 4. Once done, press the Compress button to start the compression process. After that, below the image, you will see the difference between the original file size to the new one. If you want to upload the compressed image, click the Share button and select the social media site.
Pros:
- It can compress multiple images.
- It has a compressed history.
Cons:
- It is not an ad-free application.
Part 4. FAQs about Image Compressor
How does compression affect image quality?
With the help of compression, you will have enough storage, and sending and uploading photos in e-mails will become faster. Besides that, your website performance will improve by using compressed images.
What is the importance of compressing the image when saving?
With the help of compression, you will have enough storage, and sending and uploading photos in e-mails will become faster. Besides that, your website performance will improve by using compressed images.
How much can JPEG compress?
JPEG can be compressed down to 5 percent of its original file size. Also, it will take up less space if you compress its image file size with the JPEG standard.
Conclusion
So, what image compression method do you prefer? This post taught you how to reduce image size using web-based, desktop, and mobile image compressors. Even though they have different methods to compress images, one thing is for sure; they can reduce image file size. Compressing your images using a suitable image compressor is necessary to reduce the file size without losing quality.