Compress Video Files in Adobe Premiere to Reduce Original File Size
People these days are highly engaged in video streaming. Every person consumes a massive amount of video per day. What is more, videos come in various formats and sizes. In a situation whereby you seem to have problems storing a video, file size is undoubtedly a factor.
Meanwhile, if you are a video enthusiast, you might be using the Adobe Premiere Pro. Aside from cutting scenes, editing audio, and merging clips, you could also use it to compress videos. In other words, it is a dependable and flexible video editing software. Here we bring you the process of how to compress Adobe Premiere videos.


Part 1. Guide How to Compress Videos in Adobe Premiere Pro
Adobe Premiere Pro is an elite video editing program available for Mac and Windows PCs. Moreover, it comes with authoritative video modification tools. Most professionals use it to amend professional videos and movies. Most importantly, you can manipulate videos, including the bitrate, format, and other parameters that affect the video size. The following is the procedure for how to compress videos on Adobe Premiere.
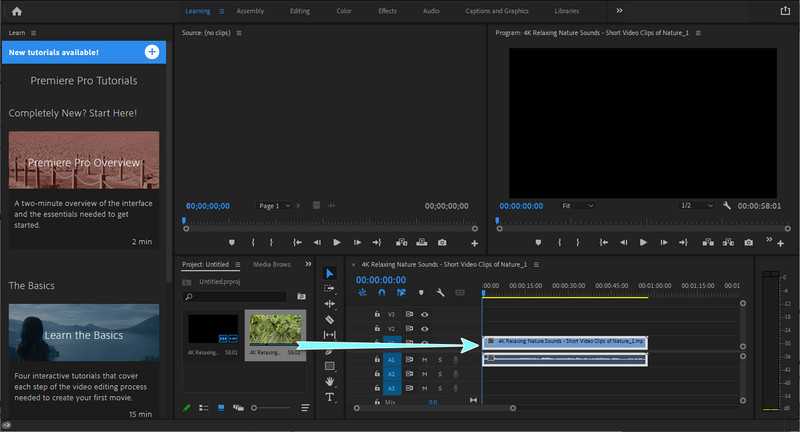
Step 1. Add footage to compress
First of all, download and launch Adobe Premiere Pro on your computer. Create a new project and a sequence. Next, click the New Project from the options upon launching the app. On the lower-left section interface, double-click on the Project window and add a video using the Import box. Next, drag the footage to the Timeline.
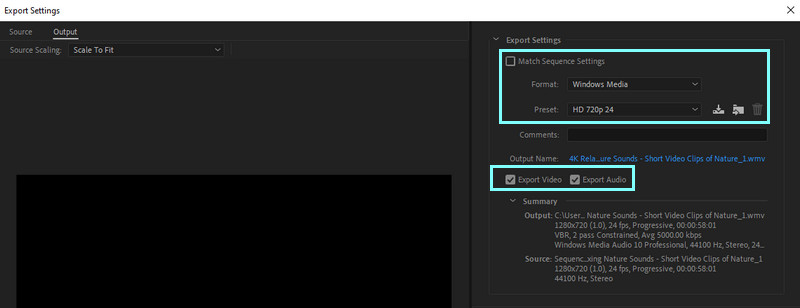
Step 2. Modify Export Settings
After adding the clip to the timeline, navigate to File > Export and click Media. Make sure that the video is selected. The Export Settings window should appear. From here, set the Format and Preset according to your needs. Ensure the Export Video and Export Audio checkboxes are marked with a check.
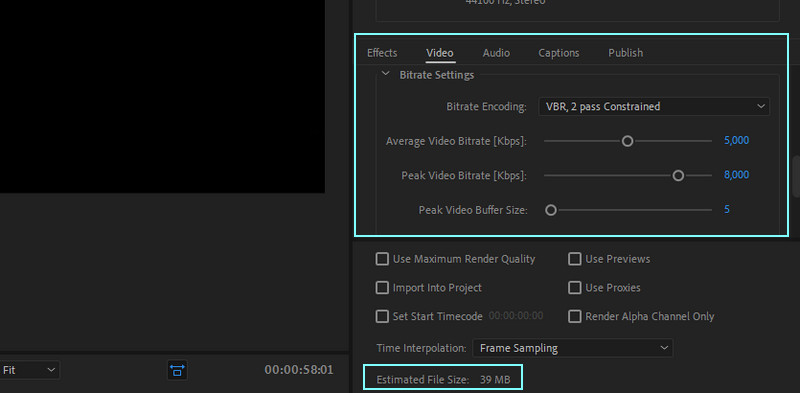
Step 3. Lower the average video bitrate
Next, go to the Video tab below the window. Use the slider to modify the bitrate to lower or reduce the video size. The recommended bitrate is around 4000 Kbps. You will see the estimated file size of the video.
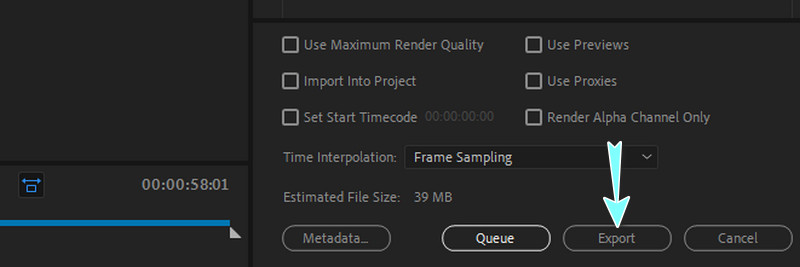
Step 4. Save the compressed video
Finally, set the output folder and name your file if you are satisfied with the results. You can do it by clicking the Export button.
Part 2. Much Simpler Ways to Compress Videos
Beyond the superior functions of Premiere, many users still find it challenging to navigate. Another major drawback is that it is expensive for an editing tool. Here we have similarly powerful and simpler alternatives. Learn more by reading below.
1. Vidmore Video Converter
Vidmore Video Converter offers a wide variety of editing options for video and audio files. Similarly, it supports Windows and Mac computers allowing you to produce stunning video outputs. More than this, it is best for compressing video files allowing you to modify parameters like bitrate, resolution, format, etc. Best of all, you can preview the output file and fine-tune the settings before the video compression begins. On the other hand, compress with the video Adobe Premiere alternative using the steps below.
Step 1. Download and install the app
To begin, get the app by clicking the Free Download button appropriate for your computer OS. Then, install the application by following the setup wizard. Launch the app afterward.
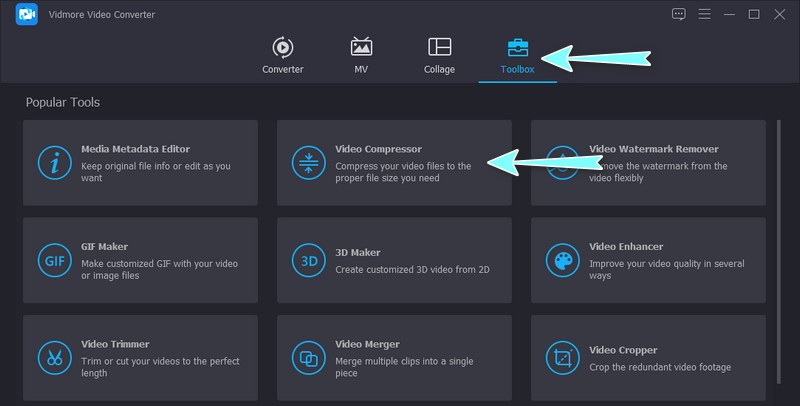
Step 2. Access the video compressor
Upon launching the file, you will see the four major tabs in the main interface. Go to the Toolbox tab and notice the Video Compressor. Click on it to launch this option.
Step 3. Add a video to compress
Next, click the Plus sign button to open your device’s folder. From the folder, browse the video you wish to compress. Select and upload the video afterward.
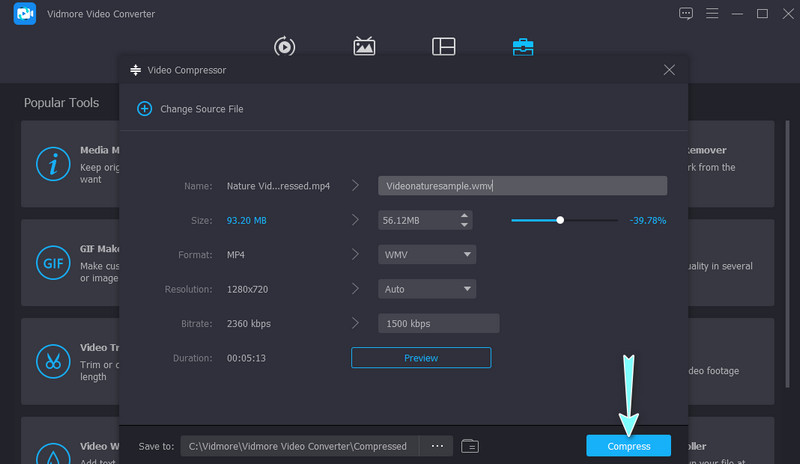
Step 4. Commence the compression
Following that, a dialog box will appear. From here, adjust the settings to reduce the video file size. You can move the slider for the video compression and change the resolution, format, etc. Finally, click on the Compress button to begin the process.
2. Vidmore Free Video Compressor Online
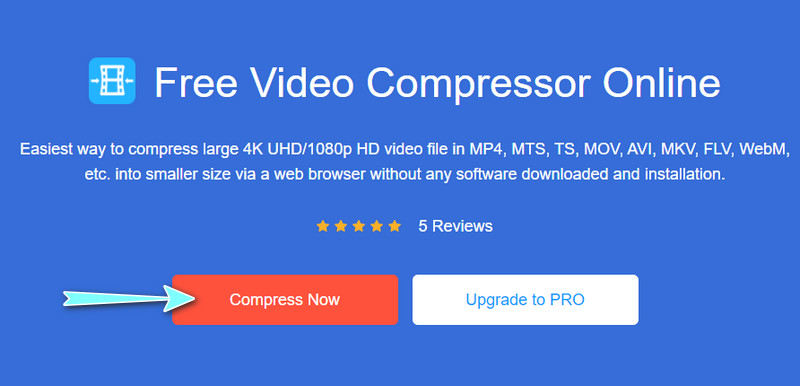
Another video compressor that you can use is Vidmore Free Video Compressor Online. The tool is fast and easy to maneuver, supporting nearly all video formats. As the name implies, it is completely online, so there is no need to download and install anything on your computer or device. Furthermore, you can reduce the video’s size by allowing you to change the compression rate, resolution, and video format. Get to know how to compress video files in Adobe Premiere alternative using the approximate guideline beneath.
Step 1. Run a browser on your computer and visit the web app by typing its name on the address bar. After that, you will land on the official page of the program.
Step 2. Now, click the Compress Now and install the bit-sized launcher. Following that, look for the video that you want to compress.
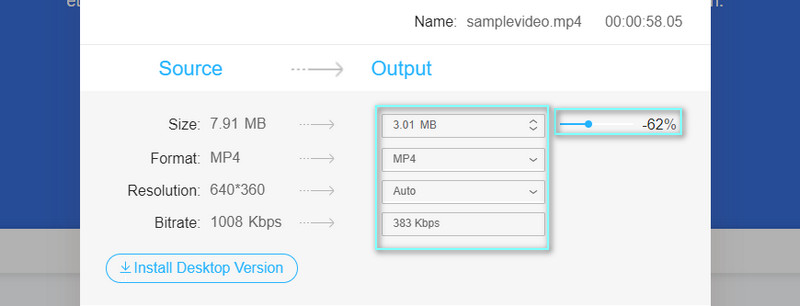
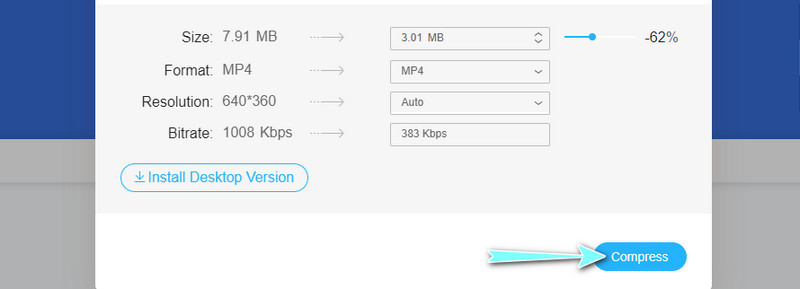
Step 3. Then, the floating window for compression will pop up. From here, you can change the size, format, and resolution according to your requirements. Simply move the compression slider bar to reduce the video’s size for your convenience.
Step 4. Lastly, click the Compress button at the bottom right corner to initialize the compression process.
Part 3. FAQs on Compressing Videos in Adobe Premiere
Can I compress videos for an email in Adobe Premiere Pro?
Yes. You can gradually lower the bitrate in the export settings of the app until you reach the recommended file size for email. You may also try lowering the resolution in case the quality is not acceptable.
What do you mean by unsupported compression type in Adobe Premiere?
It is an error in Adobe Premiere that occurs when you try to import media files like MP3, AVCHD, and MP4 files in Adobe Premiere. Nevertheless, you could do some basic troubleshooting by navigating to the Media Cache of the app. Clean the media cache database folder and try to import your files again. It should resolve the issue afterward.
What are the requirements for Adobe Premiere Pro?
Adobe Premiere Pro runs on specification requirements of the 64-bit multi-core processor and 64-bit Windows 10. Additionally, you need to have 2GB of RAM for working with high-definition videos and 1GB for standard definition videos.
Conclusion
That is the whole guideline to compress videos in Adobe Premiere. Meanwhile, you may refer to the latter solutions when you are having difficulties navigating Premiere Pro. Reducing video file size does not require complicated tweaking settings. Also, you will benefit from the acquisition of the online tool as you do not have to install anything on your computer.