How to Color Correct in Final Cut Pro: Step-by-Step Procedure
No matter how hard we try, there will come a time when we feel disappointed with our recorded video due to some technical factors. Indeed, having a poor video balance and quality is unavoidable, but it is fixable. With this being said, many seek an excellent tool that can fix such videos, and one of the most popular tools is Final Cut Pro. Thus, we made this article to enlighten users who want to know how they can utilize the Final Cut Pro’s color correction feature and how it can help in fixing their videos in detailed steps. Fortunately, we will make this happen, along with the succeeding content below.

PAGE CONTENT
Part 1. What is a Color Correction Attribute?
Before we start on the tutorial, let us have an overview first about color correction. Color correction or correcting is the act of editing the video’s color elements, such as the hue, saturation, exposure, and others. This act of modification will fix and enhance the scene and neutralize its balance. This way, it will make your video consistent and realistic in the picture. On the other hand, you must know the difference between color correcting and color grading because these two may have the same meaning but different functions.
| Color Correction | Color Grading |
| The purpose is to make the video look natural in color. | To make the video look completely different from its original look. |
| It does not involve a director or DP that much. | It syncs with DP. |
| It is the starting touch of the process. | It is the finishing touch. |
Part 2. Complete Steps on How to Color Correct in Final Cut Pro
One of the most used tools that have powerful color correction is Final Cut Pro. This software uses two main tools to add color correction: the Video Scopes and Color Board. The said tools have adjustment options for the video’s hue, brightness, and saturation. Along with those adjustments are the controls for the shadow, mid-tone, and highlights that you can customize accordingly. Thus here are the complete steps for doing the color correction on Final Cut Pro.
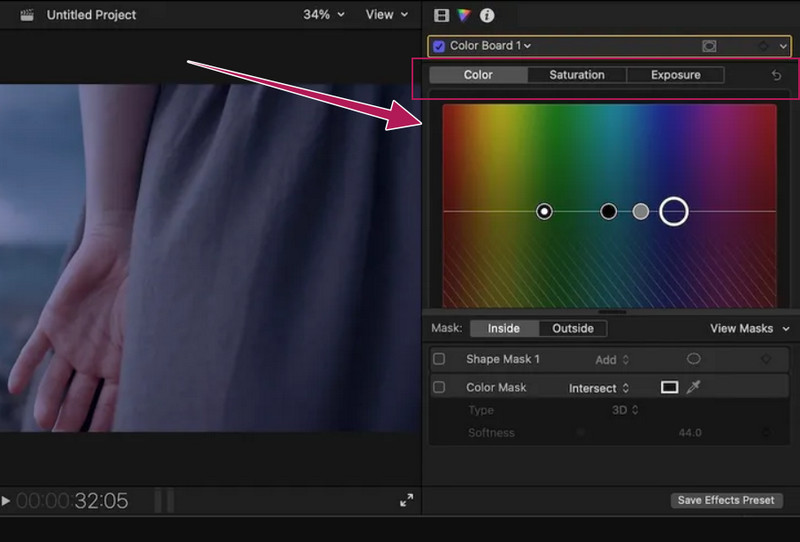
Step 1. Open the Color Board
The first thing that you need to do after launching and uploading your video in Final Cut is to open the Color Board. How? Click the Window tab, select Go To dialogue, then select the Color Board option. Alternatively, you can browse the Effects section for the Color category.

Step 2. Open the Video Scopes
After accessing the Color Board, it is time also to open the Video Scopes. Click the light switch symbol, and select the Show Video Scopes selection in the popped-up window. After that, hover over to the Settings option, and click the Waveform selection.

Step 3. Do the Color Correction
After that, freely navigate the color wheels and adjustments you see in the interface. You need to prioritize three types of controls: saturation, hue, and exposure. After that, check your video after the changes, and proceed to save it when done.
Part 3. An Easier Way than Final Cut Pro to Correct Video Color
After looking at the steps on how to color correct in Final Cut Pro and after trying them ourselves, it is indeed challenging. For this reason, for beginners to cope easily with their video color-correcting task; then we highly recommend they use Vidmore Video Converter. This easy-to-use software comes with many magnificent features and tools that you can use to enhance videos. Furthermore, it has this color-correcting tool as part of its extensive toolbox that generously works to make your videos vibrant. Without any prerequisites, you may easily access its color corrector, enabling you to modify the hue, contrast, brightness, and saturation without a hassle.
In addition, it also provides you with extra output setting options, which allow you to alter the format, quality, resolution, and many more. Speaking of formats, Vidmore Video Converter supports a wide array of video types of input and output, such as MOV, MP4, AVI, MKV, WMV, GIF, and many more.
- It is a multi-platform software that caters best to Mac and Windows.
- Advanced acceleration automation, including for the hardware and process.
- Wide range of video and audio formats.
- A toolbox that technically has everything for video editing.
How to Color Correct in Final Cut Pro’s Best Alternative
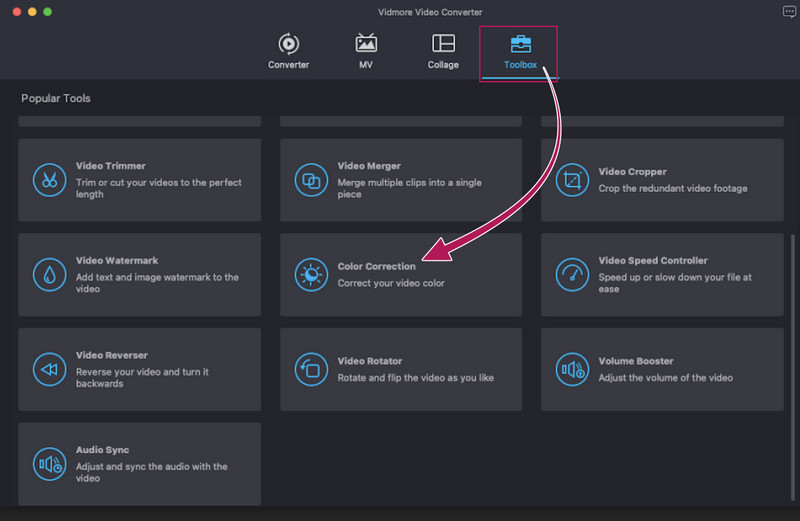
Step 1. Acquire the best software for your Mac or any PC by downloading it. Then, launch the software and go directly to its Toolbox menu, which you can find at the top center part of the interface. Then, look for the Color Correction option and progress to the file importation process.
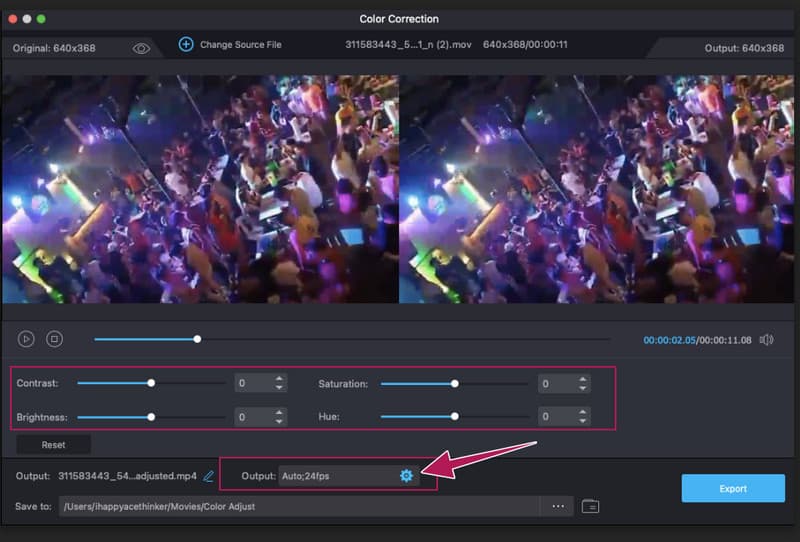
Step 2. Next to the importation is the editing process. On the new window, please feel free to adjust the settings that will help you correct the video color. What’s nice is that you can adjust via sliding or via clicking procedure. Also, you may access the Output part, where you can additionally modify the video quality and other technicalities.
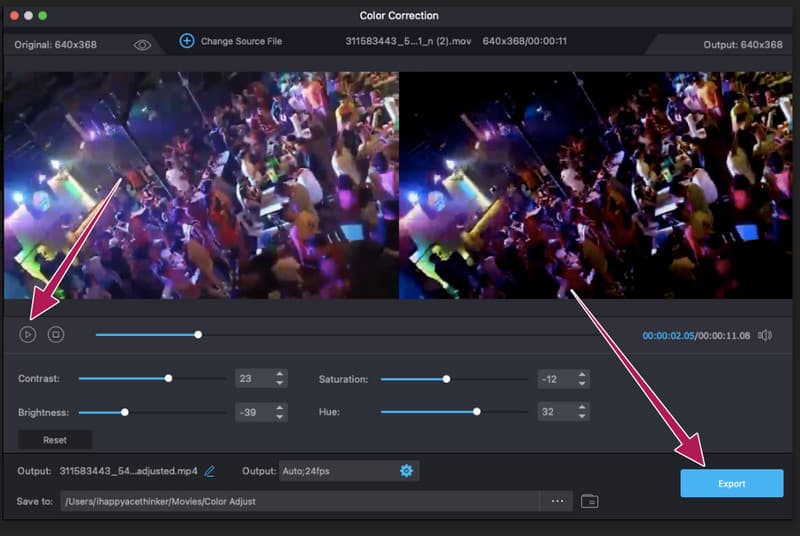
Step 3. After a while, click the Play button to check on the preview. Then, you can already hit the Export button to save your video file. To see the output, refer to the pop-up destination storage. Otherwise, check on the Save To section that will appear after the exportation process.
Part 4. FAQs about Video Color Correction on Final Cut Pro
Is there an auto color correction in Final Cut Pro?
Yes. However, the auto color corrector is not as efficient as when correcting manually. With this being said, many users prefer the manual over the automatic way in Final Cut Pro.
Can the color of multiple videos be corrected in Final Cut Pro?
Final Cut Pro comes with a ripple edit that lets you work on multiple videos at once. However, working on numerous files is much more challenging than working on a single one.
Does correcting color mean increasing file size?
It depends on the adjustment made. Some of the files come with a smaller size after color correcting, and some with a larger size.
Conclusion
Final Cut Pro has a color correction feature that works effectively. However, working with this software is another thing. We cannot guarantee that all of you can follow and do the tutorial effectively since doing it in actuality is a different story. However, we have made this tutorial as easy to understand as possible. So, the result is up to you now. Hence, if you want easy yet powerful software like Final Cut Pro, use Vidmore Video Converter instead.