Overview of Final Cut Pro Compressor and How to Utilize It
Final Cut Pro is certainly one of the superb video editing tools available. Both amateur users and video enthusiasts utilize it to alter their videos and create stunning videos. Indeed, you can enhance your video by editing effects, adding filters, adding subtitles, and other things you need to carry out to manipulate videos. The problem is that the video's file size is too big to upload on social media platforms or video-sharing sites.
In this case, Final Cut Pro comes with a compressor that will help you achieve excellent image video quality while making the file size manageable. This program will help you upload your video editing on Final Cut Pro without worrying about media size issues. To learn more about this compressor and how Final Cut Pro compress videos, continue reading.


Part 1. What is Final Cut Pro Compressor
Before going straight to how to compress videos in Final Cut Pro, let us first discuss what Final Cut Pro Compressor is. Although Final Cut Pro offers exporting options, you can create export settings designed for your requirements using the Compressor of Final Cut Pro. This program is separately purchased because it is supposed to work directly with Final Cut Pro.
It is mainly used for compressing and converting media files. What is remarkable about the program is that it comes with templates and presets associated with a particular platform. There will be specific settings for your chosen platform to upload the video online or on physical media. Moreover, it can help you save time because it supports batch exports which are especially useful for exporting multiple files at once. Now, let us learn the process of Final Cut Pro to compress video size.
Part 2. How to Operate Final Cut Pro Compressor to Reduce Video Size
Compressing videos in Final Cut Pro can be done in several methods. You may customize export settings using the Compressor and incorporate it into the Final Cut Pro as one of the export options. You could also send your projects to Compressor and directly optimize the output while accessing the available options in the Compressor. Lastly, assembling an iTunes Store package in Compressor is possible. This is perfect if you are to sell media files in the iTunes Store. But here, we will conduct the first method. Discover how to resize videos in Final Cut Pro using the instructions below.
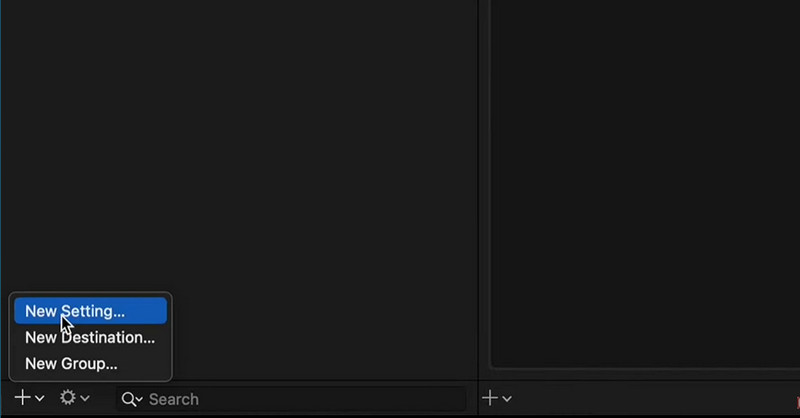
Step 1. Open the Compressor and the Final Cut Pro applications. Next, head over to the Compressor. From here, click on the Settings and Locations button at the top left corner of the interface. Then, click on the Plus icon at the bottom left corner and select New Setting.
Step 2. Give a name to the export setting and select a format. You can choose MPEG-4 as a standard video format.

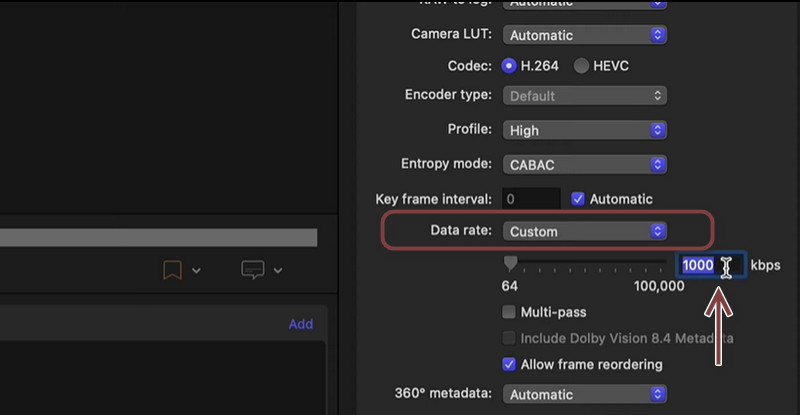
Step 3. Expand the Inspector window and go to the Video tab. Next, unfold the Data rate menu and choose Custom from the options. After that, enter your preferred data rate based on your video frame rate and resolution to get your desired quality.
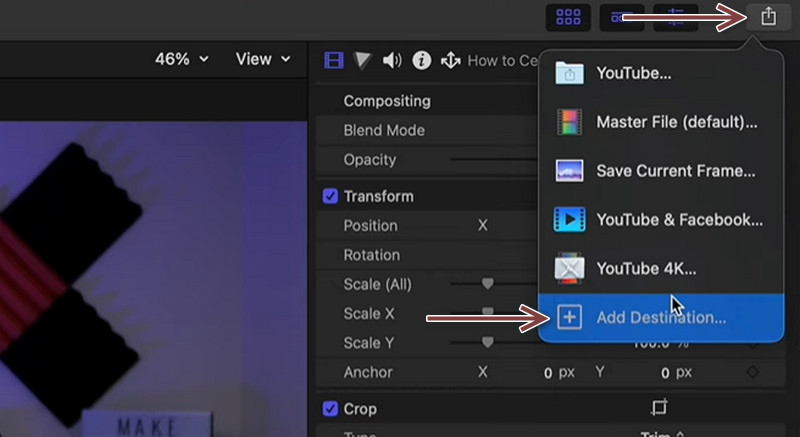
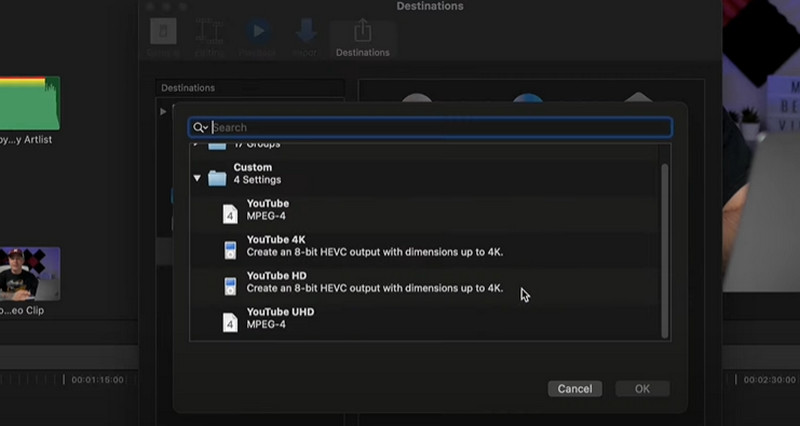
Step 4. Let us now add this preset in Final Cut Pro. Next, tick the Share icon on the top right junction. Then, select Add Destination, and the Destination window will appear. Select the Compressor Settings option afterward. Add the preset you just made from the options shown.
Step 5. Click on the Share button once more and notice that the preset you made was added. Select your newly created preset and export your video using it. You can also observe the same procedure with Final Cut Pro 7 Compressor if you wish.
Part 3. Great Alternative to Final Cut Pro Compressor
Taking a look at the Final Cut Pro, it is indeed helpful for compressing video files. However, we cannot deny the fact that it is difficult to navigate. As we know, usability is equally important besides its features and functions. Hence, we prepared a program that provides an easy to navigate user interface. Whatever your purpose is for compressing files. Whether for uploading videos online, sending for email, or storing a lot of videos on a device, this will help you a lot.
The program is called Vidmore Video Converter. You could use this tool to compress any video format without losing quality. In fact, you can compress and convert your files with it at the same time. The cool thing is you can adjust the compression settings before the compression starts using its Preview feature. On the other hand, you can use the alternative to Final Cut Pro X to compress videos.
Step 1. Launch the Vidmore Video Converter
First off, download the application by clicking one of the Free Download buttons below. Next, follow the setup wizard and instructions to install the app properly. Then, run it on your device.
Step 2. Import a video file
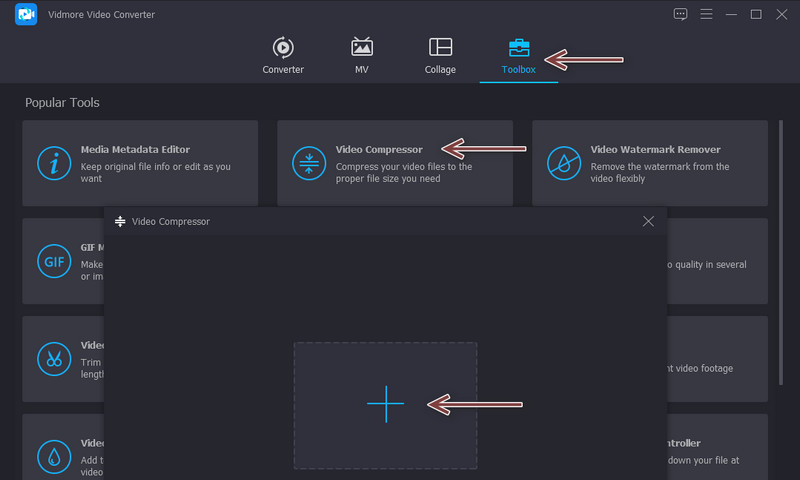
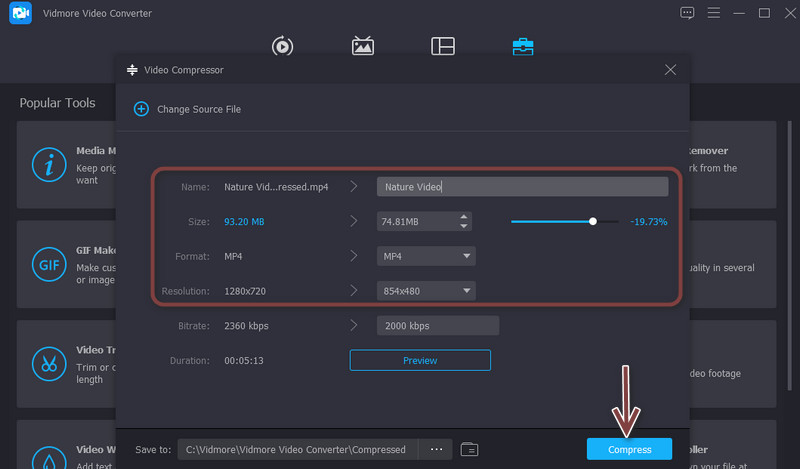
For the next step, go to the Toolbox tab and select the Video Compressor to get access to the compression tool of the app. Then, a dialog box will appear that enables you to upload videos. Click on the Plus sign button in the browser and select your target video.
Step 3. Configure the compression settings
When the clip is uploaded, another window will emerge. By then, you can get access to the settings for compressing videos. Move the toggle button to adjust the compression rate. Alternatively, you may select a format and adjust the resolution. Finally, hit the Compress button once all is set.
Part 4. FAQs on Final Cut Pro Compressor
Is there a Final Cut Pro for Windows?
Unfortunately, there is no version dedicated to the Windows system. Final Cut Pro is developed by Apple and only supports Mac.
Does Final Cut Pro Compressor provide options for compressing audio?
Yes. There is a way for you to compress or shrink the audio of a video. Simply go to the Inspector window and select the Audio tab. Then, you will be able to access various parameters and set values for bitrate, which affect the audio size.
Is Final Cut Pro worth it?
Final Cut Pro is second to none for video editing. However, it is expensive for most users. Besides, there are myriads of alternatives out there that are affordable yet offer the same results.
Conclusion
Indeed, Final Cut Pro is not only great for editing videos. In conjunction with its stunning video editing features, it offers a compressor that can give you advanced options for compressing videos. That said, the content teaches users how to resize video in Final Cut Pro. If you are a beginner and on a tight budget, programs like Vidmore Video Converter should suffice and even outstand Final Cut Pro due to its full-featured video modification options.