How to Blur Parts of a Video [Desktop, iPhone, and Online]
Do you want to protect someone’s identity, hide sensitive information, or remove distractions to highlight specific areas of your footage? You can accomplish that by blurring your videos. Blur is one of the usual effects you can apply to your picture, video, or advertisement. The viewers’ attention is only directed to a particular part or subject from the video. By blurring some parts of your video, you will only highlight the important ones, not the unneeded ones. This post will provide methods on how to blur a video using different applications. To learn about these applications and methods, read the following information presented.

PAGE CONTENT
Part 1. How to Blur a Video on Desktop
1. Vidmore Video Converter
When editing a video, it is better to edit it into a larger screen for you to see the changes. Also, it is better to work offline without needing an internet connection. In addition, it would be easy to edit if you use a beginner-friendly interface program. With that, Vidmore Video Converter checks all the boxes. This program does not require you to connect to an internet connection to accomplish your goal. You do not need to be a beginner or professional editor to control and master the program quickly. Vidmore Video Converter has plenty of built-in converters, ready-made themes, collage makers, and editing tools features. In addition, it has a filter section that enables you to blur your videos. To apply the blur effect for video, rely on the following instructional guide.
Step 1. Download and Install Vidmore Video Converter
Download and Install the program to your desktop to have complete access. After the installation procedure, launch the program to start the process.
Step 2. Add Video File
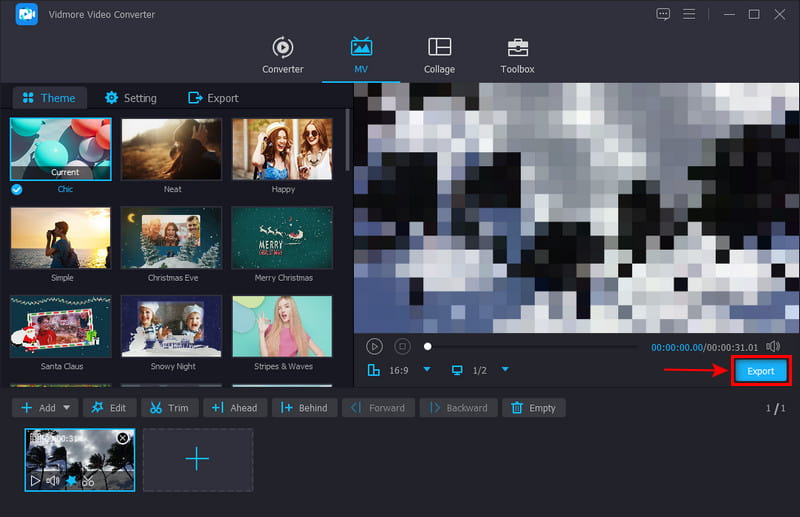
You are immediately directed to the MV tab when you open the program. Click the (+) on the lower part of the interface to upload your video. After that, choose a video from your desktop folder you want to undergo the editing process, specifically on blurring your video. After that, your video will place on the timeline, and you can watch your video from the preview screen.
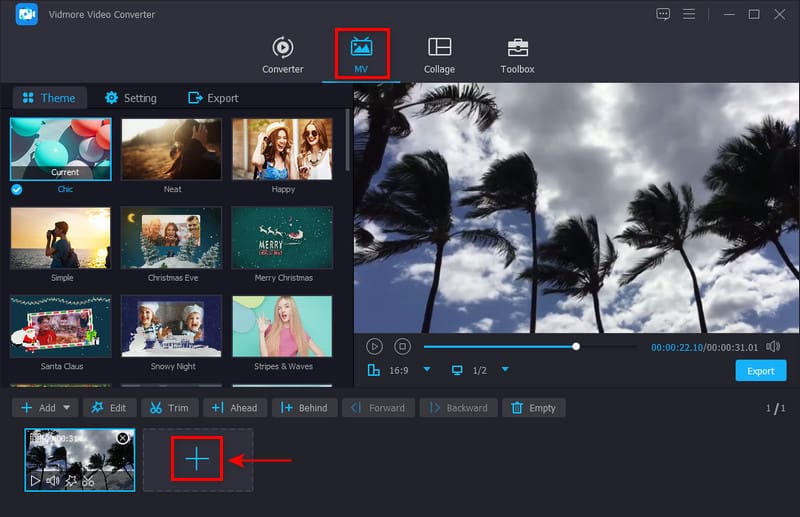
Step 3. Apply Blur Effect to Video
Click the Edit button from the lower left of your screen, directing you to another screen. Click the Effect & Filter section from the top menu bar. From there, you will see two screens placed from left and right. The left is the original video, and the right is where you will see your changes. To begin the blurring of your video, proceed to the Filter section and look for Pixelate. The Pixelate filter has a blurring effect that you can apply to your video. Once you lick the Pixelate, you will immediately see the changes on the right-preview screen. In addition, you can modify the basic effects by moving the pointers from left to right on the line bar. Once satisfied, click the OK button to save the changes successfully.

Step 4. Export Video File
Once you are satisfied with your output, hit the Export button on the lower-right of your screen to save your output.
2. How to Blur a Video in Premiere
If you are looking for another program on your desktop, you can rely on Adobe Premiere Pro. This program is a video editing platform capable of importing videos and exporting outputs to the required destination. Also, it has functions such as clipping, click and drag positioning, and adding video effects and transitions. If you want to learn how to blur a video in Premiere, count on the steps given.
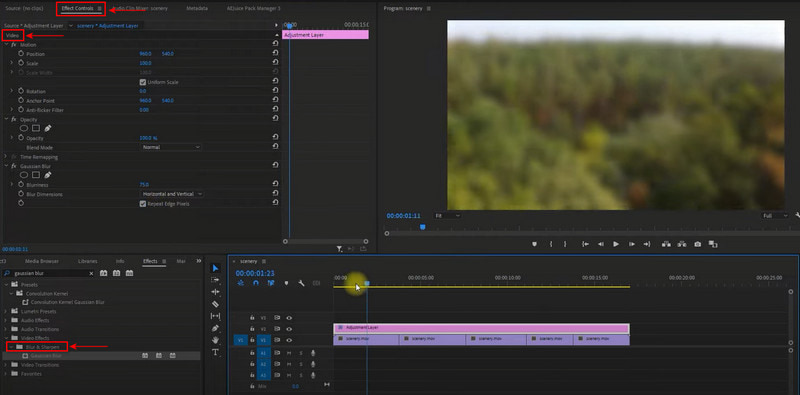
Step 1. First and foremost. open the program using your desktop. Once the program is opened, open up your video, import it, and then drag it onto the timeline.
Step 2. Once the video is placed on the timeline and preview screen, you can start blurring your video. Head to the Effects, Video Effects, and proceed to Blur & Sharpen button. From the Effects Panel, select one from the blurs effects presented.
Step 3. Once chosen, proceed to the drag-the-blur effect to the footage in your Timeline. Afterward, head to Effects Control and select the amount of blur you want to apply to your video. If you want to animate the blur, proceed to the stopwatch, and change the values over time based on your preference. After that, you can have your video with blur effects.
3. How to Pixelate a Video in Windows Movie Maker
Windows Movie Maker has a beginner-friendly interface that enables users to create simple video projects. This program can create, edit, and publish videos offline but is already an outdated video editing platform. Despite that, you can still change and apply graphic overlays, text animation, and blur effects. Proceed to the following details to learn how to pixelate a video in Windows Movie Maker.
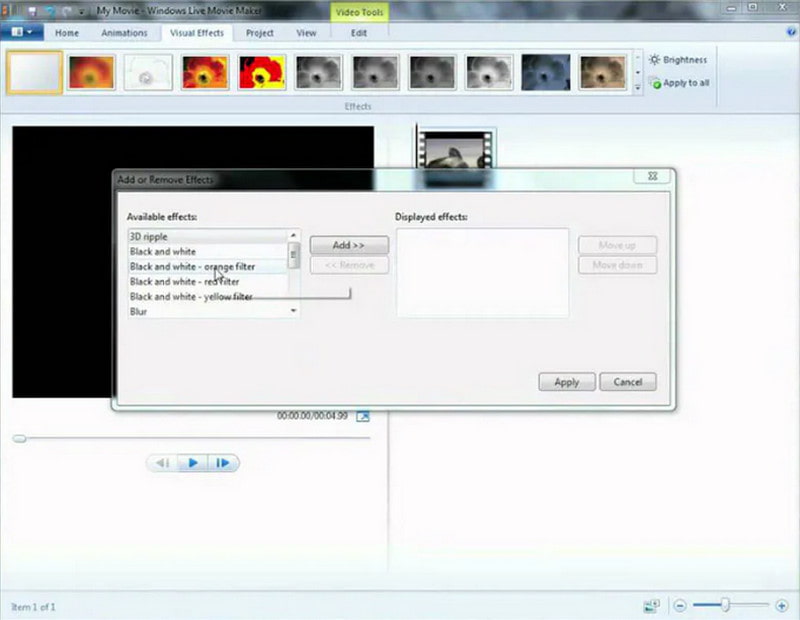
Step 1. Open the Windows Movie Maker on your desktop. When the program is opened, add the video you want to blur to the timeline. Click the Home, Add, and Add Videos and Photos from the main menu bar. It will open your desktop folder and choose one video you want to import into the program.
Step 2. Your video file is automatically uploaded on the storyboard. Click the video to highlight the parts you want to blur from the storyboard panel. Click the Visual Effects tab from the main menu ribbon. After that, click the Blur icon from the applied list of filters. You can see the blur effect on the upper left of the visual effects.
Step 3. Once done, click the File, then Save Project to save your video to the program. Also, click the File tab and Save Movie to save your video to your computer successfully. Alternatively, click File, then Publish Movie to upload your video to different social platforms it supports.
Part 2. How to Blur a Video on iPhone
1. How to Blur Video in iMovie
One of the best video editing platforms that Apple develops is iMovie. It has editing tools that enable the users to change and enhance their video color settings and stabilize shaky videos. Also, you can crop and rotate, add video transitions, and change the speed of clips using this program. On top of that, it has high-quality effects and other features that help you create videos and movies. Despite that, it lacks a built-in blurring feature. To learn how to blur video in iMovie, follow the instructional guide below.
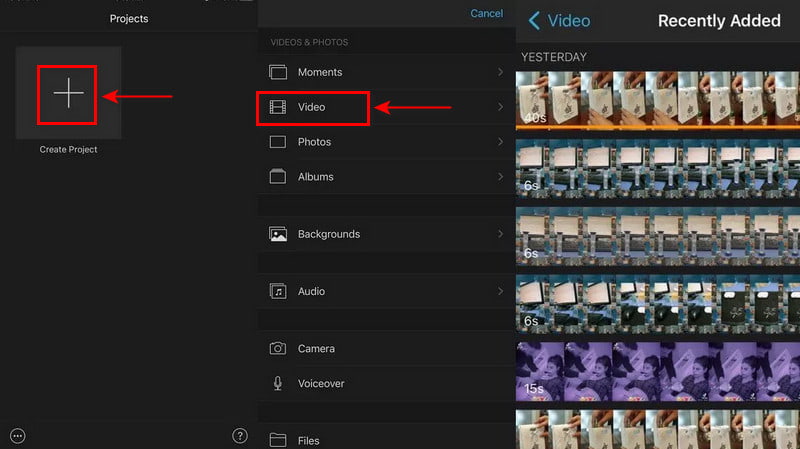
Step 1. Begin by downloading a black, blurred, or pixelated picture. Next, open the program on your mobile device. Once the program is opened, hit the (+) button and select Movie, then New Project. From your folder, choose a video you want to blur and then hit the Create Movie button.
Step 2. Hit the (+) icon to upload the blurred picture you have downloaded. After that, click the Three dots icon, then choose the Picture in Picture option. Once the blurred picture is uploaded, edit and drag it to the part of the video you want to blur.
Step 3. Once satisfied, hit the Done button to add the video to your iMovie projects. If you want to share your video, click the Upload icon.
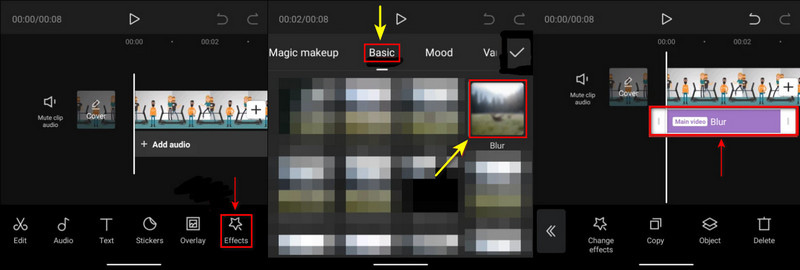
2. How to Blur Video on Capcut
Capcut is a mobile application that has easy-to-use editing tools and options. You can count on this application if you are looking for a basic video editor. It enables you to perform basic editing functions, such as adding text, effects and filters, cropping, cutting, and many more. This application can blur your video using an effect. Refer to the steps provided to learn how to blur video on Capcut.
Step 1. To begin with, download and install the application from the App Store. After installing, open the application and click the New Project button on your screen. Next, choose a video from your gallery that you want to blur, and click the Add button to proceed.
Step 2. The video you selected will be added to the timeline. From the same screen, click the Effects button from the bottom toolbar. You will see numerous effects available in this section, but head to the Basic category. Look for the Blur effect from the basic category, and click it to add to your video.
Step 3. To expand the blur effect towards the video, click the Blur bar marked in purple. Drag the pointers up until the end of the video. With that, your entire video is covered in the blur effect.
3. How to Blur a Video on Picsart
Picsart is a photo and video editing platform that allow users to create stunning pictures and videos. It is an easy-to-use application with numerous editing options and tools. In addition, it has built-in features, such as a collage maker, sticker maker, drawing tools, and many more. This application has a built-in effect and filter section, including blur. If you want to learn how to blur a video on Picsart, rely on the following steps.
Step 1. First of all, download the application from the App Store. Once done, proceed to open the application. Click the (+) icon, then the Edit a Photo button, and select a photo or video from your gallery.
Step 2. Once the photo or video is added, head to the Effects button and choose Blur effect. Also, you can set the blur value based on your preference. Once done, you will see the blur effect on your photo or video on the preview screen.
Step 3. Once done, click the Download icon on your screen to save the blurred version of your photo or video.

Part 3. How to Blur Videos Online
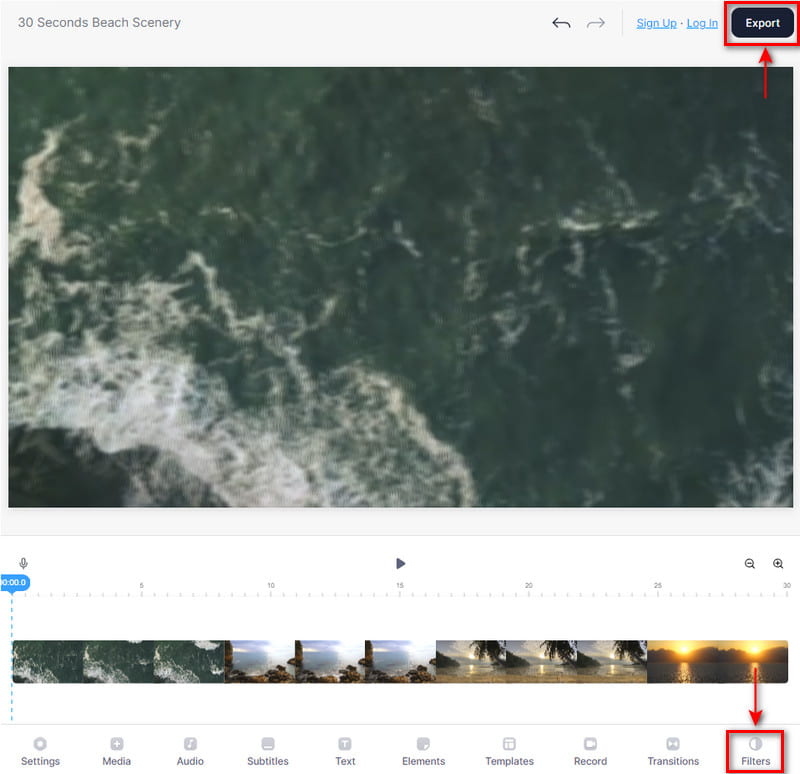
If you want a tool you can access online to blur your video, you can count on Veed.IO. This online tool is a free video editor that you access for free. You can edit your video online without downloading a program to your desktop. It has plenty of editing tools and options and has built-in effects and filters you can use. It has blur, box blur, and pixelate effects that you can add to your video. Proceed to the steps below to learn how to video blur online using this tool.
Step 1. Visit the VEED.IO’s Blur Video Online official website. Click the Blur video button on the main interface, and upload the video you want to blur.
Step 2. Once the video is added to the timeline, click the Filter from the bottom menu toolbar. Head to the Effects, scroll down, and select from Pixelate, Box Blur, or Bokeh Blur.
Step 3. Once done, click the Export button to save your video with the blur effect.
Part 4. FAQs about Blurring Videos
What is the effect of blur?
Once you apply a blur effect to your video, it will make your video looks uncleared, out of focus, or distorted.
What is the main purpose of blurring?
Blurring an image or video part’s main purpose is to enable you to share information while protecting sensitive information.
What is blurring in video editing?
It is a method used for privacy purposes and helps you highlight transitions and title screens presented. It is easier to read what texts are on screen without unneeded parts presented.
What are the types of blur?
There are four types of blur: defocus, gaussian, motion, and rectangular.
Conclusion
When you want to highlight what is being presented on your screen, it is better to blur what parts are not needed. Especially if you need to hide unnecessary parts from your video that does not need to be present. With that, you need to learn how to blur parts of a video to give focus to the particular subject. Rely on the mentioned tools above with different approaches to blur your video quickly and hassle-free.