How to Create a Slideshow Online [A Thorough Guide]
Since cameras and camcorders are popular, we store our experiences of important occasions in images and videos. To better preserve these sweet and unforgettable memories, creating a slideshow with images and videos is a good idea. This post will present an online slideshow maker you can access. Besides that, it will introduce an offline slideshow that is rich in ready-made themes. Are you ready to know these slideshow makers? If so, proceed to the following details.

PAGE CONTENT
| Usability | Arrange in Sequence | Audio Track | Duration | Ready-made Themes | |
| Google Photos Slideshow | Moderate | Users cannot change the order of the uploaded files. | Users cannot add music. | Users cannot shorten or lengthen the duration of each image. | It has no ready-made themes. |
| Google Drive Slideshow | Moderate | Users can change the order of the uploaded files. | Users can add music. | Users cannot shorten or lengthen the duration of each image. | It has no ready-made themes. |
| Animoto Slideshow | Satisfied | Users can change the order of the uploaded files. | Users can add music. | Users can shorten or lengthen the duration of each image. | It has ready-made themes. |
| Canva Slideshow | Satisfied | Users can change the order of the uploaded files. | Users can add music. | Users can shorten or lengthen the duration of each image. | It has ready-made themes. |
| Vidmore Video Converter | Satisfied | Users can change the order of the uploaded files. | Users can add music. | Users can shorten or lengthen the duration of each image. | It has ready-made themes. |
Part 1. How to Use Google Photos to Make a Slideshow
Google Photos is a straightforward photo organization application with the advantages of being online and bound to your account. It is a simple application that provides several useful features. One of them is the ability to make a slideshow using your images. With that, you can create and tell stories based on your images without switching between them constantly. However, it lacks editing options to customize the slideshow further.
To learn how Google Photos Slideshow works, proceed to the following steps:
Step 1. To begin with, launch the Google Photos application using your device.
Step 2. Once the application is opened, select Albums in the sidebar and choose the album that contains the images you want in a slideshow. Besides that, you can create a new album specifically for your slideshow project.
Step 3. Choose the images you want to appear in the slideshow. Continue making selections until you have selected all the images you want to appear in the slideshow. Remember that you can only select images for your slideshow in one album.
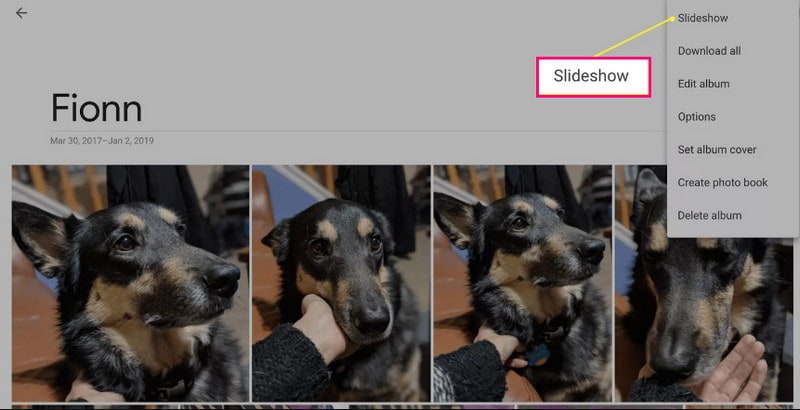
Step 4. Select the three-dot sign in the upper right part of your screen and select Slideshow from the drop-down menu list.
Step 5. The slideshow shows all the selected photos in the album and starts automatically with a 5-second fade between images. Unfortunately, this application does not enable you to customize the amount of time each image is shown for. If you wish to pause the slideshow, click the current image. To resume it, press the three-dots icon again and repeat the procedure.
Pros:
- It automatically creates a slideshow of your images.
Cons:
- Users can only select images from one specific album.
- There is no option to customize the amount of time each image.
- Users can't change the order of the images.
- Users cannot change or incorporate music into the slideshow.
Part 2. How to Create Slideshows in Google Drive
Google Drive is a cloud-based storage that stores your files securely and opens them from any device. It has three components: Google Docs, Sheets, and Google Slides. With the help of Google Slides, you can turn your images or videos into a slideshow. It has helpful editing options to help you achieve the best look you want for your slideshow project.
To learn how Google Drive slideshow works using Google Slides, rely on the steps presented:
Step 1. Using your Google account, select Drive from the nine-dots icons. Hit + New and select Google Slides from the list.
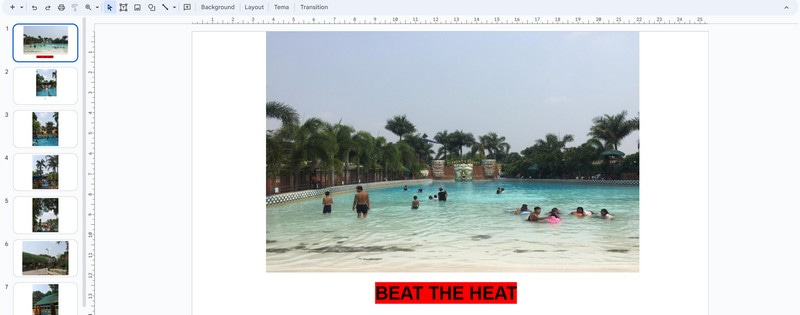
Step 2. Click the Insert tab, select Image, and choose whether to upload images from your computer, web, drive, and more. Depending on your preference, you can add single or multiple images per slide. If your images are not in the proper place, you can drag each image to its designated order.
Step 3. Add text, transition, select a theme, and change the background color to make your slideshow more appealing. Besides that, you can add music to your project by clicking the Insert tab and choosing Audio.
Step 4. Once satisfied, head to the File tab and select Download to save your slideshow project.
Pros:
- It enables users to add numerous images per slide.
- It enables users to add text, theme, transition, and more.
- It enables users to add music to their slideshow.
Cons:
- It consumes a lot of time to create a slideshow.
- When you add pictures, it must be per slide, not a single upload.
- There is no option to modify the amount of time per image.
Part 3. How to Do a Slideshow with Animoto
Animoto's Slideshow maker is easy-to-use and offers a lot of templates and themes you can choose from. It enables you to import multiple image or video files and apply the drag-and-drop method to add them to your chosen template. In addition, it is packed with editing options like changing the image's duration, color, layout, and more to level up your slideshow.
To learn how the Animoto slideshow works, count on the steps provided:
Step 1. Visit Animoto's official website using your browser. Next, click Get Started Free from the main interface.
Step 2. Click the Categories option and select the Slideshow from the list presented. Then, select a Template you want to use, and click Get Started.
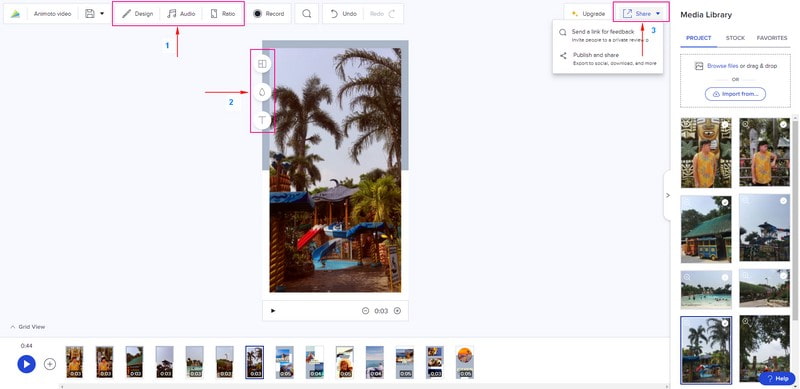
Step 3. Upload image or video files from the selection provided. After that, drag each image from your chosen template. Here, you can shorten or lengthen the duration of each image. Besides that, you can apply design, add text and audio and change your slideshow's aspect ratio, color, and layout.
Step 4. Once satisfied, click the Share button to publish and share your slideshow.
Pros:
- It offers numerous templates and themes.
- It enables users to change the background color and layout and add text.
- Users are allowed to shorten or lengthen the amount of time per image.
Cons:
- It requires users to sign in to their account.
- Avail of the paid version to remove for a watermark-free slideshow.
Part 4. How to Make Slideshow Online Through Canva
Canva is an online design platform with numerous elements and templates to make professional-grade graphics. Besides that, it is a design tool that enables you to create amazing slideshows by adding your image files. You can find slideshow templates for various occasions, including birthdays, holidays, graduations, travel, and more. Indeed, it can help you create a stunning slideshow that can gain much appreciation and views when you share it.
To learn how Canva Slideshow works, continue reading the steps:
Step 1. Go to Canva Free Slideshow Maker and hit Make a Slideshow to get started.
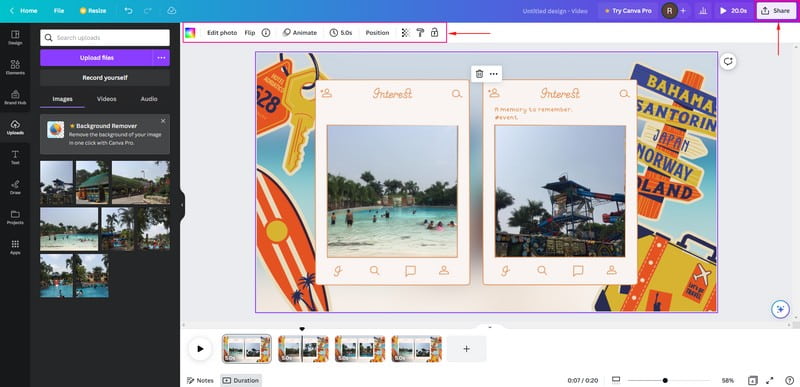
Step 2. You are directed to the Slideshow Video templates and select one you prefer to use. Next, head to the Uploads button, click Upload files, and select the image files you will use.
Step 3. Drag your uploaded image files to your chosen template and place them according to their order. Here, you can change the speed per image, and background color, crop the files, and add audio and animation.
Step 4. Once done, click the Share button and select Download to save your slideshow.
Pros:
- It enables users to add multiple image files to create a slideshow.
- It lets users change the image's duration and background color and add audio and animations.
Cons:
- It requires users to sign in to their accounts.
- Export settings are limited.
Part 5. Bonus: Offline Method to Create Slideshow with More Effects
Vidmore Video Converter primarily works as a converter with several built-in features, including MV. This feature allows users to create a slideshow using your image or video files. You can add images or video files as many as you want to incorporate into your slideshow. It has more than 40 ready-made themes you can select from. Adding an audio track to your slideshow is also possible to make it livelier. Besides that, you can use other editing options to help unleash your creativity and enhance the appearance of your project. On top of that, it has a user-friendly interface, making it easier to use, which is recommendable for first-time users.
To learn how to create a slideshow offline using Vidmore Video Converter, count on the following steps.
Step 1. Download and Install the program to have complete access to the program.
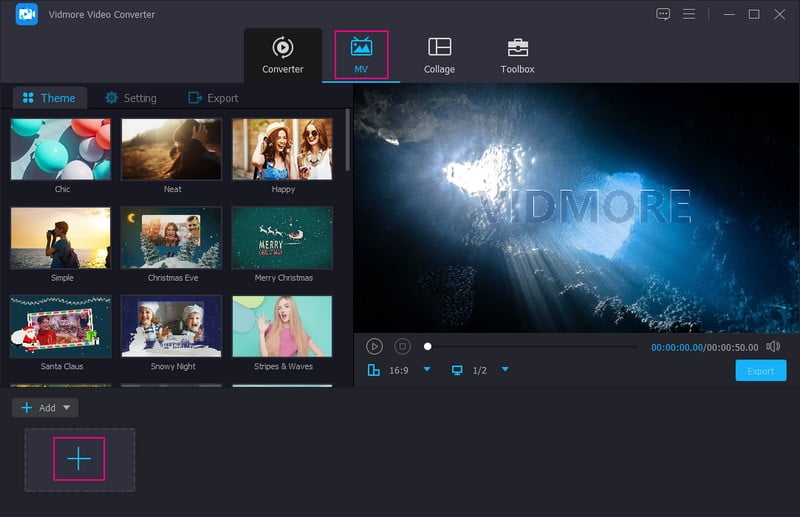
Step 2. Open the program, select the MV tab, and click the (+) icon to open your desktop folder. Select the image or video files you want to add to your slideshow. Then, drag these images or video files to arrange them based on your preferred order.
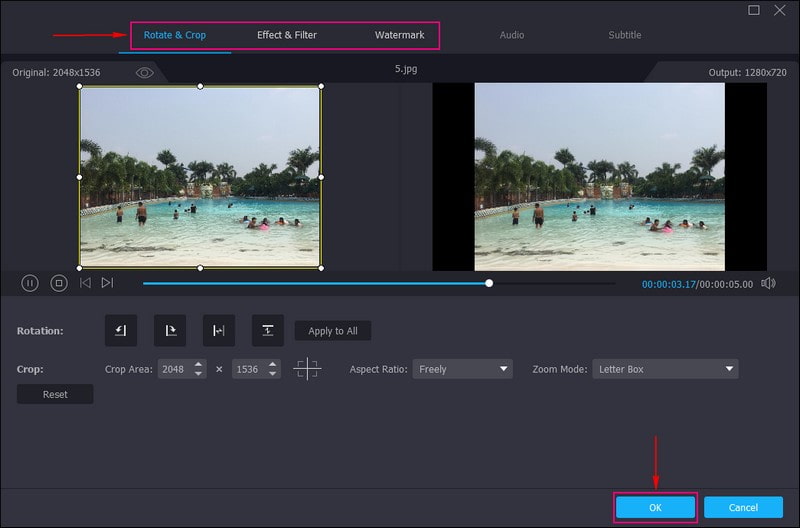
Step 3. Click the Edit icon, which contains various editing options you can apply to your project. Go to Rotate & Crop to correct the image or video presentation. Go to Effect & Filter If you want to enhance the quality of your project. Lastly, go to Watermark if you want to add a text or image watermark. Remember to hit the OK button to apply and save the changes.
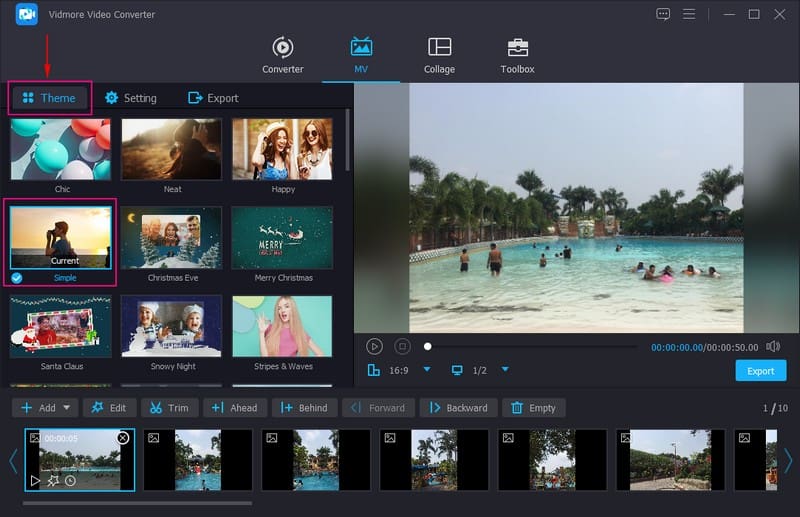
Step 4. Select a Theme from the list you like to use. When you click on a specific theme, the theme will be applied, and you will see the changes from the preview screen. Move to Settings, and enter a text from your slideshow's start and end parts. You can also modify the Font Style and Color based on your liking. Next, move to Audio Track, and add music from your folder. You can also modify the Volume and Delay according to your desired soft and loud sound.
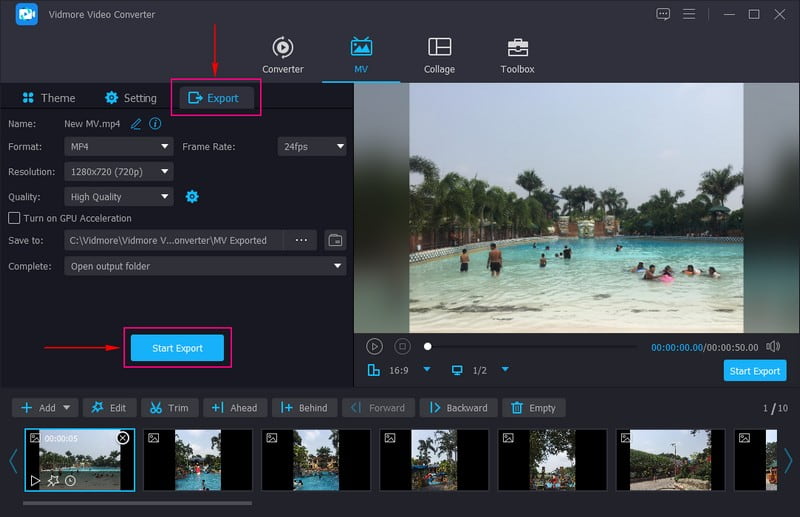
Step 5. Head to the Export button, and choose your preferred Format, Quality, Resolution, and Frame Rate. Once done, press the Start Export button to create your slideshow successfully.
Part 6. FAQs about Creating a Slideshow Online
How many photos is a 5-minute slide show?
A 5-minute slideshow contains 60 and 120 pictures to keep your audience viewers and interested to your project.
How long is a 15-minute slideshow?
A 15-minute slideshow contains ten slides up to 30 if each image has 30 seconds duration each using Powerpoint.
How many photos should be in a slideshow?
The suggested number of photos in a slideshow is 15-35 photos per average length song, which is about 3-4 minutes long.
Conclusion
You have learned how to create a slideshow online using various slideshow makers. These slideshow makers can help you produce a stunning slideshow you can share with your family, friends, and social media. But if you thought of using an offline slideshow maker, use Vidmore Video Converter. It has numerous ready-made themes and editing functions to help you create an appealing slideshow.