5 Feasible Ways to Create Slideshow on Windows and Mac
Can you turn your images from your last vacation, wedding, anniversary party, and other occasion into a slideshow?
It is necessary to create a slideshow for both personal and professional reasons. On the personal side, learning how to make an image slideshow can help you show off photos to friends and family. On the professional side, learning how to make a slideshow can benefit people in various lines of work. This post will instruct you on how to make a slideshow on Windows and Mac using different creators. Without further ado, continue reading, and learn more.

Part 1. How to Make a Slideshow on Windows and Mac
1. Vidmore Video Converter
When looking for a program, you must consider that it works perfectly. It should provide your primary needs and meet your expectation or standard. Besides that, it should have an easy-to-use and understandable interface that makes it easy for users to navigate. From all the mentioned qualifications, Vidmore Video Converter checks all the boxes. This program has a beginner-friendly interface, making it easier to use. With that, you do not need to be a professional editor to accomplish your task.
Vidmore Video Converter has a built-in MV feature that enables you to make a slideshow. It is the best slideshow maker, allowing you to use your image or video files. It provides more than 40 ready-made themes, which you can use and apply to your slideshow. These ready-made themes will add extra visual effects, appearing your image and video slideshow more appealing. Also, you can add an audio track to make your slideshow livelier. Besides that, using the other editing options will unleash your creativity.
- Make slideshow using image and video files with music.
- Equipped with numerous ready-made themes.
- Packed with various editing options beneficial for creating a slideshow.
- Text can be added to the beginning and ending parts.
Below is the guide on how to make a slideshow using Vidmore Video Converter:
Step 1. Download and Install Vidmore Video Converter
Download the program from the official website. After that, proceed to install the program by following the program's installation set-ups. Once installed on your computer, launch the program to get started.
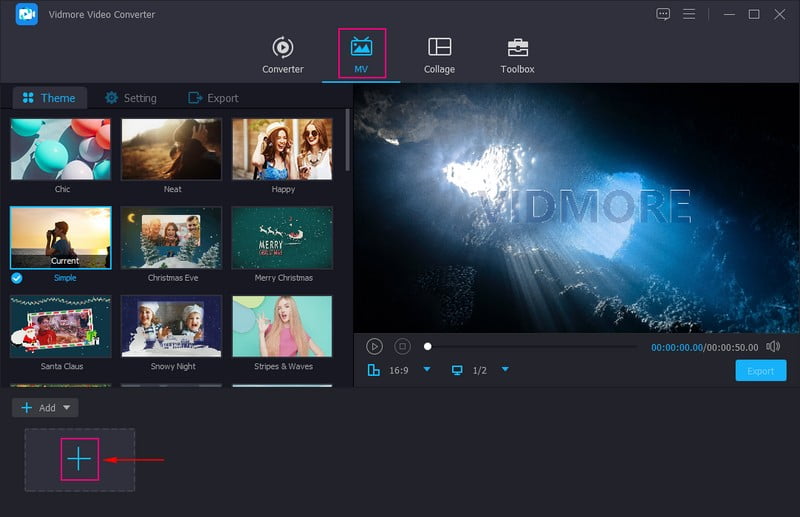
Step 2. Select MV tab
Once the program is opened, please navigate the MV tab from the main interface.
Head to the (+) icon, which will open your desktop folder, and select the images or videos you want to create a slideshow. After that, drag and drop the image or video files to arrange them according to your preferred sequence.
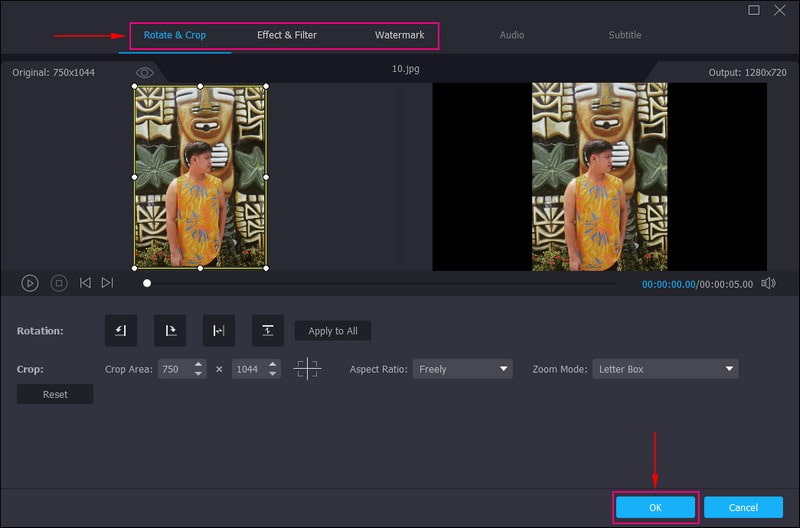
Step 3. Use Editing Options
Hit the Wand icon representing edit, which contains different editing options you can apply to your slideshow. On the Rotate & Crop tab, you can rotate your image or video files clockwise, counter-clockwise, and more. Also, you can set a number to the crop area to crop a specific frame from your files. Besides that, you can select your desired aspect ratio from the list presented. In addition, under zoom mode, you can choose from letter box, pan & scan, and full screen. On the Effect & Filter tab, you can modify the basic effects, such as contrast, brightness, saturation, brightness, and hue. Also, choose a filter you want to apply to your files. On the Watermark tab, you can incorporate a text or image watermark.
Note: Click the OK button on every change you make to apply and save the changes.
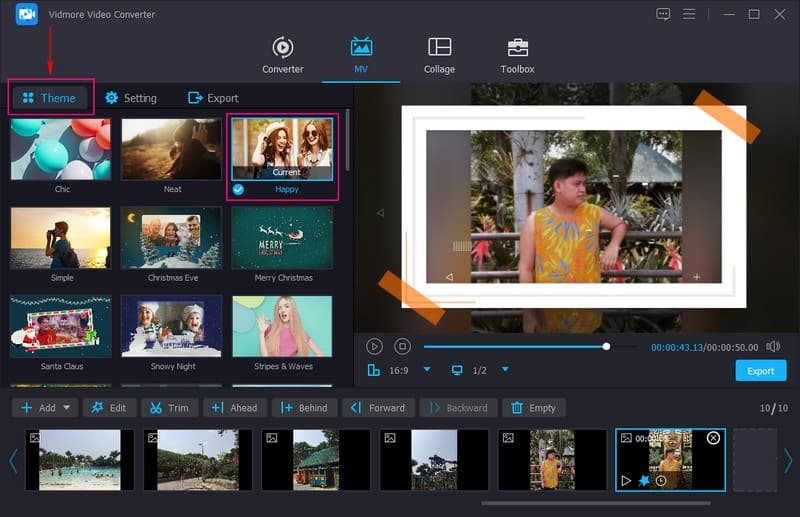
Step 4. Select a Theme
You are back in the MV section. This time, head to the Theme option and choose the best and perfect for your slideshow. Once you click a specific theme, you will see the changes directly from the preview screen once the theme is applied.
Once satisfied, move to the Settings option, and enter a Start and End title on your slideshow. Also, choose a specific Font style and Color according to your preference. Besides that, under the Audio Track option, you can keep the original audio track of your video files or background music. Also, choose whether to Loop Play, Fade in, and Fade out the background music. Here, you can modify the Volume and Delay based on your preferred soft and loud sound.
Step 5. Export Image/Video Slideshow
Proceed to the Export option, and select your preferred Format, Frame Rate, Resolution, and Quality. When done, hit the Start Export button to make your slideshow successfully. You can access your slideshow output on your desktop folder. Afterward, you can share your created slideshow with your family, friends, and social media platforms.

Pros
◆ It has a converter, collage makers, and several tools in one section.
◆ It has rotate, crop, effect, filter, and watermark options.
◆ Image or video files can be dragged and dropped according to the user's preferred sequence.
◆ It enables users to add music to the output.
◆ It is compatible with Mac and Windows systems.
◆ It is accessible without the need for an internet connection.
Cons
◆ Subscribe to the paid version to access the program's best and additional features and tools.
2. Movavi Slideshow Maker
Movavi Slideshow Maker is one of the best-recommended programs for making slideshows, automatically or manually. You have complete control over whether to let the program do the work for you and then tweak the result. But you can edit yourself if you want more control over the creative procedure.
This program enables you to add text to your photos in different styles. Also, it provides an extensive library of templates, effects, and filters to help you make your slideshow project more enticing. Besides that, it provides free-to-use stock music, or you can upload your desired music for your slideshow. If you decide to share your slideshow on social media, there will be no copyright issues. Overall, it is an excellent slideshow-making application to have on your desktop.
Key Features:
◆ Automatic and manual mode.
◆ Packed with visual effects, including ready-made themes, transitions, titles, stickers, filters, and effects.
◆ It can add both image and video files.
◆ Add up to 500 images and videos per slideshow.
Below are the steps on how to make a slideshow using Movavi Slideshow Maker:
Step 1. To begin with, download and install the program from the official website. After the installation process, open the program to get started.
Step 2. Once you open the program, two options exist to make a slideshow, allowing you to choose one. These options are Slideshow Wizard and Creating a Movie in manual mode. But if you want to save a lot of time, you better select Slideshow Wizard mode. It is the easiest method to make an appealing slideshow.
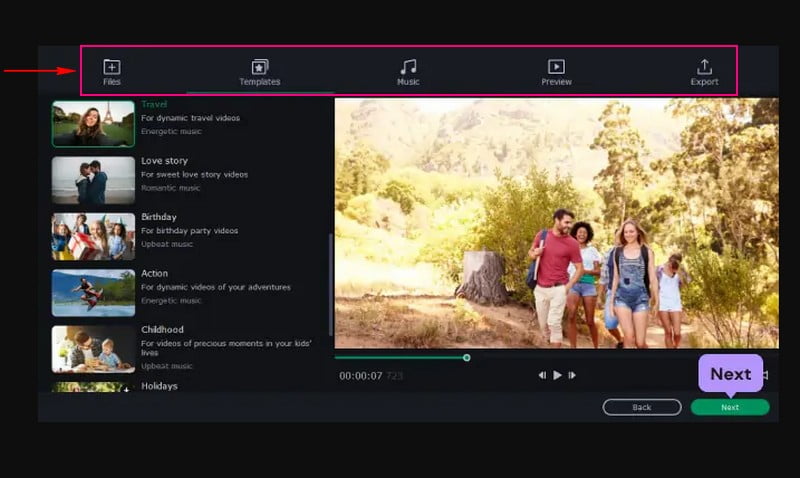
Step 3. In the Files tab, hit the (+) icon to open your desktop folder, and select the photos you want to use. After uploading the photos, you can drag each photo and place it in your preferred order.
Step 4. Head to the Templates tab and select a specific theme from the list of ready-made themes available for your slideshow presentation. If you prefer to incorporate your choice of music and transition style, skip this step by hitting No Theme and Next. Move to the Music tab; here, you will see a list of music files you can add to your slideshow. But if your choice of music is saved on your desktop, press the (+) icon and import your desired music file.
Afterward, go to the Preview tab and check if everything looks good. Under Titles, you can add Opening Titles and End Titles for your slideshow presentation. You can say anything about the slideshow before it starts playing. Under Slide duration, you can modify the duration of your slideshow according to your preferred speed. Besides that, you can choose either None, Fit to frame, or Add Background under the Fill black bars option.
Step 5. Once satisfied, go to the Export button, and hit Save the Video to save your slideshow project. To save the slideshow, name your project, select your preferred format, and choose the destination where you want to save your output. After that, press Start, and please wait for a few moments until your slideshow is ready.
Pros
◆ The interface is easy-to-use and understandable, which is recommendable for first-time users.
◆ There are two options to make a slideshow: auto and manual mode.
◆ It offers several built-in music files and permits users to add their desired music.
◆ It offers numerous visual effects beneficial for slideshow projects.
Cons
◆ The free version only lasts for seven days; after that, it will ask you to subscribe to the paid version of the program.
◆ This program is unstable for users who are using Apple Silicon M1.
◆ It causes slow rendering when working on a complex project.
3. Powerpoint
Powerpoint is an excellent program for presentations that are widely used in the education and business sectors. Besides that, it helps create slideshows. With Powerpoint, you can access all the features presented to make your slideshow project stand out and more appealing. The most popular features of this program are designs, animations, and transitions, which you can apply to your project. This program enables you to make impressive presentations that engage and attract an audience effectively. Indeed, it is a powerful slideshow creation tool that provides numerous editing options for your project.
Key Features:
◆ Equipped with several designs, transitions, and animations.
◆ It contains numerous editing options for creating slideshow projects.
◆ Enables users to add image and video files to the slideshow.
Below are the steps to learn how a Powerpoint slideshow works:
Step 1. First and foremost, launch the Powerpoint application using your desktop device and start a new presentation.
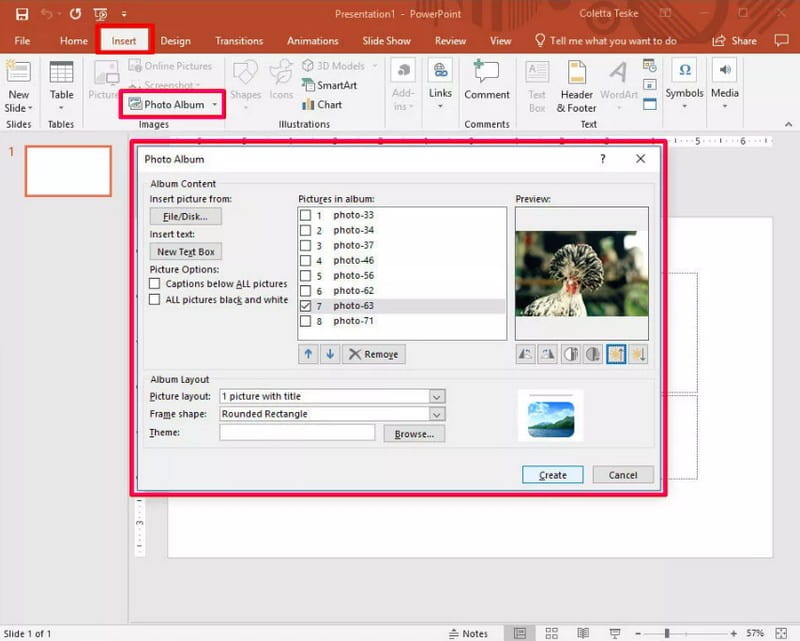
Step 2. Head to the top menu bar, select the Insert tab and click Photo Album from the options under it. Once clicked, a window will appear on your screen, presenting all the settings for modifying your Photo Album.
To insert your pictures, hit the button in the upper left corner of the labeled File/Disk. Choose the photos you want to use from your desktop. Once selected, the images will all be displayed on the Pictures in Album. After that, all the images are numbered based on the order in the presentation. They also have boxes placed before them, which you can modify using specific settings. These settings change the brightness and saturation, moving up and down and rotating the image.
Step 3. Head to the Layout option under Picture and change the Frame Shape. Click the small V-shaped button that shows a menu list of frames you can choose to reshape your images. Besides that, you can also select your desired theme for your slideshow. Once clicked, a window will appear on your screen, presenting a folder with all the themes you can choose from.
Step 4. Go to the Picture option, and click the Caption Below All Pictures button. Here, you can caption all the images with their default image names. Another option included here is the Insert text, where you can enter a text from each image. Also, from All Pictures Black and White, here you can turn your image to black and white if you want to.
In addition, head to the Transitions tab and select the transition you want to incorporate into your slideshow project. Next, move to Slide Show, click the Set Up Slide Show, and select Loop continuously until ESC to enables the Powerpoint loop slideshow.
Step 5. Once satisfied, head to the File tab and select Save. Your created slideshow will be saved in your desktop folder.
Pros
◆ It can turn your image presentations into a slideshow.
◆ It has effects and filter sections that can help you enhance your slideshow projects.
◆ It is rich in transitions, animations, text font styles, and designs and enables users to control the speed of the slideshow.
Cons
◆ It uses a lot of storage space on your desktop device.
◆ The method of making a slideshow should be narrower for first-time users.
◆ The built-in templates are repetitive and have the same style.
4. After Effects Premiere
After Effects is used in the post-production phase and has numerous effects that can be used to manipulate imagery. It offers designs titles, creates cartoon characters, and applies animation. Indeed, this program is known for storytelling, making visually appealing motion graphics, and more. Besides that, using this program, you are allowed to make slideshows. You can create a slideshow using your images as fast as possible. It is because the program will automatically create a slideshow of your images once you import them.
Key Features:
◆ Several visual effects.
◆ Various text animations.
◆ Packed with several transitions.
◆ Enables users to add images to create a slideshow.
Below are the steps to learn how Adobe Slideshow works:
Step 1. To have complete access, download and install the program on your desktop. When the installation process is finished, run the program to start.
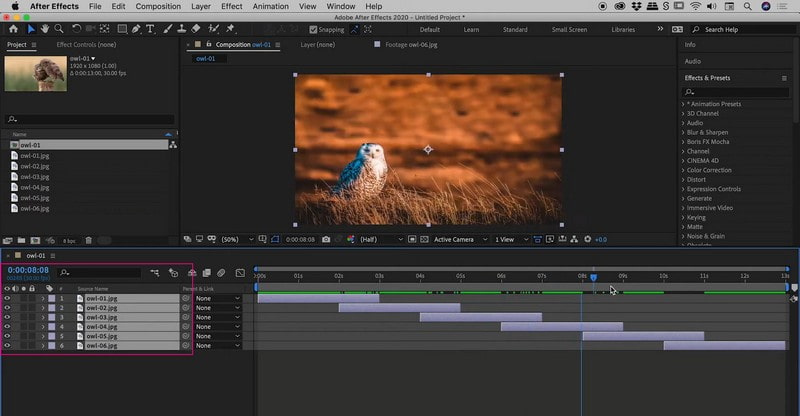
Step 2. From the Project panel, click and hold the images you want to make a slideshow. Then, drag these images to the New Composition Panel located at the lower part of the Project panel.
After that, the New Composition from Selection box will appear on your screen, and you can modify each setting presented. Remember to put a checkmark beside the Sequence Layers option, remove the checkmate beside the Overlap option, and enter your preferred duration. Next, move to Transition, and select the desired transition you want to apply to your slideshow from the list available.
Step 3. Click the OK button to apply the changes, and then you will see your slideshow playing on the preview screen. As you can see, before the image moves to another one, it has a blur effect before it ends.
Step 4. Once satisfied with the output, save your created output in your computer folder.
Pros
◆ It has a straightforward interface.
◆ It enables users to add visual effects to their slideshow projects.
◆ The transitions can be applied to making slideshows.
Cons
◆ It uses a lot of computer processing power and ram.
◆ Sometimes the program crashes in the middle of rendering the video.
◆ Previewing the output video takes a lot of time.
5. Final Cut Pro
Final Cut Pro is an advanced video-editing program professional video editors, and filmmakers use to make impressive animations and videos. Because of its high-tech features, users can incorporate several effects into their videos to make them look worth watching. Besides that, you can make video slideshows using this program, and it can help you give your still images a new look. When using Final Cut Pro, you do not need to use any template; instead, you can sequence photos on the timeline. Besides that, you can add transitions and audio effects to make a slideshow more appealing.
Key Features:
◆ It uses a magnetic timeline, allowing non-destructive editing of clips.
◆ Packed with numerous effects and video transitions.
◆ Enables users to add audio to slideshow projects.
◆ Images can be moved, trimmed, and reordered.
Below are the steps to learn how Final Cut Pro Slideshow works:
Step 1. Download and Install the program on your desktop. Afterward, open it, go to the File tab, and click New Project.
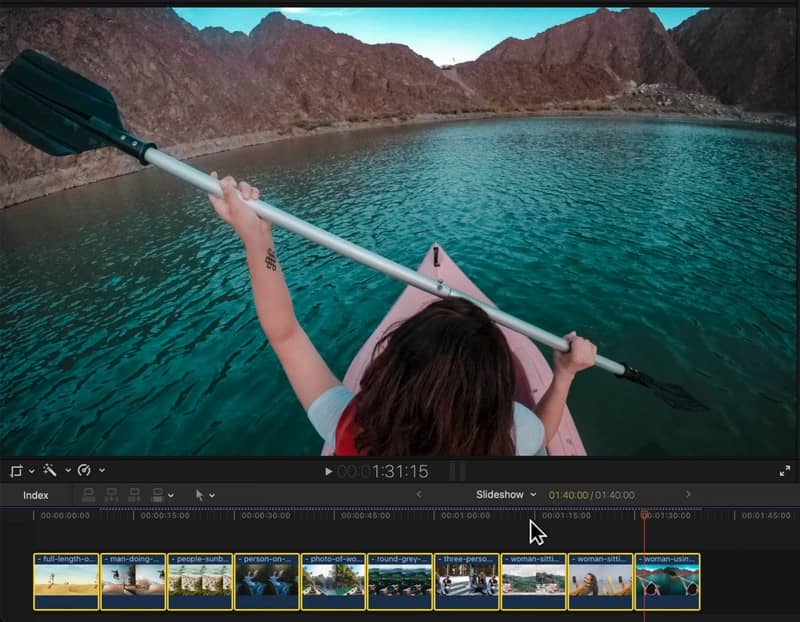
Step 2. Head to the File tab again, select Import, then click Files and upload all the images you want to make a slideshow. Next, go to the Browser pane and drag your images to the Timeline. Ensure that you follow the order in which you want these photos to appear in the slideshow. Also, you can drag each image individually and drop it to your preferred place before or after other photos. The slideshow will display the photos according to their position to the slideshow.
Step 3. Go to the Menu and press Effects and Video Transitions to add several transitions between your images. Now choose the type of transition you want to incorporate, such as Wipe or Fade. Your preferred effect will appear at your selected location in the Timeline. Also, you can add audio effects to your slideshow. To do that, hit File, select Import, and then Files. Here, select the audio file you want to use.
Step 4. Hit Effects and select Video Generators to add opening or closing credits. Click the Controls from the newly opened window and input the text you want to display in your video. Then, press Video and drag the box into the Timeline to your preferred location where it should appear.
Step 5. Once satisfied with your project, hit the File tab, select Export, and then QuickTime Movie. After that, select your preferred video quality and click OK to save your slideshow.
Pros
◆ It has free effects and provides excellent transitions.
◆ It has fast rendering.
Cons
◆ The file references should be relative to the project file for users to save time looking at the image or video files they will use.
◆ It uses a lot of storage space on desktop devices.
◆ The interface needs to be narrower for first-time editors.
◆ It is not available on Windows systems.
Part 2. FAQs about Slideshow
How long does a slideshow take 120 pictures?
A slideshow of 120 images would be about six minutes long if each photo lasted 3 seconds.
How many photos should be in a slideshow?
The recommended number of images in a slideshow is 25-35 pictures per average length song, which is about 3-4 minutes long.
How many pictures do I need for a 20-minute slideshow?
Each image will generally have a 7-second screen time, including transition time between images, so 8-9 images per minute are fine.
Conclusion
There you have it! You have learned to make a slideshow using the best slideshow maker. With that, you can start creating a slideshow that includes your pictures, whether your selfies, groupies or any pictures you have. But if you want an excellent slideshow creator, use Vidmore Video Converter. It is the perfect program and time to transform your images or videos into a fantastic slideshow!