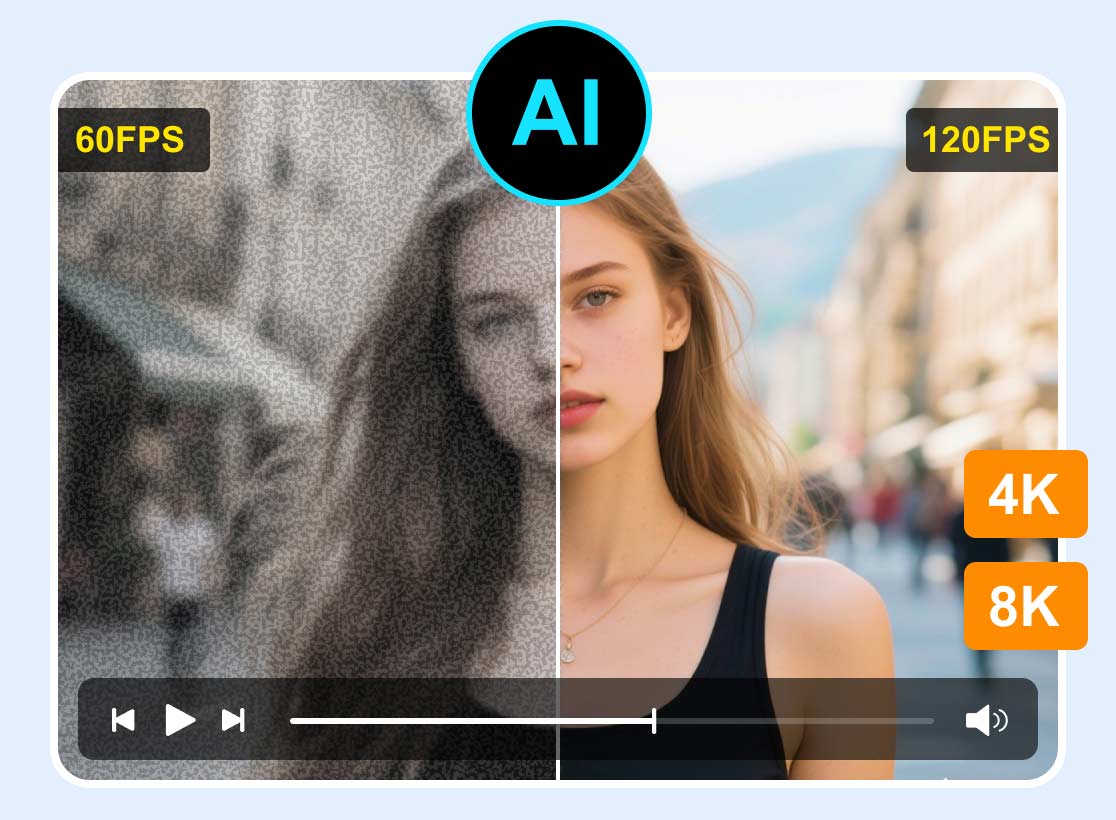
How to Remove Noise from Video for Enhanced Playback
Video noise is one reason your videos appear grainy, less professional, and distracting. It often happens when you are recording/filming in low light, compressing video files, or using high ISO settings. Fortunately, there are several tools you can use to address this video noise. By learning to denoise video, you can restore clarity and reduce noise. If you want to learn how to reduce and remove noise from your video, read this tutorial. We will guide you on how to optimize your video for better, more consistent playback.

PAGE CONTENT
Part 1. Why Video Noise Happens
When a camera struggles to capture enough light or detail, particularly in low-light or dark conditions, video noise can occur. The video appears less polished due to this noise, which manifests as flickering pixels, erratic color, or an overall loss of clarity.
Another reason the video noise occurs is sensor limitations and compression. Fine details may be lost, and noise may become more apparent when video files are compressed to conserve space. Plus, mobile phones and cameras with smaller or lower-quality sensors struggle to capture light, resulting in more noise in the final video. Having enough knowledge about these reasons enables producers to modify their shooting environment, for example, by utilizing better lighting or camera settings, to minimize noise before editing.
Part 2. 5 Ways to Remove Video Noise on PC/Phone
Do you want to take a look at the best video denoising programs? Please see the comparison table below. After that, you can start learning the best methods for removing the nose from your videos.
| Video Denoiser | Best for | Starting Price | Pros | Cons |
| VidHex Video Enhancer | Quick AI-powered enhancement and denoising for everyday creators | $31.92 monthly | • Fast processing. • Supports high-quality video. • Supports various output formats. | • Some features are available on the paid version. |
| Topaz Video AI | Professional restoration, advanced denoising, and upscaling | $299 a year | • Excellent AI-powered denoising • Multiple enhancement models (denoise, sharpen, stabilize) | • Expensive for casual users • Heavy on hardware requirements |
| Adobe Premiere Pro | Professional video editing with integrated denoising | $22.99 monthly | • Built-in VR DeNoise effect • Powerful editing suite • Works seamlessly with other Adobe apps | • Steep learning curve • Subscription-based pricing • Resource-intensive |
| CapCut | Beginners, influencers, and quick social media edits | $9.99 monthly | • Free version with strong AI tools • Easy to use across desktop, mobile, and web • Pro version unlocks watermark-free 4K exports. | • Some advanced features are locked behind Pro • Occasional lag on a heavy project |
| PowerDirector | Enthusiasts and creators looking for a balance of speed and advanced editing tools | $4.33 monthly (billed annually) | • Fast rendering with hardware acceleration. • AI-powered enhancement. • Intuitive interfaces. | • Subscription model required for latest AI updates. • AI tools can be CPU/GPU intensive. • Notification pop-ups in the free version. |
Method 1. Denoise Video Using VidHex Video Enhancer
Suppose you are looking for an excellent program to remove noise from your video. Look no further than VidHex Video Enhancer. With this program's Video Denoise feature, you can produce a better version of your file. You can make it clearer and smoother, resulting in a successful video playback. What we like here is that denoising videos is simple, thanks to its comprehensive user interface. The good part here is that you can change your video's output format, resolution, bitrate, and more. Lastly, you can access this reliable video denoiser on both Mac and Windows, making it ideal for all users.
More Features
- • It has a smooth video denoising process.
- • The program supports various formats, including MP4, MKV, AVI, FLV, WMV, and more.
- • It can offer various enhancement models, including a face model, an anime model, a colorization model, and more.
- • The software supports batch processing.
To learn how to denoise video using VidHex Video Enhancer, follow the steps below.
Step 1. First, download VidHex Video Enhancer on your Mac or Windows. Then install it to begin denoising your videos.
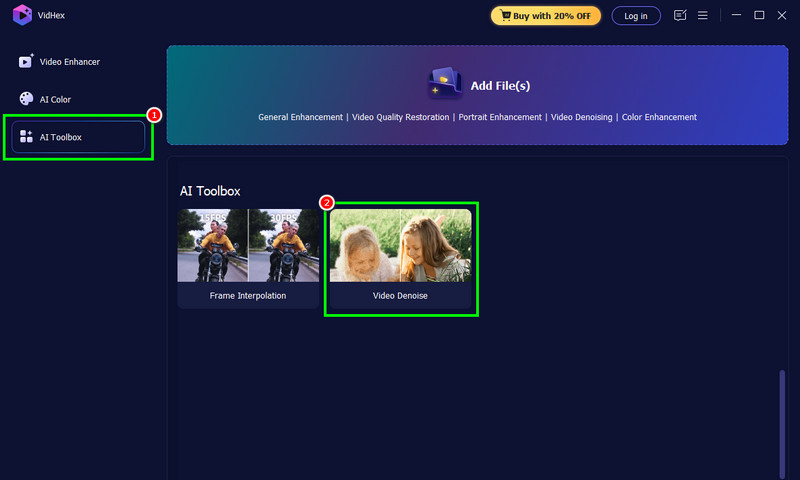
Step 2. From the interface, proceed to the AI Toolbox. Tap the Video Denoise feature to start adding the video you want to process.
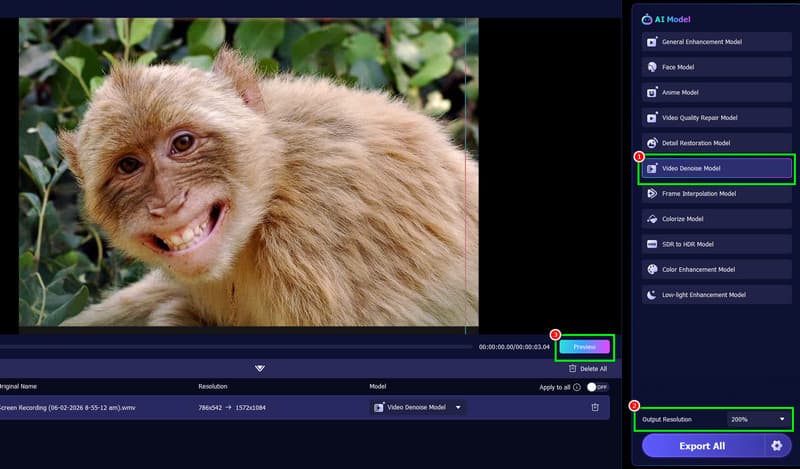
Step 3. After selecting the Video Denoise Model in the right interface, you can also choose the desired video resolution. You can also click Preview to view the final video.
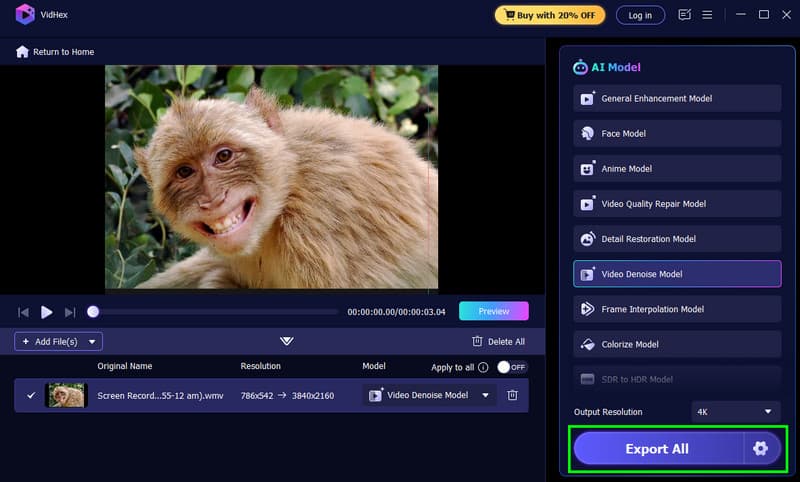
Step 4. Finally, hit the Export All button below to begin saving the final video. Once done, you can now play it and enjoy the content.
Method 2. Denoise Video Using Topaz Video AI
Another AI-powered tool you can rely on to effectively reduce noise in your video is Topaz Video AI. Thanks to its Video Noise Reducer, you can address noise and adjust to your preferences. The best part is that you can access all the necessary features with the software. You can sharpen the video, apply compression, adjust zoom, and more. It also has a fast export process, allowing you to get results without consuming much time. The only drawback here is that the program is resource-intensive. Plus, some features are only available on the paid version. If you need an effective video noise reduction program, consider this one.
Drawbacks
- • Some features are available only with the premium version.
- • There are times when the platform is crashing.
- • It requires a high-spec computer to perform smoothly.
- • The software is not free to use.
- • Its user interface is complicated, especially for non-professional users.
- • When using a low-spec computer, the program may crash.
- • To save the final video at the highest quality, subscribe to the plan.
- • It inserts a watermark on the free version.
- • Lacks deep color grading and flexible industry-standard shortcuts.
- • Many AI features require additional “Credits” on top of the subscription.
- • Frequent complaints about crashes and lag on heavy or high-res (4K/8K) projects.
- • Intrusive marketing notifications even for paid subscribers.
Follow the instructions below to reduce the video noise.
Step 1. The first step is to download the Topaz Video AI program to your computer. After the installation, start denoising your video.
Step 2. Go to the File section and click Open to load the video you want to enhance.
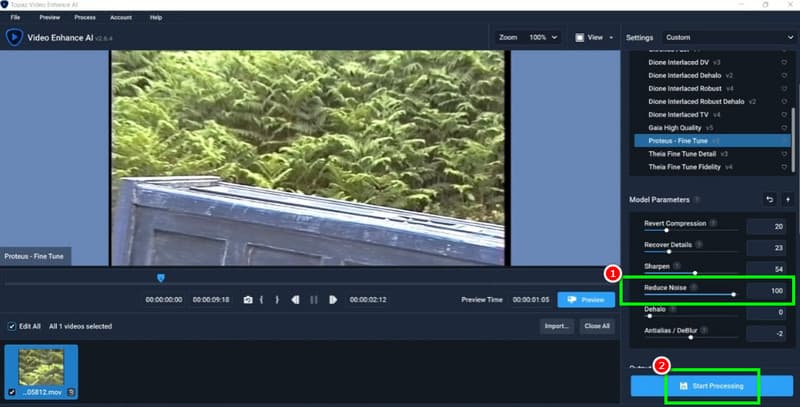
Step 3. From the right interface, select Reduce Noise, then use the adjustable slider to reduce noise.
Step 4. For the last step, click the Start Processing button below. Once done, start watching the video on your device.
Method 3. Denoise Video Using Adobe Premiere Pro
One of the most effective and advanced video editing programs for lowering noise in video is Adobe Premiere Pro. Using built-in effects and adjustments that remove unwanted speckles while preserving key features helps clean up grainy or low-light videos. Editors can easily apply denoising effects, adjust settings, and mix them with other upgrades to achieve professional-quality results, thanks to its versatile tools. You can also access additional editing tools to improve the video. You can crop, trim, adjust color, add text, and more. Because of this, Premiere Pro is a dependable option for both novice and experienced artists who desire smooth, noise-free graphics.
Drawbacks
To denoise video in Adobe, follow the steps below.
Step 1. Download and install Adobe Premiere Pro on your computer. Then, launch it and add the video to the Timeline section.
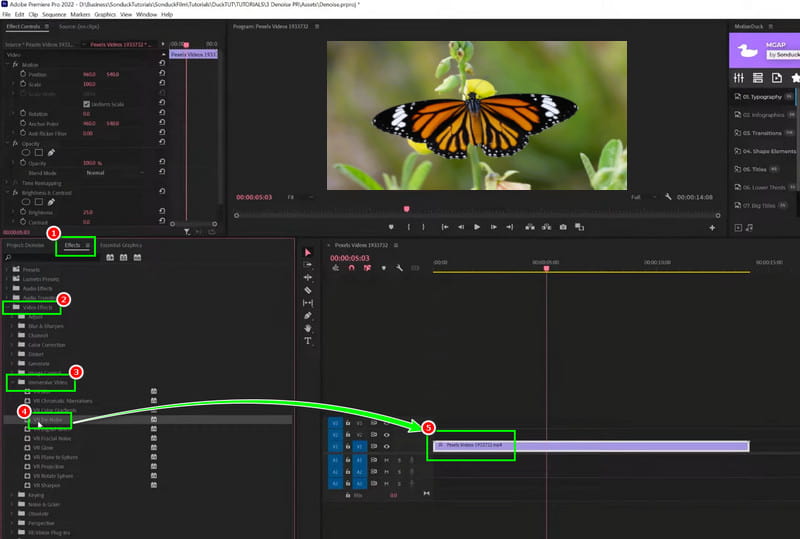
Step 2. After that, proceed to the Effects > Video Effects > Immersive Video section. Then, click and drag the Video Denoise feature to the timeline.
Step 3. As a result, the video noise will decrease. To adjust the noise level, change the value in the Noise Level section. Once you're satisfied, save it to your device.
Method 4. Denoise Video Using CapCut
CapCut is also ideal for removing video noise. With its smooth video noise removal, this tool is ideal for all users. In addition, it offers two noise-reduction options: weak and strong. Additionally, you can improve your videos in several ways. You can adjust the video color, crop it, change the playback speed, cut it, and more. What we like here is that you can access the video editor on various platforms, including Windows, macOS, iOS, and Android.
Drawbacks
To denoise video on CapCut, follow the steps below.
Step 1. Download CapCut on your computer. After you launch it, click the Create Project button to add the video.
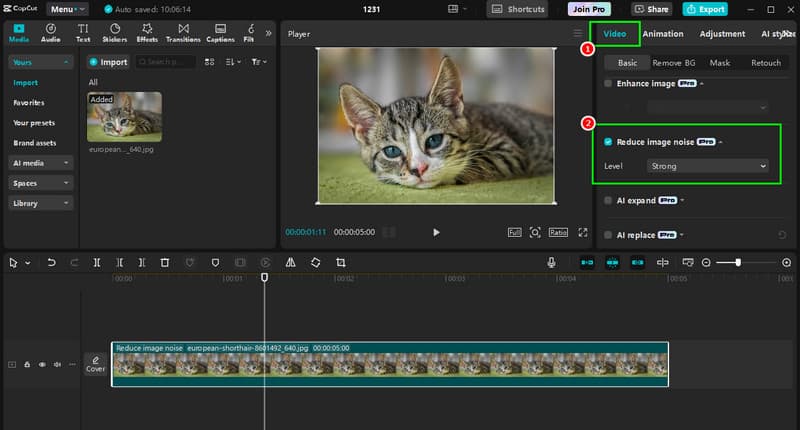
Step 2. Then, from the top-right interface, select the Video section. Proceed to the Reduce Image Noise and choose your preferred level.
Step 3. After checking the result, you can now tap the Export button above.
With these methods, reducing noise in your video is easy. Thus, a straightforward approach to the instructions above is to achieve better video playback.
Method 5. Remove Video Noise via PowerDirector
Do you prefer to edit using your smartphone? If yes, you can rely on PowerDirector. This mobile application is accessible using Android or iPhone devices. It is commonly used for cutting, editing, refining, and sharing videos. It has a built-in feature to help you remove or reduce noise and grainy video. That enables you to produce the high-quality video you wish to have.
Drawbacks
Step 1. Open the application using your mobile device. Next, add your video to the main timeline track. Click the Media icon, proceed to the Video section, and select the video you want to denoise.
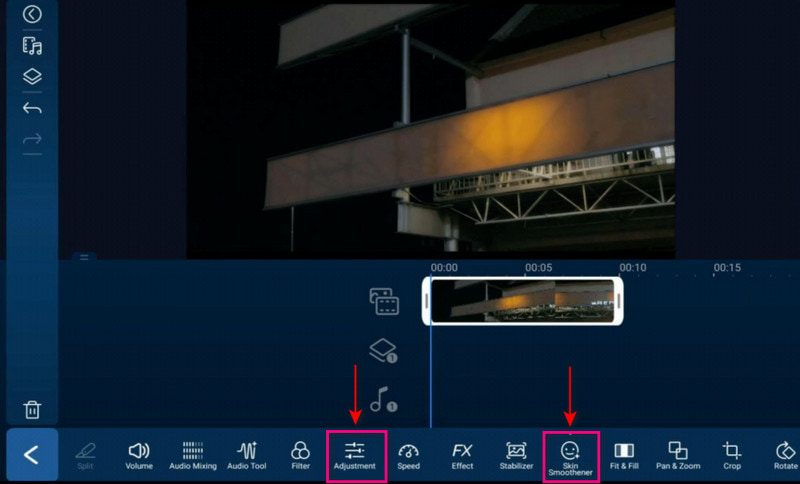
Step 2.To denoise your video, tap your video, and select Skin Smoothener from the menu options. From there, increase your video's amount of Skin Smoothness up to 100. Afterward, proceed to the Adjustment, then Sharpness, and increase the amount of Sharpness up to 100.
Step 3. Once settled, click the Save icon to save your clean and without grainy effect to your file folder.
Part 3. FAQs about Denoising Video
Is it easy to denoise video?
Absolutely, yes. Removing and reducing video noise is simple when you use the right tool. For beginners, you can access an easy-to-use video denoiser. For professionals, using an advanced tool is ideal.
What tools are perfect for denoising videos?
There are various tools you can access to effectively denoise videos. Some of them are VidHex Video Enhancer, CapCut, Premiere, Topaz, and more.
How to prevent video noise during filming?
The best thing you can do is to use proper lighting and avoid over-compression. Additionally, always use a higher-quality sensor for better output.
Conclusion
Thanks to this tutorial, you have explored the best methods for denoising video. Thus, you can use this article to review all the details and enhance your videos for a better viewing experience. Additionally, if you are looking for an excellent tool that delivers the best results, we recommend VidHex Video Enhancer. This program removes noise from your video smoothly, making it ideal for users.