Article Title: How to Make Videos Better Quality on Instagram [Realiable Ways]
Are you one of those people who like to upload and share videos on social media platforms? These days, posting videos on our social media accounts is commonly done. When you scroll over to your social media account, you will see different video content uploaded by your internet friends. You can upload a video from a place or occasion you visited or a random video you do daily.
Instagram is a popular social media platform usually used to upload eye-catching pictures or videos. A free photo and video-sharing application that enables users to share photos or videos with their followers. However, users experience that when their videos are uploaded, they suddenly become blurry and seem low-quality. This post will present information that tackles the problem you are encountering regarding the platform. It will also provide information on how to post high-quality videos on Instagram. To learn more about these, proceed by reading the following information.

PAGE CONTENT
Part 1. Why are My Instagram Videos Blurry
There are different reasons why the video blurs after uploading it using the application. It is a common issue that users experience when they upload their videos. Why are my Instagram videos blurry? To fill your curiosity, refer to the information provided.
- First on the list is the problem regarding the internet connection. A fast and stable internet connection is necessary when uploading a video using the application. If not, your video will get blurry because it is not fully loaded, and the quality will be reduced to upload it.
- It is necessary to have an updated application to upload a better-quality video. If you still use the old version, your video might appear worse and blurry than you think.
- The video being uploaded might not be the required standard size as there is an existing size limitation. In that case, your video will be compressed and appear blurry once uploaded.
- Do not use your phone camera but the application’s camera, with no trimming or quality loss. With that, your video will not appear blurry once uploaded.
Part 2. How to Improve Video Quality For Instagram
1. Vidmore Video Converter
As a first-time user or novice in video editing, it is essential to use an application that is easy to understand. It should be an application that meets your expectations and provides your basic needs in editing. The best application you can rely on that checks all the boxes is Vidmore Video Converter. This program has a user-friendly interface, so it does not matter if you are a beginner in video editing. This program has numerous built-in features, such as a converter, ready-made themes, collage makers, and a section where tools are located.
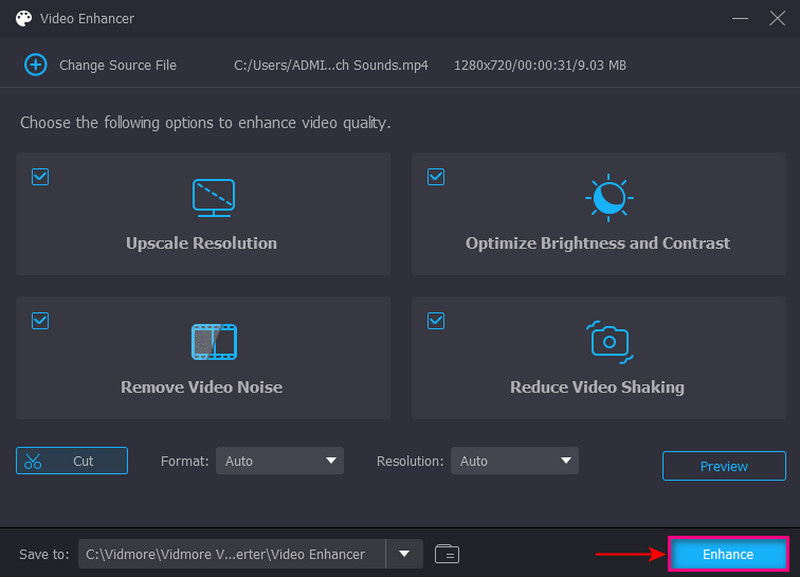
Video Enhancer is one of the tools located in that section. It is the primary tool to improve the video quality you want to upload. This tool has the following options to enhance video quality: upscale resolution, optimize brightness and contrast and remove video noise and shakiness. You can produce the high-quality video you wish to upload on your social media accounts. To know to improve video quality on Instagram using this program, rely on the steps below.
Step 1. Download and Install Vidmore Video Converter
To have complete access, download and install the program. When the installation process is done, launch the program to get started.
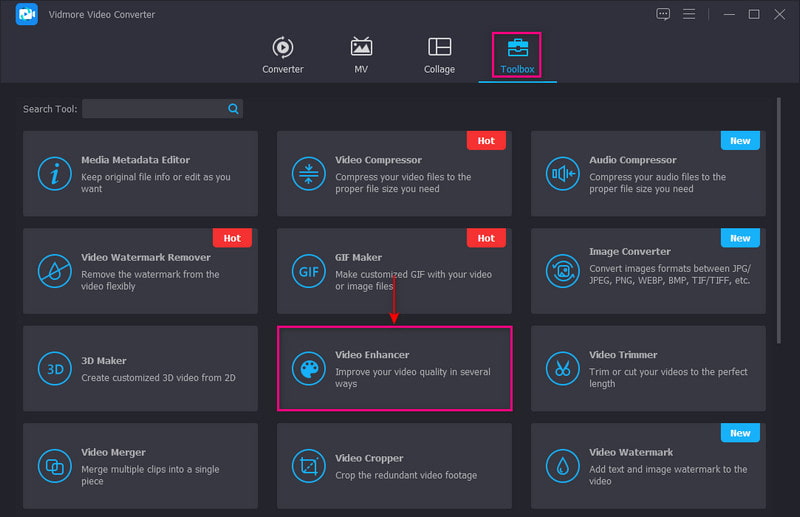
Step 2. Choose Video Enhancer
When the program is opened, locate the Toolbox tab, and select Video Enhancer from the list of tools presented.
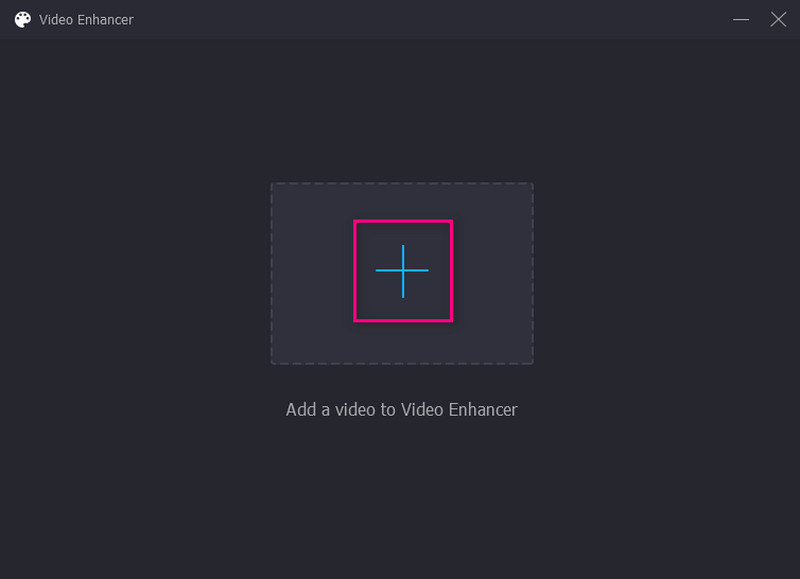
Step 3. Add a Video to Video Enhancer
Click the (+) icon in the center of your screen. It will automatically open your computer folder and select a video you want to improve the quality.
Step 4. Improve Video Quality
A new window will appear on your screen with the following options to enhance video quality. These options are Remove Video Noise, Optimize Brightness and Contrast, Upscale Resolution, and Reduce Video Shaking. You have complete control to enable the four key features on your screen. With that, check the small box beside the following options. After that, click the Preview button to see the changes made. In addition, click the Resolution option to select a higher resolution.

Step 5. Save Improved Video Quality
When you are done, click the Enhance button. After that, your video will be saved in your computer folder.
- Support improving all kinds of video quality in just 1 click with AI.
- Multiple AI models for unblurring, denoising, upscaling, colorizing, etc.
- Support exporting video resolution up to 4K and 8K.
- Support almost all popular video formats for Facebook and Instagram.
2. Capcut
Typically, you upload videos on Instagram using your mobile device. Improving the video quality using a mobile application is also a better option. Capcut has a beginner-friendly interface that is easy to understand and control. It offers excellent features to enhance your videos, making basic color adjustments and stabilization. In addition, it enables you to change the framerate and resolution of your video to produce a high-quality video output. To learn how to improve video quality on Instagram using Capcut, refer to the steps presented.
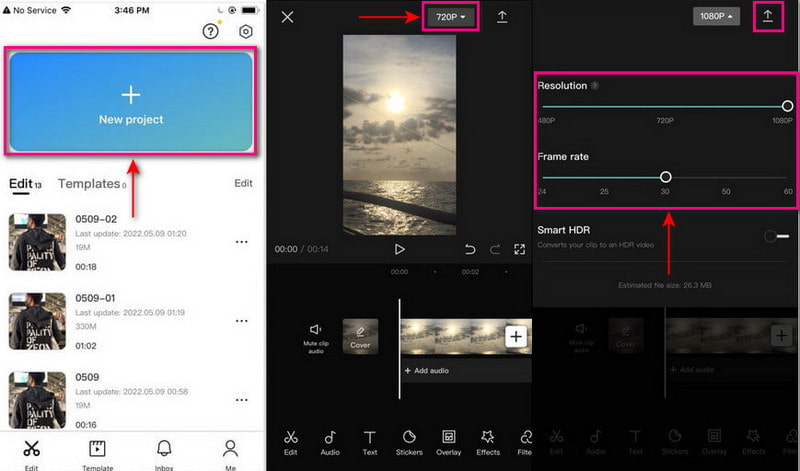
Step 1. Download and Install the application using your mobile device. Once done, proceed to open the application. Hit the + New Project button on the upper corner of your screen to add, and select the video. Once done, click the Add button to upload your video to the editing section.
Step 2. Head to the upper right corner of your screen once your video is placed in the main editing section. Head to the Resolution drop-down menu list, and a slider will appear on your screen. From there, set the higher quality and frame rate you prefer to improve the video quality.
Step 3. When settled, click the Export button to save your edited video to your device folder.
Part 3. How to Post High-Quality Videos on Instagram
Below are the steps on how to keep high-quality videos on Instagram:
Step 1. Launch the Instagram application on your mobile device. Remember to have the latest version of the application.
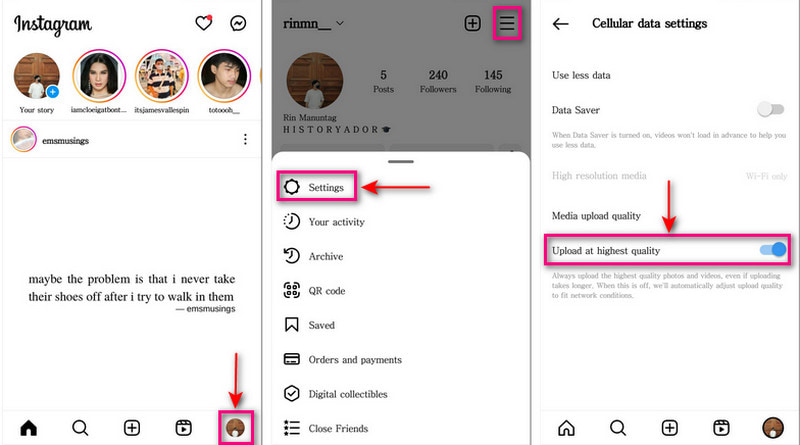
Step 2. Click your Profile icon located at the lower right corner of the application. It will bring you to your profile page from the home tab. Next, click the three horizontal lines icon on the upper right corner of your screen.
Step 3. A menu panel will show up on your screen. Click Settings first on the list, and the settings options will open. Next, click the Account, scroll down, and look for the Cellular data use option.
Step 4. Head to the Media upload quality, and enable the Upload at highest quality option. When you enable this option, Instagram will upload your videos in the highest quality.
Part 4. FAQs about Instagram’s Video Quality
How do I stop Instagram from reducing video quality?
Ensure you post video content that fits the recommended dimensions for maximum quality. Instagram will reduce your video’s quality and resize your content if not.
What is the best video quality for Instagram?
The best video dimension on Instagram is 1080 pixel by 1920 pixel which provides the best quality video.
Does Instagram allow 1080P video?
The recommended video size for an in-feed video is 1080 pixel by 1350 pixel. However, you can use 1080 pixel by 1080 pixel, 1080 pixel by 680 pixel, or 1080 pixel by 1350 pixel if needed.
Conclusion
You cannot help but be disappointed when you make a good quality video, but when you upload it, it looks different. This post gives you an idea of how to avoid it by following the abovementioned information. Also, you have learned how to improve video quality on Instagram using a mobile and desktop device. With that, you can now post high-quality videos on Instagram without thinking about having low-quality videos.