Increase the Video Speed in Adobe Premiere: Step-by-step
In every piece of creative work, the transitions between ideas and sections are the single most crucial feature. You are engaging someone for the length of a piece of content you created, whether an essay or a video. It demands that you deftly thread your different ideas and thoughts into a coherent narrative. If you jump about too much from one topic to another, you risk confusing your readers and losing their interest in what you have to say. As any competent video editor will tell you, recording a scene in slow motion and then speeding up the conclusion in post-production is a regular and effective transition. We've compiled a tutorial that delves into three simple techniques on how to speed up a video in Premiere.

- Part 1. How to Fast Forward a Video in Premiere
- Part 2. Easier Way to Speed Up a Video
- Part 3. FAQs About Speeding Up a Video in Premiere
Part 1. How to Fast Forward a Video in Premiere
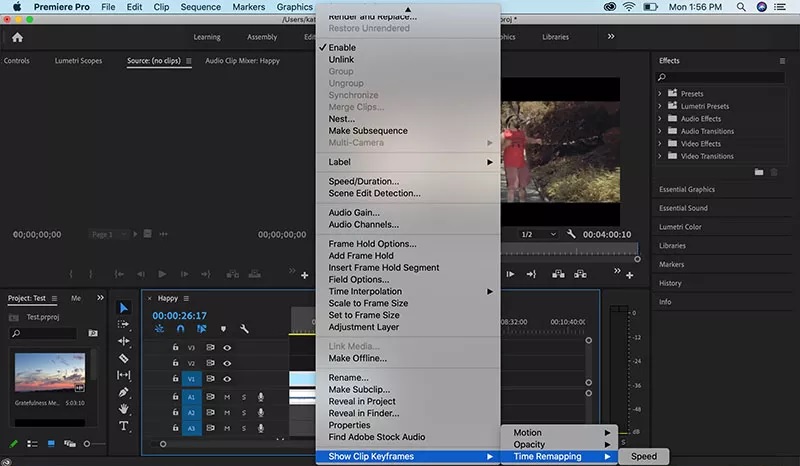
1. Time Remapping
Time Remapping is another function of Adobe Premiere Pro that you can use to speed up any video clips you have imported into the program. You'll locate this option under the Edit menu of the editor. To do this, kindly follow the instructions provided further down the page.
Step 1: Click and drag the clip track's vertical position in the Timeline to make it taller. To modify the clip's speed, choose Fx from the clip's menu, then select Time Remapping.
Step 2: This band may be dragged up or down to change the clip's pace. Just turn up the volume to speed up a clip that is initially playing more slowly. To speed up your videos, you must use keyframes. Hold the Command key while clicking the Control + C and then the rubber band. You might split the video into three pieces if you added two keyframes. To adjust the playback speed, click and drag the middle portion upwards or downwards.
Step 3: The whole keyframe may be moved by simply dragging it while holding down the Option key. Test out different ramp-up durations till you locate a time frame that's convenient for you.
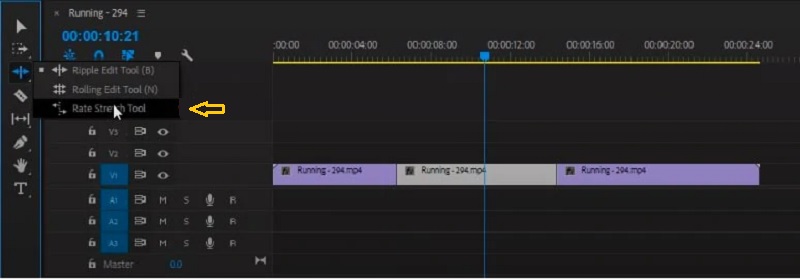
2. Stretch Tool
If all you want to do is speed up a movie, don't worry too much about how quickly the speed of the video changes. The Rate Sketch Tool in Premiere Pro may be an alternative method that works for you. The Rate Stretch feature in Premiere Pro allows you to vary the length of your clip by changing the pace of the clip. It ensures that the whole clip will always fit inside the period you choose, regardless of how long the clip is shortened. Please refer to the instructions below if you would like to use this tool to speed up one of your clips.
Step 1: To begin, choose a clip from the Timeline you want to use.
Step 2: You may access the Rate Stretch Control by clicking the Toolbar's third button. In addition to that, you may input the letter R using the keyboard that is available to you.
Step 3: After that, to advance the movie more quickly, drag the film's border toward you from the outside of the screen. Altering the clip directly next to it is another option for closing the gap in the Timeline.
3. Speed Duration
Step 1: Click the button once the video has been imported into the Timeline.
Step 2: Then, choose the Speed/Duration option using the right mouse button on the clip. You may also press the Control or Command key in combination with R.
Step 3: Lastly, raise the percentage of the playback speed and then click the OK button.

Part 2. Easier Way to Speed Up a Video
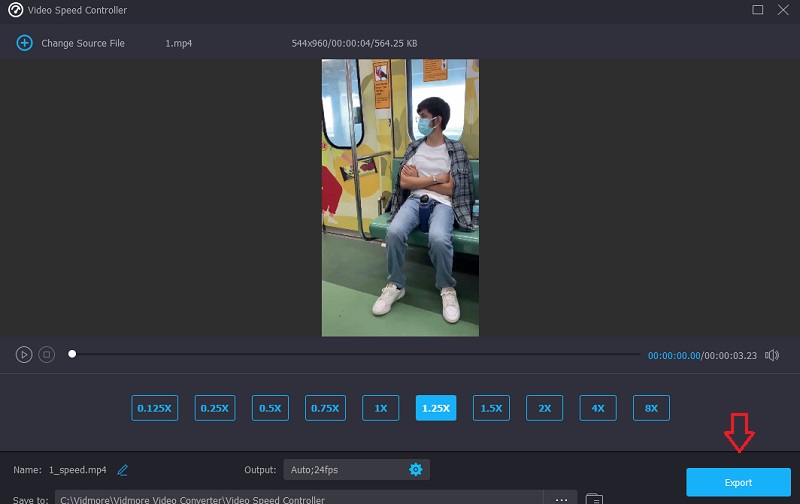
Suppose you are working on a straightforward video project and cannot access Premiere Pro at the moment. In that case, an excellent option is to use Vidmore Vidmore Converter to accelerate the pace of your video. You may make a movie or a piece of a video play up to eight times quicker than the original video with the help of Vidmore Video Converter. You can accomplish it with only a few clicks.This software product is a video and audio editor that enables users to enhance video in the quickest and easiest method possible. You can find the video speed controller in the toolbox that is included with the Vidmore Video Converter. With the help of this video speed controller, users can return a video to its average pace even after it has been sped up or slowed down.This software not only functions as a video speed controller, but it also lets users trim, merge, cut, and apply other effects to their films. It also has a quality/output format adjustment option, so customers can rest easy knowing that it won't lower their content. Users shouldn't be concerned about a drop in quality. In short, you must download and run this program.
Step 1: The procedure for installation is of utmost significance. To do this, click the Free Download button on the homepage. After that, give the software permission to run on your Windows or Mac OS computer.
After you have navigated to the main interface, choose the Toolbox tab and then the Video Speed Controller from the menu that appears. After some time has passed, you may upload your video by using the Plus button.

Step 2: Vidmore's video speed controller has eight different settings. Pick the one that appeals to you the most and then click on it.
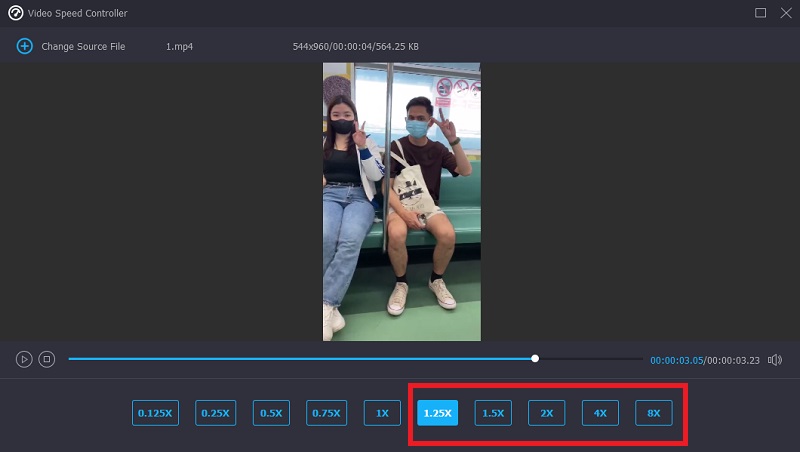
Step 3: You may determine whether or not you want to alter the quality of your file by pressing the symbol that looks like a setting in the bottom portion of the playing speed choices.
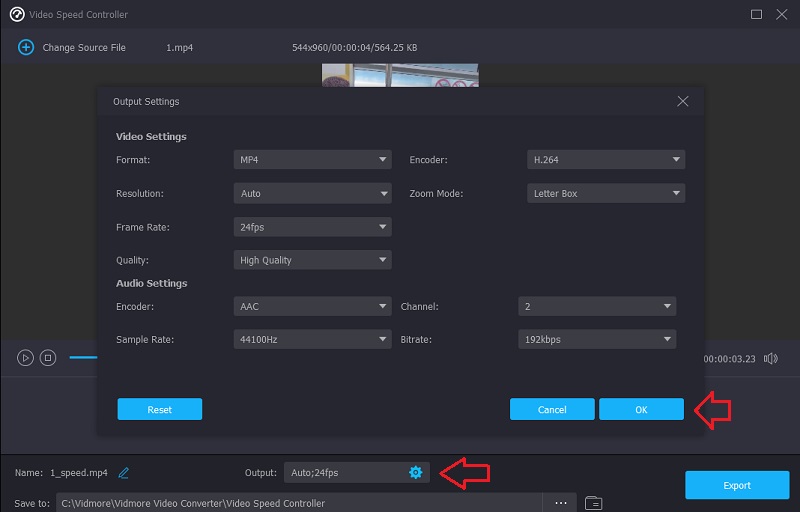
When satisfied with all the improvements you have made, you should click the Export option and wait until the procedure is finished.
Part 3. FAQs About Speeding Up a Video in Premiere
Does fast-forwarding a video in Premiere Pro a good choice?
Without a doubt, you can. We are all aware that Adobe Premiere Pro is an editing tool that offers the finest quality. And you can use it to enhance both films and still photographs. Because of this, there is no question that it is an excellent option for accelerating the playback of video footage.
How do you quickly make a film faster in Adobe Premiere?
Time Remapping is a popular feature in Premiere Pro that allows users to adjust the playback speed of an entire movie.
How fast can Time Remapping go at its fastest?
The most significant speed achieved while remapping time has been raised to 20,000 percent. This feature allows you to produce a time-lapse film using extremely lengthy source clips.
Conclusions
Since you know how to increase video speed in Adobe Premiere Pro, you can do it on your own. To speed up your movies quickly, you must follow the instructions in the sample tutorial that is just shown to you. Vidmore Movie Converter is the place to go if you want a less complicated method of accelerating the playback of your video.