How to Solve VLC Player Lagging Issues for A Better Playback
VLC Media Player is one of the most trusted media players you can access on your Mac and Windows computer. It can play/open various media files, such as video and audio, allowing you to have a fantastic playback. However, there are times when the software is not performing well. It may show lags and other issues. So, if you are curious about the reasons why VLC Player is lagging, this is the right place for you. We are here to give you various reasons why such an issue happens. Then, we will also provide simple solutions you can follow to solve the problem. Thus, come to this post and be knowledgeable about the discussion.

PAGE CONTENT
Part 1. Reasons Why VLC is Lagging
There are various explanations on why your media player is not performing well. So, to get some of them, you must read the information below. With that, you will get enough insights on why there's a choppy playback on VLC Media Player.
Outdated Media Player
If your VLC Media Player is outdated, you might encounter various issues, including lag. This is because the oldest version of the media player can't handle the newest video and audio files, especially when they contain the latest codecs. It is better to check if your software is up to date to ensure a smooth video playback.
Improper Media Player Settings
If you have improper media player settings, such as caching value, video output value, and hardware decoding, you can't enjoy watching your favorite content. Insufficient buffering can lead to choppy playback, which can be dissatisfying to users.
Corrupted Video File
Sometimes, the video player is not the problem, but your video file is. If you have a corrupted video file, you can't play your video in VLC effectively and smoothly. This kind of problem may be caused by incomplete video downloads or malware. It would be best to always check the condition of your video file for better playback.
Part 2. Best Fixes to Solve VLC Playback Jumps Forward Frame by Frame
After learning all the possible reasons why VLC is not performing well, we can now proceed with various solutions you can use to solve the issue.
Solution 1. Update VLC Media Player
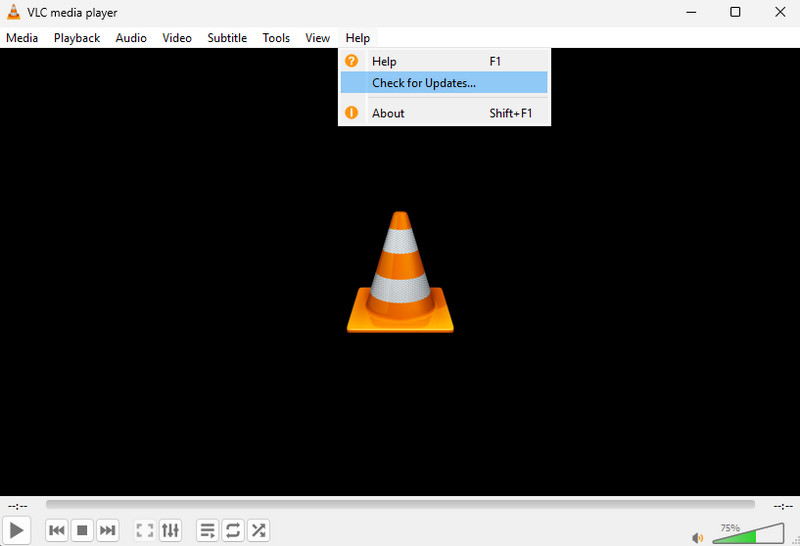
As we have discussed, an outdated VLC Media Player can provide dissatisfying performance and even show various issues, such as lags, glitches, bugs, and more. So, if you want to get the best performance of the software, the best solution is to get its latest version. With that, you can get some changes that can help you play content smoothly. If you want to update VLC, the first thing to do is to launch it on your computer. After that, navigate to the Help section and click the Check for Update option. Then, you can follow the instructions on your screen to install the software's latest version.
Solution 2. Change VLC Caching Value
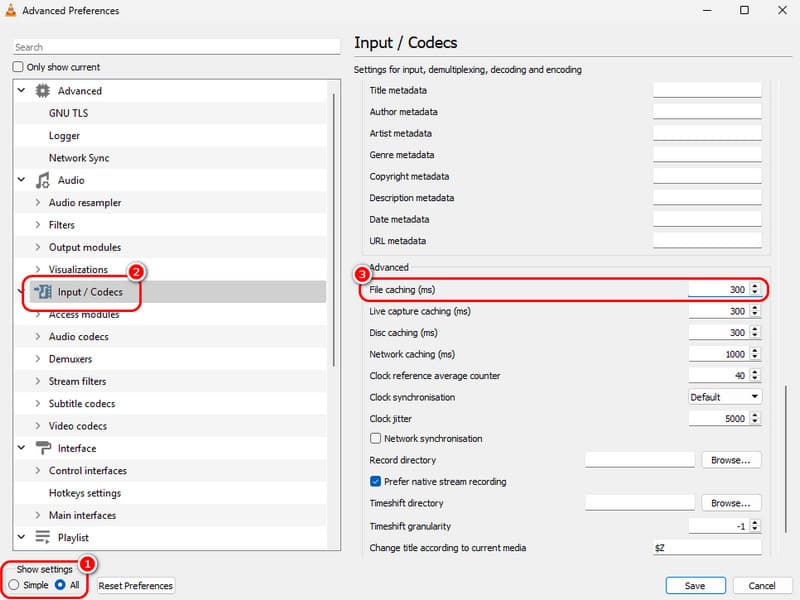
Another solution is to change the VLC caching value. This is necessary to improve video playback and can help you solve video issues, such as buffering issues, unstable networks, high-bitrate videos, and laggy local playback. To proceed, launch the software and click the Tools > Preferences option. After that, go to the Show Setting below and hit the All function. Then, go to the Input/Codec > Advanced section and see the File Caching option. You can now change the caching value.
Solution 3. Change 'Skip the Loop Filter for H.264 Decoding'
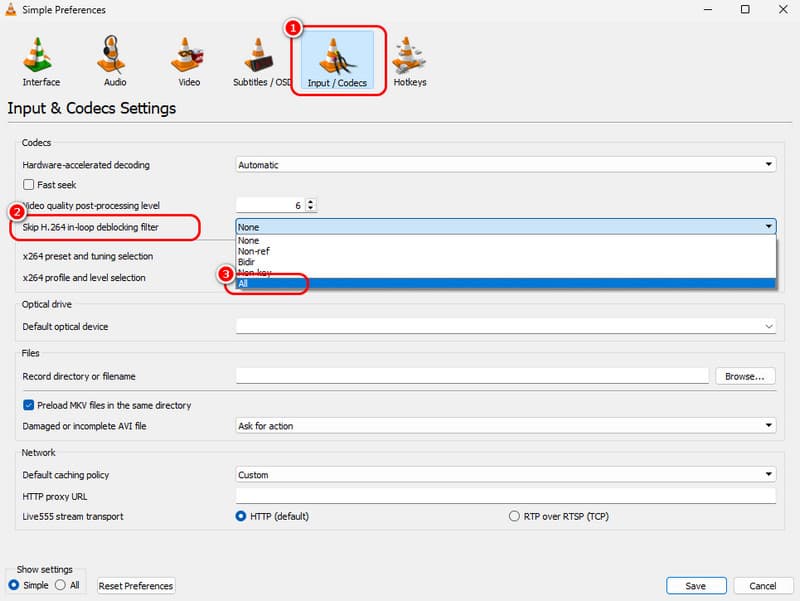
You can also try to modify the 'skip the loop filter for H.264 Decoding' option on VLC. This method is helpful if you want to solve laggy video . It can also improve playback performance on weak hardware. To start the process, proceed to the Tools > Preferences section. Then, navigate to the Input/Codecs section. After that, go to the Skip H.264 in-loop deblocking filter and select the All option. Once done, hit Save to apply changes.
Solution 4. Disable VLC Hardware-accelerated Decoding
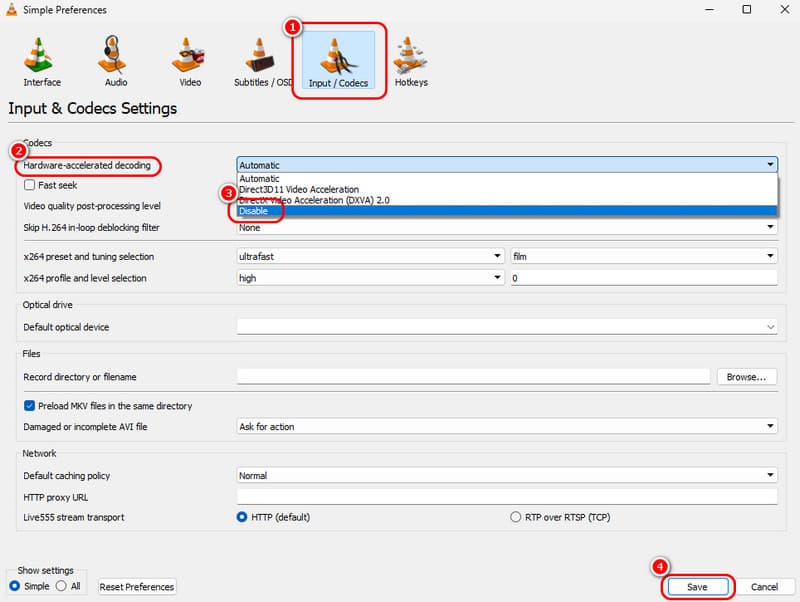
If VLC playback jumps forward frame by frame, you can try solving it by disabling the VLC hardware-accelerated decoding. It can even stop your video from lagging. To begin the process, launch VLC, proceed to the Tools > Preferences section, and click the Input/Codecs option. After that, proceed to the Hardware-accelerated decoding feature and select the Disable option.
Solution 5. Change FFmpeg threads to 2
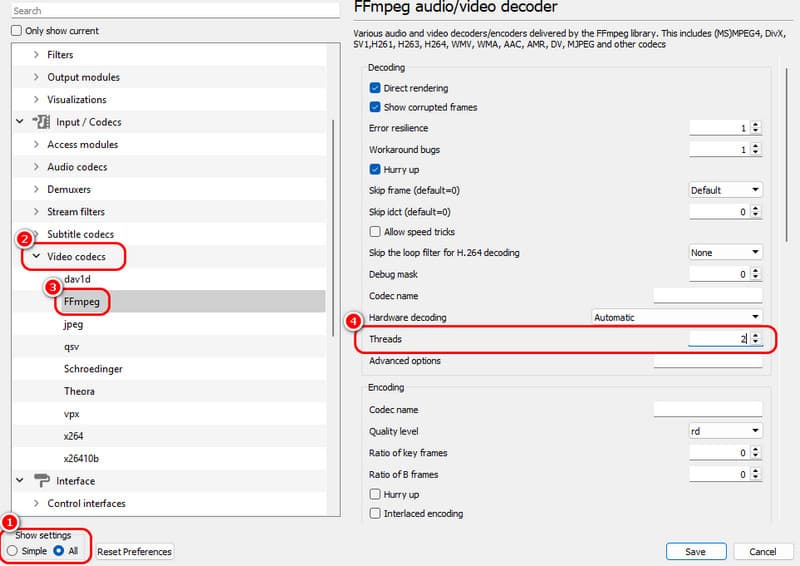
If your videos are laggy, stuttering, or jerky, you can fix them by changing the FFmpeg threads to 2. With this process, you can even play your 4K videos smoothly. To change the FFmpeg threads, go to the Tools > Preferences section. After that, click the All from the Show All option. Navigate to the Input/Codecs > Video Codecs > FFMPEG section. Proceed to the Threads option and insert 2. Tap the save button to apply changes.
Solution 6. Change Video Output Module
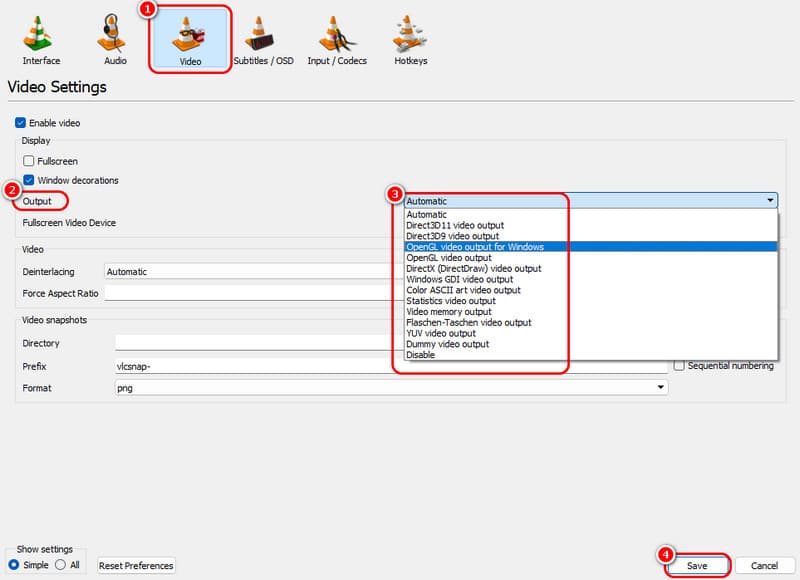
There are times when you can get a satisfying video playback when changing the output module in VLC. So, to begin changing it, you can go to the Tools > Preferences feature. Then, go to the Video section, and you will see the Output option. You can now start changing the output module based on your preferred option. Then, tap Save below.
Solution 7. Convert Video File Format
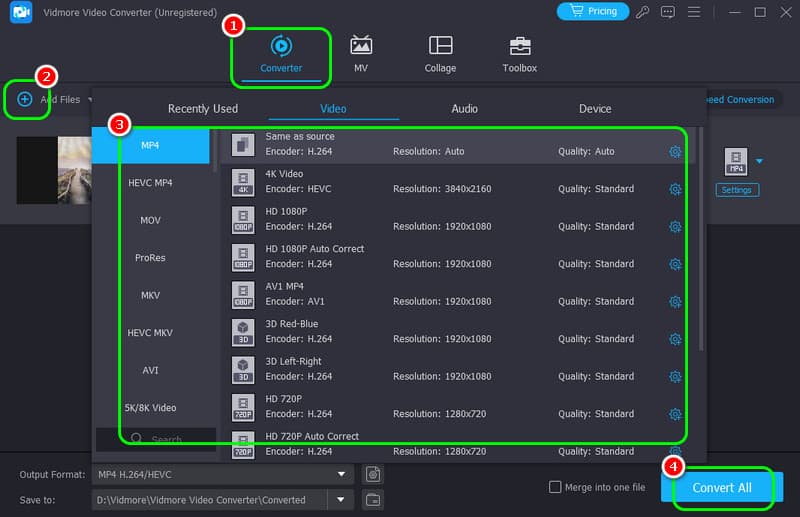
Another way to solve the issue is to change the video file format. This is ideal if you want smooth video playback. As we all know, video formats play a vital role in effective playback. If you use an unsupported format, you won't get better performance. So, if you want to convert your file, you can use various converters, such as Vidmore Video Converter. This useful converter is ideal if you want to convert your videos with a smooth conversion process. You can even get the desired result quickly, thanks to its ultra-fast conversion. It also supports a batch conversion process, allowing you to deal with bulky files. Now, if you want to transcode your videos using this program, use the steps below.
1. After you download the program, launch it, proceed to the Converter feature, and add the video by hitting the Add Files option.
2. Then, proceed to the Output Formats section to select your preferred video format and quality.
3. Once done, you can now tap the Convert All button to begin the conversion process.
Solution 8. Use Another Video Player
If the media player does not provide a satisfying viewing experience, it would be better to use an alternative to VLC. Various media players are available, including 5KPlayer, KMPlayer, QuickTime Player, Windows Media Player, and more.
Part 3. Best Video File Repair Tool
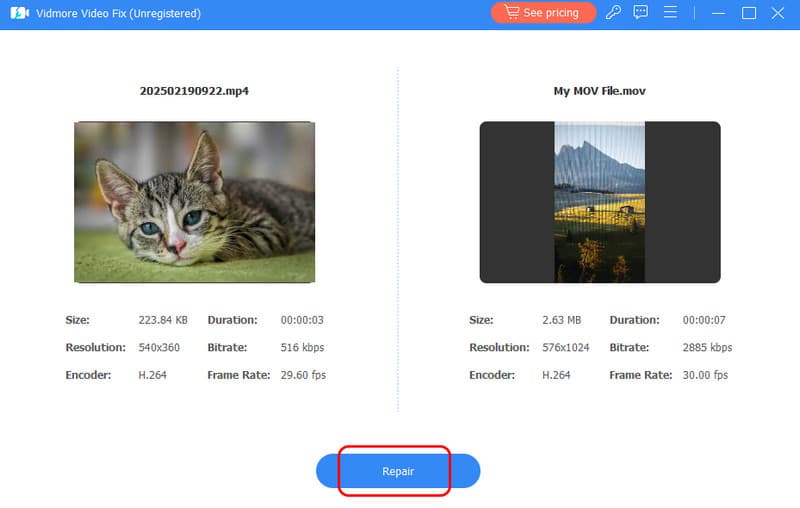
If you have damaged, corrupted, or laggy videos, you can expect a less-than-smooth and less-than-satisfying viewing experience. So, if you want to deal with your video file for better playback, the best solution is to fix it. If you are searching for the best video file repair tool, we recommend using Vidmore Video Fix software. It is an effective video repair software perfect for fixing different video playback issues. The program can even give you a simple repair process, making it suitable for all users. Aside from that, the tool will also let you attach a sample video during the process. It is ideal if you want to fix your video with high accuracy. The best part here is that the program can produce a high-quality video. Thus, you can watch your repaired file better and more satisfying.
More Features
● The software can offer its AI-powered technology for a better video repair process.
● It can provide an intuitive design.
● The program can support various formats, such as MOV, M4V, MP4, MKV, WMV, FLV, and more.
● It can repair various video playback errors.
To start repairing your videos, you can begin following the methods below.
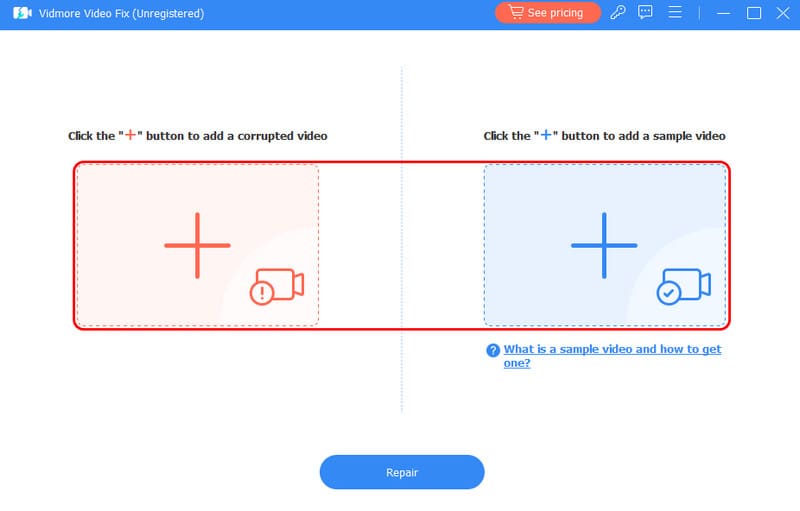
Step 1. Access Vidmore Video Fix on your computer. Then, launch it to begin the procedure.
Step 2. Hit the Red + option to insert the video you want to fix. You can also add the sample video to the Blue + option.
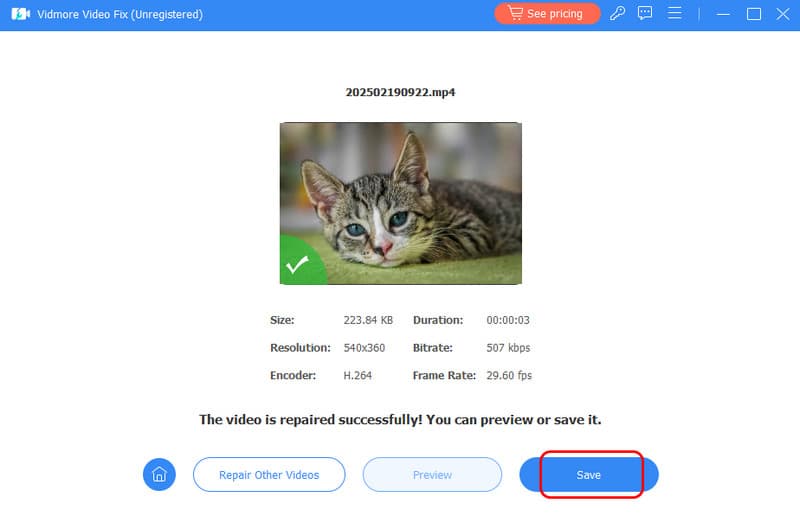
Step 3. After that, you can now hit the Repair button below. After the repair process, you can use the Preview feature to check the condition of the repaired video.
Step 4. You can start clicking the Save button to keep the repaired video on your device.
With these instructions, you can now effectively fix your videos, no matter the issue. It even has a simple layout, allowing you to navigate everything without any problems. Aside from that, it is also capable of fixing various errors, such as no sound on MP4, shaky video, 0xc00d36b4 error, and more.
Conclusion
There you go! If you want to know why VLC Player is lagging, you can get all the information you need. You can also follow all the solutions to solve the problem. Plus, if you want the best way to fix your video for better video playback, we suggest utilizing Vidmore Video Fix. This is among the most powerful tools that can fix almost all video playback errors, which is ideal for all users.