A Guide on How to Screenshot on Mac: Hotkeys & Steps
Often, when using a computer, we need to take a screenshot. For example, when we see a particularly interesting image, or when creating an operating guide and need to show viewers where a button is located. The designers of computer systems have long recognized the importance of screenshot tools, and both Mac and Windows systems now offer highly developed built-in screenshot tools.
In this guide, we will focus on how to screenshot on Mac, including which shortcut keys to use to activate the corresponding function. If you need more powerful professional tools for screenshots and image editing, you can also refer to the alternatives we provide here.

PAGE CONTENT
- Part 1. Shift + Command + 3: For Entire Screenshot on Mac
- Part 2. Shift + Command + 4: To Screenshot a Part of a Mac Window
- Part 3. Shift + Command + 4, and Then Press Space: For a Specific Mac Window Screenshot
- Part 4. The Best Screen Recorder to Take Screenshots on Mac: Vidmore Screen Recorder
- Part 5. FAQs of How to Use Screenshot on Mac
Part 1. Shift + Command + 3: For Entire Screenshot on Mac
Let's cut to the chase. Considering that clicking on the Snipping Tool in the taskbar and then clicking to launch it may not be as fast as pressing a shortcut key on the main screen, we will directly introduce the hotkeys corresponding to each function.
Let's start with the most basic full-screen screenshot.
Here is how to take a screenshot on Mac.
To capture the entire screen, press the following three keys simultaneously:
Shift + Command + 3
Then release the keys immediately. Your full-screen screenshot on Mac will be automatically completed.
Your screenshot will appear as a thumbnail in the corner of the screen. Click to view and edit.

Part 2. Shift + Command + 4: To Screenshot a Part of a Mac Window
Often, you may only want to capture a specific portion of the screen to highlight certain content without exposing the entire screen. In such cases, you need to first press another set of shortcut keys to take a screenshot on a Mac:
Shift + Command + 4
At this point, your mouse cursor will change from an arrow to a crosshair.
Click and drag the crosshair icon to select the area you want to capture. Once the selection is made, release the mouse button. The screenshot will be automatically captured.
If you find that the selected area is incorrect during the process, press the Esc key to exit the screenshot mode, then use the above shortcut keys again to re-select the screenshot area.
If the selected area is correct but the position is wrong, you can hold down the Spacebar while clicking to select the area, drag the screenshot frame to the desired location, and then release the mouse button.

Part 3. Shift + Command + 4, and Then Press Space: For a Specific Mac Window Screenshot
To accurately capture the contents of the target window while ensuring that the edges of the screenshot are neat and aesthetically pleasing, you can use another set of shortcut keys instead of manually selecting the area one pixel at a time:
Shift + Command + 4 + Space
Please note the order of the operations here. You may find that the shortcut keys in the previous section seem to have the same components as this set, but the difference lies in the order.
If you need to move the already selected window, press the Space key while selecting and dragging the screenshot area;
When capturing a specific window or menu, first press and release Shift + Command + 4 simultaneously, then immediately press and release the Space key. At this point, the mouse cursor will turn into a small camera icon. Move the camera so it hovers over the target window you want to screenshot, then click the mouse.
Similarly, if you selected the wrong window and want to cancel the screenshot, press the Esc key.
Some window edges may appear with a shadow in the screenshot. If you want to avoid this issue, hold down the Option key while clicking the mouse.

Part 4. The Best Screen Recorder to Take Screenshots on
Mac: Vidmore Screen Recorder
Using keyboard shortcuts to take screenshots on a Mac is indeed very convenient. However, such system-built-in tools often have a common issue—their functionality is too basic. While the Mac Snipping Tool allows you to select the screenshot area and has video recording capabilities, its overall settings are limited, and it cannot capture content from the computer's webcam. Additionally, the post-recording editing features it provides are minimal. If you seek more personalized functionality, using professional screen recording software may be necessary.
We recommend trying Vidmore Screen Recorder as an alternative to the Mac Snipping Tool. First, it can record almost everything from your computer: system desktop images, dynamic videos, audio from the microphone and system speakers, footage from the computer's webcam, and even the screen of your phone connected to the computer (you can connect via WiFi or a USB data cable).
After recording, Vidmore Screen Recorder offers a full suite of screenshot, video, and audio editing features, allowing you to complete all production steps on a single platform. Whether you want to record online video conferences, or capture intense gameplay, Vidmore Screen Recorder will help you accomplish the task without lag or loss of video quality.
Here is a guide on how to use Vidmore Screen Recorder. We will take screen capturing as an example.
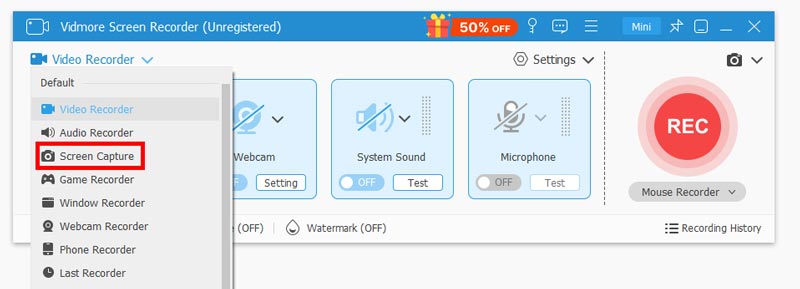
Step 1. Download and install Vidmore Screen Recorder on your device. Launch it and enter the main interface. Open the window you want to capture
Step 2. You will see a Screen Capture feature. Click on it.
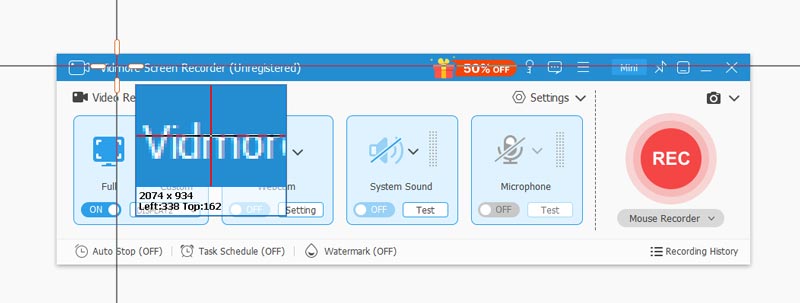
Step 3. Your mouse will now turn into a cursor. Drag it to select the area you want to capture. Once you have selected the area, release the mouse button, and the screenshot will be taken.
Part 5. FAQs of How to Use Screenshot on Mac
How to crop a screenshot on Mac?
After taking a screenshot, click on the thumbnail in the lower right corner to enter the Preview interface. There you will see the Tools menu. Find Crop in it and start editing. Alternatively, you can use a third-party image resizer to process the captured image.
Where do I locate screenshots on my Mac?
By default, your screenshots will be automatically saved to the desktop, named in the format Screen Shot [date] at [time].png. If you can't find them on the desktop, try checking the desktop in the Finder window.
How do I take a screenshot with my Mac?
You can use the system's default free screen recording tool—Snipping Tool—to capture screenshots. You can use keyboard shortcuts or bring up the window. There are also some third-party software options, such as Vidmore Screen Recorder, which are also excellent choices.
Conclusion
Through this guide, you will gain a detailed understanding of how to take a screenshot on a Mac using shortcut keys. Three sets of shortcut keys will teach you how to capture the entire screen, a selected area of the screen, and a single menu or window. If you are looking for a screenshot tool with more comprehensive recording and editing features, we recommend trying Vidmore Screen Recorder as an alternative to the Mac Snipping Tool. The full guide is provided in this article.