









How to Denoise Video Using Premiere Pro [Tutorial]
How to denoise video in Premiere Pro? Well, if you want to achieve clean, professional-looking video content, denoising is one of the most helpful techniques. Noise often shows up in footage in low or high ISO settings, which can also distract viewers from the overall quality of the video. Thankfully, this guidepost can show you the detailed methods to denoise videos using Adobe Premiere Pro. We will also explore some of the key features the program can offer for a better video editing process. So, if you want to learn more, start reading this tutorial.

PAGE CONTENT
Part 1. How to Denoise Video in Premiere Pro
Want to denoise video in Premiere Pro successfully? Premiere Pro, one of Adobe's apps, is among the best video denoisers you can rely on. It lets users clean up grainy footage without affecting the original quality, making it ideal for low-light captures. The video editor also supports both built-in and third-party plugins, giving users flexibility in how they approach noise reduction.
In addition, the video editor can give its appealing user interface. It ensures an enjoyable editing experience while providing seamless access to necessary tools. Lastly, its combination of performance, quality, and customization makes Premiere Pro an excellent choice for producing polished, noise-free video content.
To learn how to denoise videos in Adobe Premiere Pro, follow the steps below.
Step 1. First, download and install Adobe Premiere Pro. Then, set up everything to begin the video denoising process.
Step 2. Then, click File > Open options to start adding the video. Drop the video into the Timeline section below.
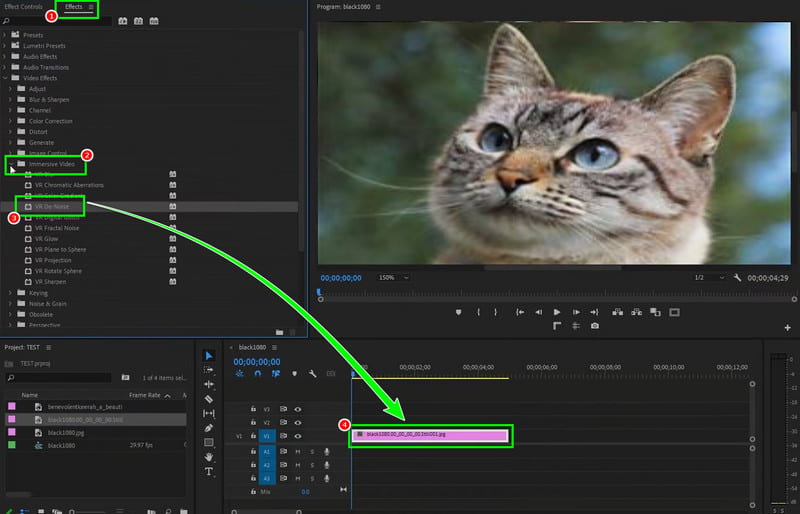
Step 3. After that, navigate to the Effects feature and go to Video Effects > Video Immersion.
Step 4. Click and drop the VR De-Noise function into the video from the Timeline section. Then, you will see some changes to your video.
Step 5. If you are satisfied with the result, start saving/exporting the video.
Drawbacks of Adobe Premiere Pro
- The main user interface might be complicated for some non-professional users.
- The program is not 100% free. You have to get a subscription plan to access all the features without restrictions.
- Since it is a resource-intensive video editor, you must have a high-spec computer.
Part 2. Other Features of Adobe Premiere Pro
Adobe Premiere Pro is an ideal video denoiser. It ensures you get the result you need. But the good thing here is that denoising videos is not the only thing the program can do. It also offers various features that can help you improve your videos. Check the information below and explore the features of Premiere Pro.
Timeline Editing
Premiere Pro can offer its timeline editing feature. It lets editors, users and content creators arrange media files, layer clips, and trim footage with precision. You can drag and drop various files, change transitions, and synchronize the video with audio in Premiere.
Work with Adobe Ecosystem
Another powerful feature is its ability to integrate with other Adobe Creative Cloud apps, such as After Effects, Audition, and Photoshop. This feature lets you edit audio, design graphics, and insert visual effects without complicated importing and exporting.
Offer Various Video Editing Tools
The good thing about the program is that it offers a range of basic and advanced video editing tools. You can flip video in Premiere, crop, rotate, add text, and more. It also offers professional editing features, such as Multi-Camera Editing, Lumetri Color Panel, Advanced Audio Editing, and more. This ensures that you can edit and enhance your video in many ways.
Handle Multiple Formats and Resolutions
After editing your videos, you can save them with the best video quality. You can save the footage from HD to 8K and VR. It lets editors work with videos from virtually any camera or device. The program also offers optimized export settings for platforms like Vimeo, YouTube, and social media. You can also save the video to various output formats, like MP4, WMV, MOV, AVI, and more.
Part 3. Best Alternative to Premiere Pro for Denoising Videos
Are you a non-professional user and want an easier way to denoise video? In that case, the best alternative to Premiere Pro is VidHex Video Enhancer. This program offers its Video Denoise Model feature. This feature allows you to remove any noise from the video effectively. What makes the software powerful is its AI-powered technology. With just a single click, the tool can automatically denoise the video, making the process simple and fast.
Additionally, it has a simple user interface, ideal for beginners. You can also choose your desired output resolution for up to 1080p, 2K, and even 4K. With that, when it comes to denoising videos easily, there is no doubt that VidHex Video Enhancer is the best tool you can access when replacing Premiere Pro.
Additional AI Enhancement Models
- General Enhancement Model
- Video Denoise Model
- Frame Interpolation Model
- Colorize Model
- Low-Light Enhancement Model
- Color Enhancement Model
- Face Model
- Video Quality Repair Model
- SDR to HDR Model
- Detail Restoration Model
- Anime Model
See the steps below and learn how to denoise video effectively.
Step 1. Download and run VidHex Video Enhancer on your computer. Once the interface appears, start denoising your video.
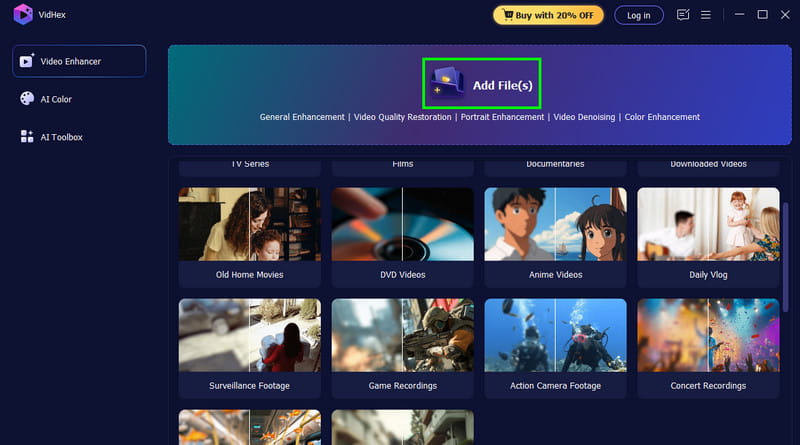
Step 2. Tap Add Files to start adding the video you want to denoise. You can add more than one video if you want to denoise numerous files.
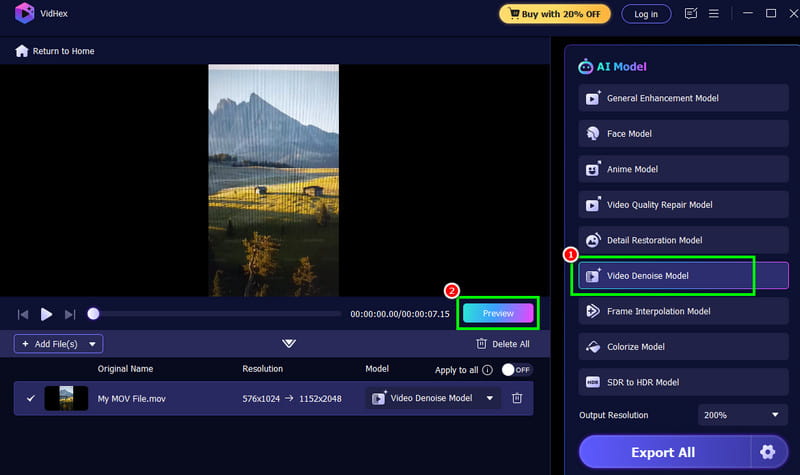
Step 3. Start denoising the video by clicking the Video Denoise Model. Then, the program will automatically denoise the video. You can tap the Preview button to check the video.
Step 4. After denoising the video, click the Export All button.
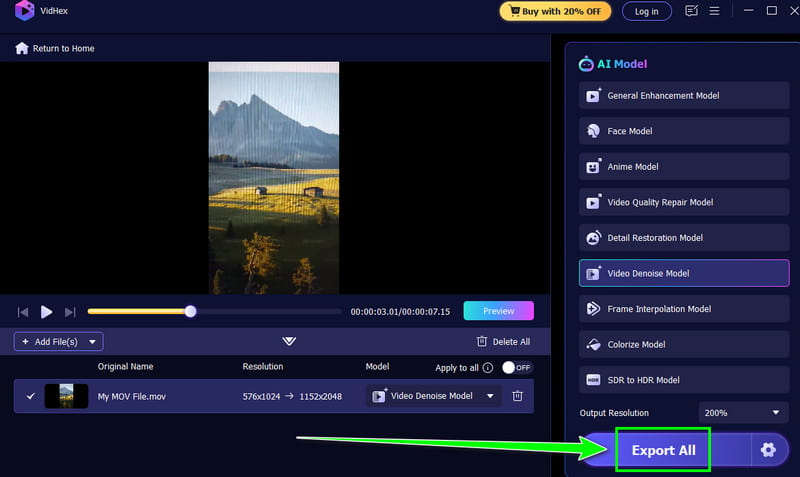
Now you have learned how to denoise videos more easily. So, if you want a cleaner, sharper version of your grainy videos, start using VidHex Video Enhancer!
Part 4. FAQs about Denoising Video Using Premiere Pro
Can you denoise video on Premiere Pro?
Definitely, yes. The program offers a video denoiser, perfect for removing the noise from your videos. The process is also smooth, making it one of the best tools for achieving the result you need.
Can I use the Lumetri Color feature to reduce noise?
The feature doesn't directly remove noise from the video. This feature can help you adjust the video brightness, saturation, and contrast, allowing you to minimize its visibility.
What is the best export format after denoising videos in Premiere Pro?
It depends on where you use the video. For social media, you can save the video as MP4 (H.264). On the other hand, you can save videos as DPX and ProRes for professional workflows. This ensures maximum quality retention after the video denoising process.
Conclusion
Now, you have learned how to denoise video in Premiere Pro. With that, if you want to make your video sharper and cleaner, follow the process we have provided in this guide. Plus, if you are a beginner and want an easier method to denoise videos, we recommend using VidHex Video Enhancer. This program offers a simple interface and an easy-to-follow method that lets you remove noise from your videos, making it a great alternative to Premiere Pro.