Trim a Video in QuickTime: Better Walkthrough and Review of Alternatives
You may have trouble uploading your videos over the internet because most of them are lengthy. There is no doubt most netizens these days are into sharing videos online. It is one of the hottest activities online users are participating in. Yet, video sharing is not all about uploading. It takes editing, such as cutting, especially when they are lengthy.
Unless you want to share movies, it is alright to upload long videos. But in the case of sharing memes or funny clips, video trimming is a vital skill you should acquire. There are many ways to trim videos, and you are a Mac user, you should not look further than QuickTime. But do you wonder how to trim videos in QuickTime Player? This post will show you to get this job done and introduce some great alternatives.


Part 1. Easy Steps How to Trim Videos in QuickTime
QuickTime is a multimedia player and editor available only for Mac computers. Using this tool, you can split clips into halves or desired partitions. Trimming the start/end video parts is also possible. Specifically, this is useful for getting an important scene from footage and eliminating the unimportant ones. Moreover, the tool also offers rotating capabilities to correct the orientation of your videos. In other words, QuickTime is a very nice tool to have if you wish to edit and watch videos from your Mac computer. Want to learn how to trim a video clip in QuickTime and enjoy its benefits? The guidelines are as follow:
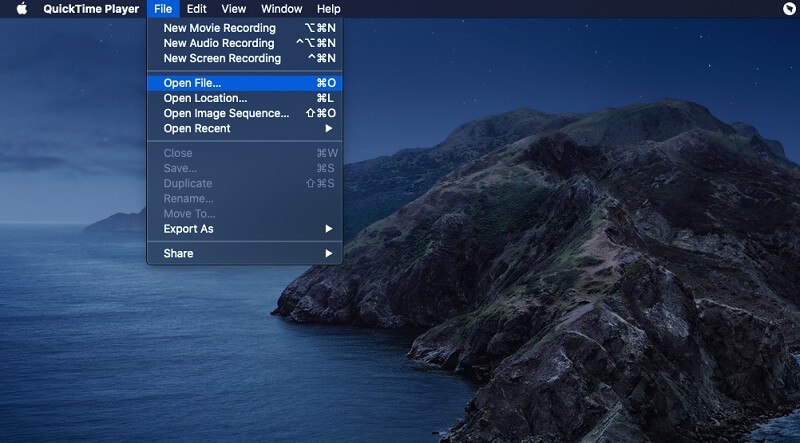
Step 1: Boot up your Mac computer and launch the QuickTime Player app. Once the tool is launched, import a media file from your file folder. Click the File option and select Open File. Browse, then choose the video you wish to trim with QuickTime.
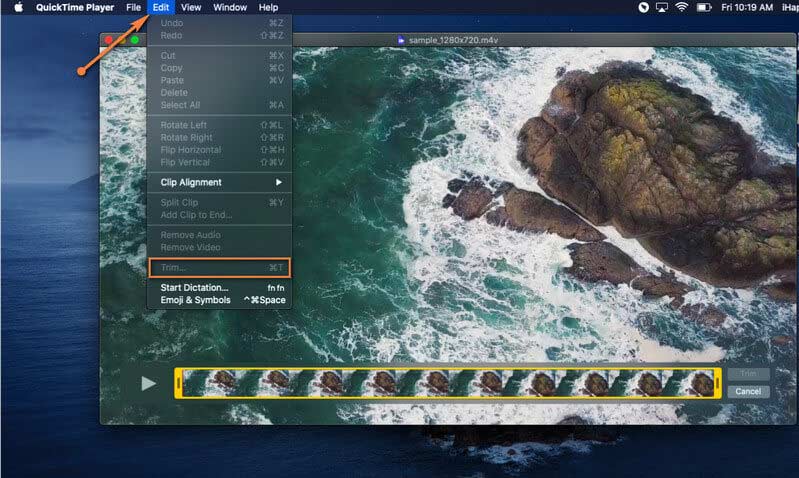
Step 2: Go to Edit and select the Trim option to use the trim function. You will see the handlebar inside the player.
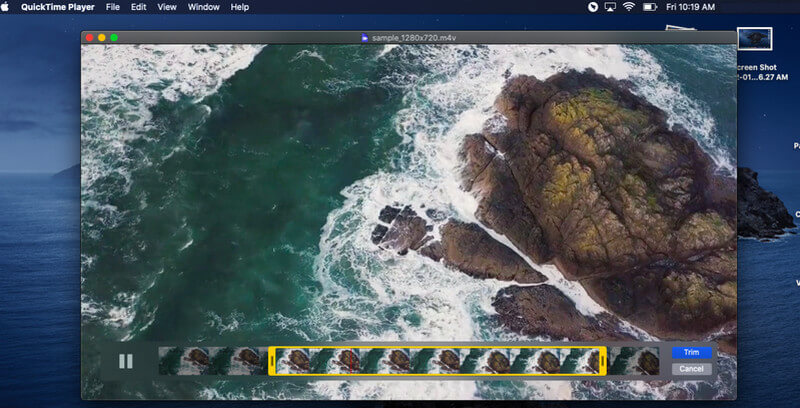
Step 3: Now, drag the yellow handlebars on each end of the video trimmer. Select the part of the footage you want to retain. You can choose to check the playback of the selected part by clicking the Play button.
Step 4: Finally, click the Trim button once you are decided on the part you selected. You may go to Edit > Undo Trim if you wish to undo it. Then, you can start again.
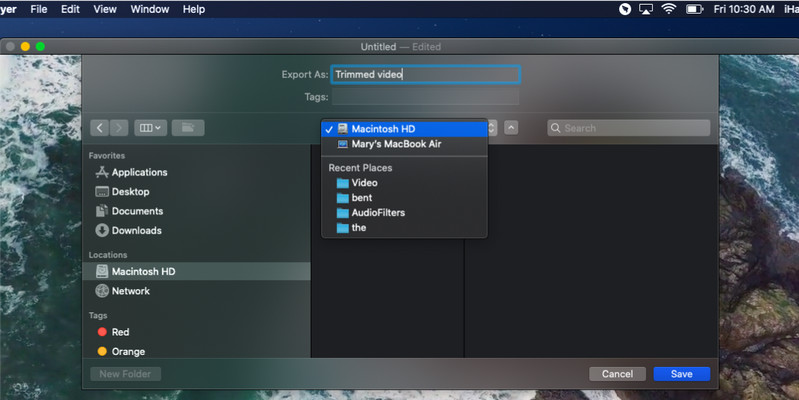
Step 5: To demonstrate how to save a trimmed video in QuickTime permanently, go to File > Save. Alternatively, you can export the file with a different resolution. Yet, the exact resolution depends on the original file. After choosing, enter a name for the exported file, select a file destination, and hit Save.
Part 2. Practical Ways How to Trim Videos on Windows/Mac
1. Vidmore Video Converter
Apart from that, it can preserve the quality of your original file retaining up to 4K UHD quality videos. In other words, this also lets you edit professional videos or movies, which is perfect for video enthusiasts. If you want to know how to cut part of a video in QuickTime with an alternative, below are the steps to use it.
- Cuts in the middle of the video and at the start/end of the video.
- Add overlays like logo, subtitles, or watermarks.
- Supports nearly all video/audio formats.
- It comes with a reducing video shaking capability.
- Preserves the quality of the original file.

Step 1. Install Vidmore Video Converter
The initial thing you must do is to download the program. Simply click the Free Download button and have the program installed. Once you are through with the installation procedure, proceed on launching the program.
Step 2. Load a media file
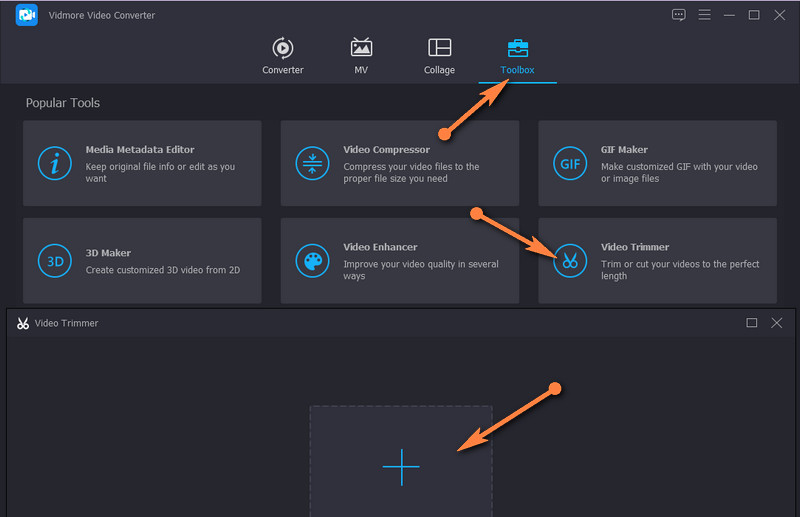
Next, go to the Toolbox tab to access the trimmer. From here, click the Video Trimmer option and add a file by clicking the Plus sign button from the dialog box that will display.
Step 3. Trim the video
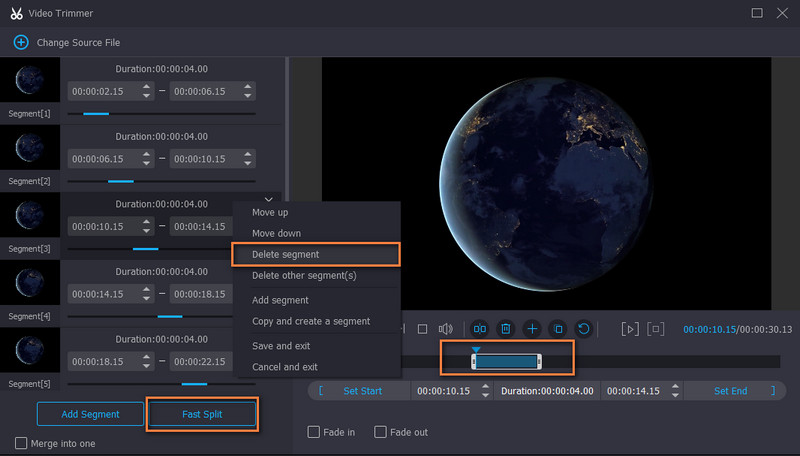
Once the file is loaded, trim the video by selecting a range using the handlebars. Optionally, you can split the video by clicking the Fast Split button on the bottom left-hand side of the interface. Now, select the partition you wish to remove, right-click and choose Delete Segment.
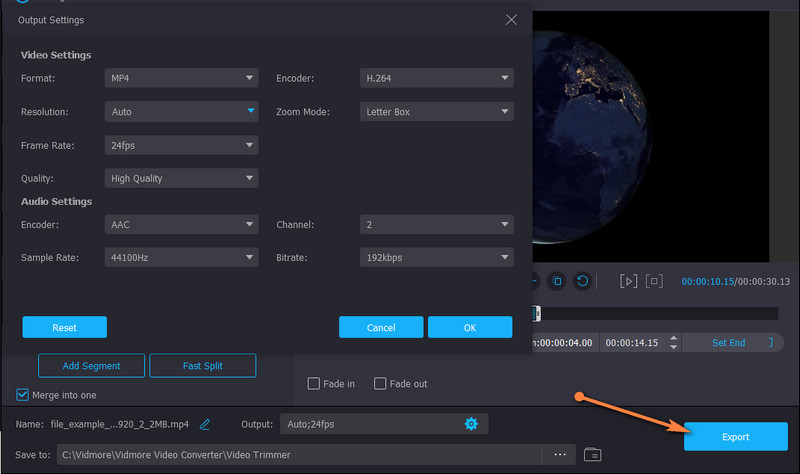
Step 4. Export the trimmed video
Before saving the video's final version, you may choose to edit the output or add fade effects. Once all set, hit the Export button on the bottom right corner to save the video.
2. VLC media player
With a VLC media player, trimming videos is also possible. This is an excellent alternative to QuickTime if you wish to trim videos on your Windows PC. It is an entirely free, multi-platform program allowing you to play and cut videos on Mac and Mac. Besides, this is also available on mobile devices like Android and iPhone. To cut a video in QuickTime alternative, refer to the walkthrough below.
Step 1. Make sure the VLC app is installed on your computer, then launch it.
Step 2. Import the video you want to trim by dragging and dropping the file into the program.
Step 3. Access the Advanced Controls option from the View menu. Next, find the section where you want to start cutting and hit the Record button. Hit the Pause button when the Playhead reaches the ending point where you want to stop cutting.
Step 4. he output will automatically be saved on the Videos folder of your computer.

3. Aconvert.com
If downloading an application is not your thing, you can opt for an online solution like Aconvert.com. Long as you have a good and reliable internet connection, you can easily achieve your cutting task. One major drawback of this tool is you can only upload videos with a 200MB file size. For simplified steps on how to trim a video in this QuickTime alternative, continue reading below.
Step 1. Launch Aconvert.com using a browser on your device.
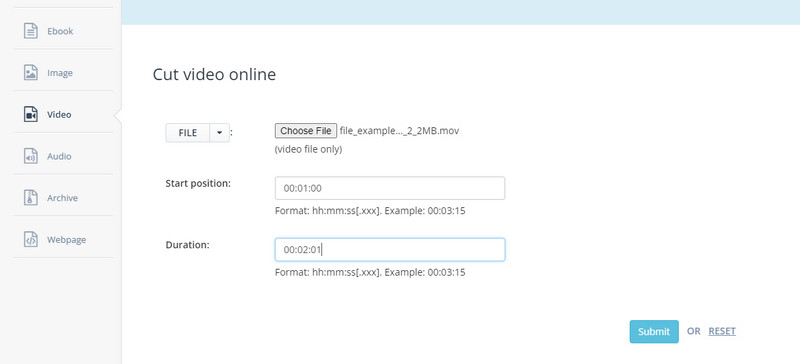
Step 2. Upload a video and go to the Video section. Then, access the Cut option.
Step 3. After that, set the Start position in seconds or minutes and the Duration.
Step 4. Finally, hit Submit to continue with the process.
Part 3. Comparison Chart of Video Trimmers
Suppose you need to learn further about the tools mentioned above. In this case, this content also curated a comparison table to scrutinize these programs.
- Tools
- QuickTime
- Vidmore Video Converter
- VLC media player
- Aconvert.com
| Supported Formats | Built-in Player | Platform |
| MP4, MIDI, MP3, WAV | Mac only/td> | |
| MP4, MKV, FLAC, AVI, MOV, MP3, AAC, M4A, and more. | Windows and Mac | |
| AVI, MOV, MP4, M4A, MP3, etc. | Windows, Mac, Android, and iPhone. | |
| FLV, MKV, WMV, M4V, GIF, MP4, etc. | Web |
Part 4. FAQs on Trimming Videos in QuickTime
How can I save a trimmed video in QuickTime permanently?
When you are done trimming the video, simply go to the File option on your QuickTime. Look for Save and select it. After that, the tool will only save what is inside the yellow bar during the trimming process.
How can I trim multiple parts of a video?
If you consider cutting multiple parts of your video, you should split the footage into several segments and select the segment you wish to remove. Do not forget to save the video after the process.
How can I cut part of a video online?
There are numerous web cutter tools designed to trim videos online. You can choose from the ones you can see over the net or go with the one we introduce, Aconvert.com.
Conclusion
After reading the post, you should have figured out how to trim videos in QuickTime. There is no trick or complicated setting to tweak to accomplish it. The process is easy to follow and straightforward. On the other hand, you may utilize other substitutes to help you trim videos on Windows or look for something else that QuickTime does not offer. It will depend on your personal preferences for choosing the best tool.
Video Tips
-
Trim Video
-
Quicktime
-
MOV Solutions